 Skip to content
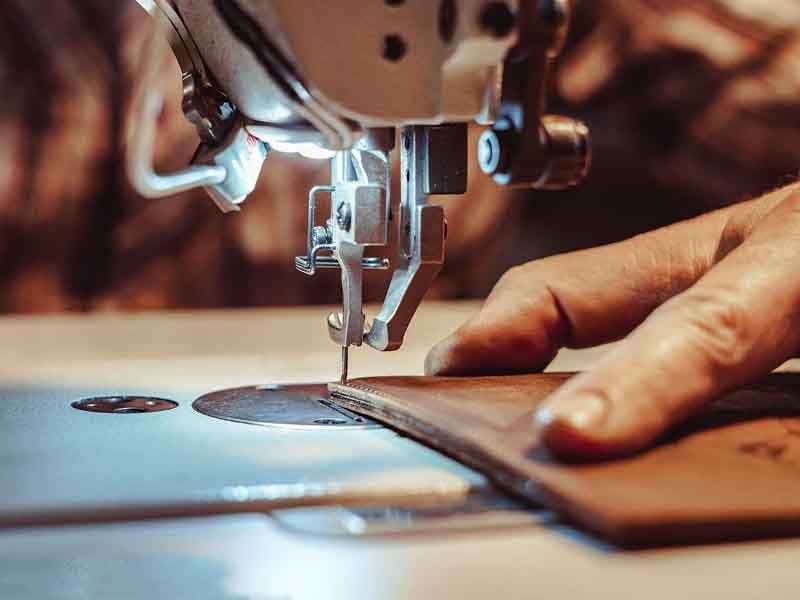
Sewing leather is not just a craft—it’s a commitment to precision, patience, and quality. Whether you’re creating a bespoke leather handbag, durable belt, or premium leather accessory, knowing how to sew leather correctly is the difference between a product that lasts for years and one that falls apart after weeks. Unlike fabric, leather is unforgiving; once you pierce it with a needle, there’s no undo button. That’s why professionals—and even experienced DIYers—must understand every layer of the process, from tool selection to finishing techniques.
To sew leather effectively, you need specialized tools like leather needles, durable thread, and a heavy-duty sewing machine or hand stitching awl. Use saddle stitch for strength, match needle size to leather thickness, and always prepare the leather by marking and skiving. With proper preparation, stitching, and finishing, leather products can be both stylish and long-lasting.
So, how do top brands ensure clean seams and perfect curves in their leather collections? Let’s dive into the full guide that even seasoned leatherworkers refer back to—and discover how Szoneier Leather turns every stitch into a signature of quality.
What Tools and Materials Do You Need to Sew Leather?
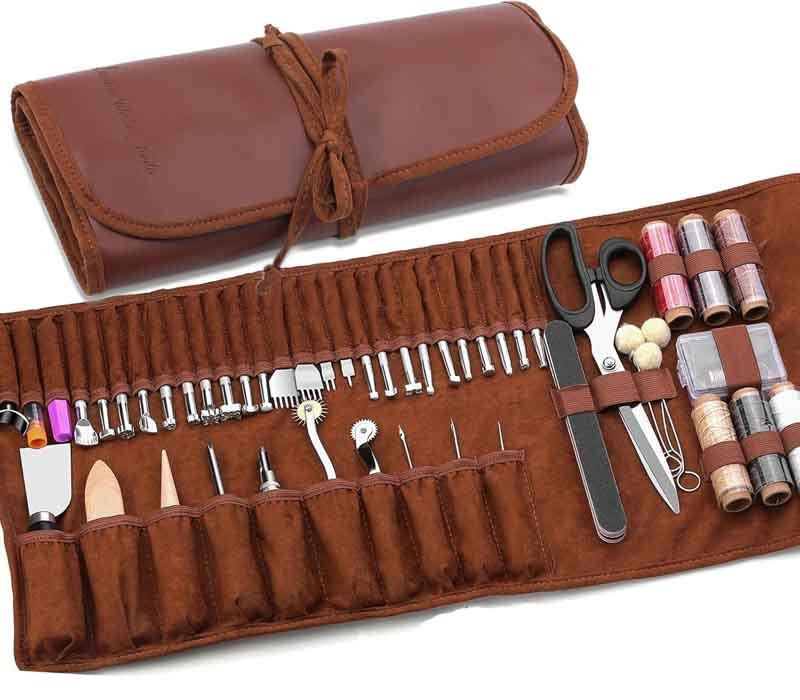
To sew leather, you need heavy-duty tools including leather-specific needles, waxed thread, a stitching awl, edge creasers, and a cutting mat. Quality tools prevent tearing and skipping while ensuring strong, clean seams. Choosing the right leather material, such as full-grain or top-grain, also impacts the final product’s quality and feel.
Professional leather sewing starts with investing in the right tools and selecting appropriate leather materials. Here’s a guide:
| Tool/Material | Purpose | Recommendation |
|---|---|---|
| Leather Needles | Puncture tough hide without bending | Size 90/14 for light leather, 110/18+ for thick |
| Waxed Thread | Adds strength, resists fraying | Polyester or nylon, size 0.6–1.0mm |
| Stitching Awl | For hand-piercing holes with control | Diamond-tip preferred |
| Cutting Mat & Ruler | Protects surfaces, ensures accurate measurements | Self-healing mats ideal |
| Mallet & Stitching Chisels | Create even holes for saddle stitching | 3mm–5mm spacing for consistency |
| Edge Creaser & Burnisher | Smooths edges for finished look | Wood or brass burnishers with gum tragacanth |
Leather selection is just as critical. Full-grain leather offers the best durability and natural patina, while split leather is more affordable but less strong. Always match your leather type to the intended use—e.g., soft cowhide for wallets, thicker bridle leather for belts.
How Do You Prepare Leather for Sewing?
To prepare leather for sewing, you need to clean it, skive any thick areas, and mark your stitch lines with precision tools like edge creasers or dividers. Proper preparation ensures your pieces align perfectly, your stitches remain even, and the leather behaves predictably during sewing. Skipping this step often leads to misaligned seams, excessive bulk, or visible flaws in the final product.
In leathercraft, preparation isn’t optional—it’s foundational. Unlike fabric, leather doesn’t stretch to forgive a misplaced stitch or recover from a crooked seam. Each step you take before putting needle to hide directly impacts the durability, finish, and professionalism of your final product.
1. Cleaning the Surface: Removing Oils and Residue
Before anything else, wipe down the leather with a dry microfiber cloth to remove surface dust. If the leather is untreated or oily, use a light application of saddle soap to clean deeper. This ensures adhesives stick and threads glide cleanly without contamination.
Tip: Never saturate leather with water—it weakens the fiber structure and may cause warping.
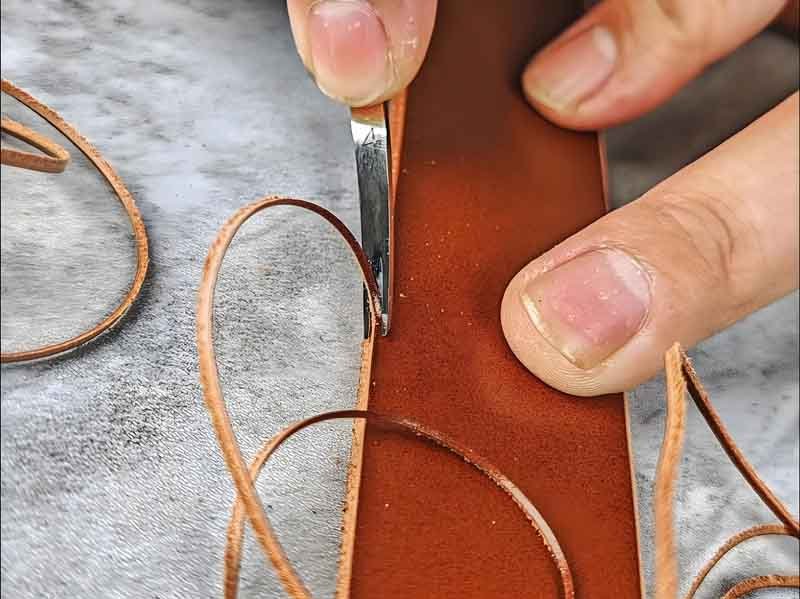
2. Skiving: Thinning the Leather Where Needed
Skiving is the process of thinning leather in areas that fold or layer, such as:
- Strap ends that fold over buckles
- Wallet edges with multiple card slots
- Bag gussets or flaps
Tools:
- Skiving knife or French edge tool
- Edge beveler for softening corners
A well-skived edge allows the leather to fold smoothly without bulky buildup or cracking. For thick leathers (5–6 oz), this step is critical when turning edges or forming box corners.
3. Marking Stitch Lines for Accuracy
Using rulers, wing dividers, or stitch marking wheels, you can create evenly spaced stitch guides. Most leathercrafters mark the stitch line 2–3 mm from the edge, depending on design and seam strength requirements.
| Tool | Use Case |
|---|---|
| Wing Divider | Marking consistent stitch line |
| Stitching Wheel | Marking hole spacing |
| Awl | Puncturing holes for hand sewing |
| Edge Creaser | Adds visual groove for stitching |
These markings prevent wandering stitches and ensure symmetrical seams on mirrored pieces like wallets or belts.
4. Edge Preparation: Burnishing Before Sewing
If your leather product includes exposed edges, pre-finishing those edges makes your final polish far cleaner. You can burnish using:
- Gum tragacanth and a wooden slicker
- Beeswax and canvas cloth
- Edge paint for colored, polished results
Burnishing creates a sleek edge that resists fraying and absorbs finishing oils more evenly.
5. Gluing for Temporary Alignment
For bag panels, card slots, or complex builds, applying a thin layer of contact cement or leather glue to hold layers together ensures nothing shifts during stitching.
Remember: Leather cannot be pinned like fabric. Glue is your alignment tool.
Let glue dry for 10–15 minutes and press pieces with a roller to ensure adhesion.
6. Clamping Instead of Pinning
Instead of pins, which damage leather, use:
- Leather clips
- Binder clips with scrap leather padding
- Tapes or adhesives
These keep seams in place without leaving permanent holes or marks.
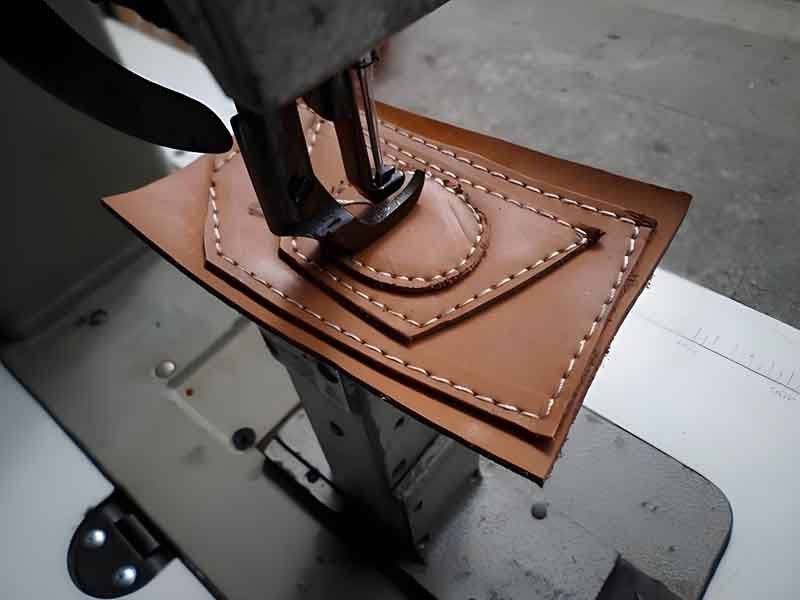
Which Stitch Is Best for Leather: Hand Sewing vs. Machine Sewing?
The best stitch for leather is the saddle stitch, a hand-sewing technique known for strength and durability. It uses two needles that pass through each hole from opposite sides, creating a reinforced seam that won’t unravel. While machine sewing with a lockstitch is faster and suitable for large production runs, it lacks the strength and luxury finish of saddle stitching. The ideal choice depends on your product type, scale, and desired finish.
Sewing leather isn’t just about holding materials together—it’s about enhancing product lifespan, structure, and perceived quality. The right stitching method plays a massive role in how your final product performs and ages. In this section, we’ll compare saddle stitch (hand-sewn) vs. lockstitch (machine-sewn), helping you decide which method best suits your project or product line.
Understanding the Saddle Stitch (What Stitch Is Best for Leather?)
The saddle stitch is widely regarded as the gold standard for hand-sewn leatherwork. Used in luxury leather goods and saddlery, it offers unmatched strength and aesthetic quality.
How it works:
- Two needles and a single length of thread are passed through each hole from opposite directions.
- If one side breaks, the other continues to hold, unlike machine lockstitch which unravels when broken.
Benefits:
- Incredibly strong and secure
- Rich, hand-crafted appearance
- Allows better tension control
Drawbacks:
- Time-consuming
- Not ideal for mass production
When to use it:
- Custom leather goods (wallets, belts, watch straps)
- High-end private label production
- Where durability is critical (e.g., saddles, holsters)
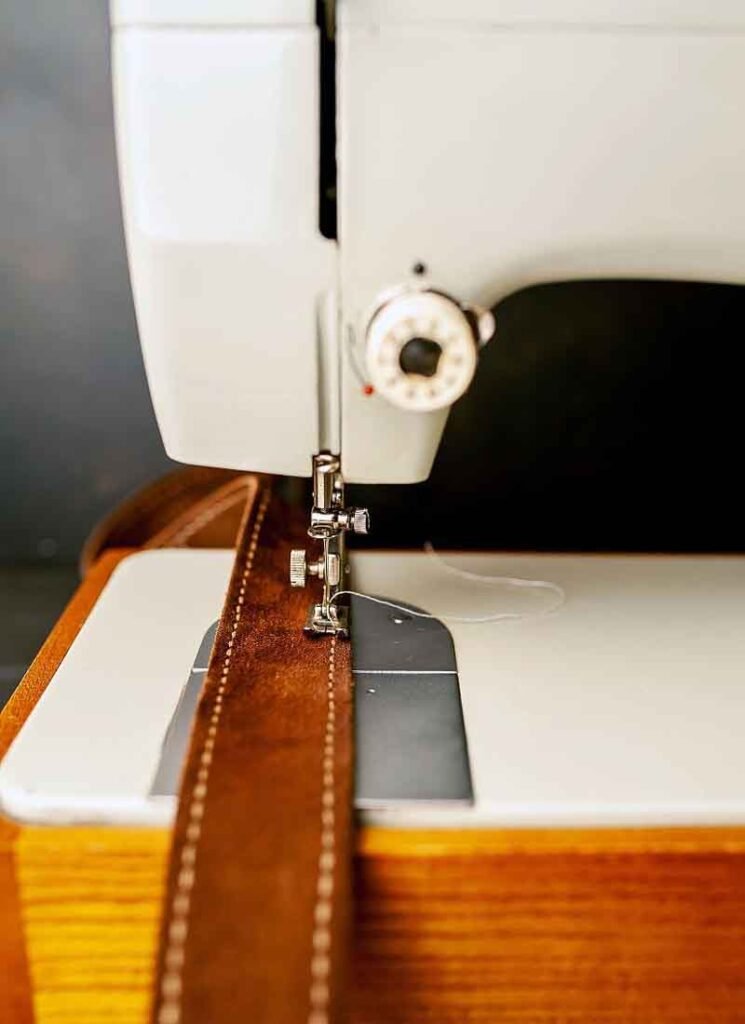
Lockstitch and Zigzag Machine Stitches
Lockstitch, the most common machine stitch, uses a top thread and bobbin thread that interlock in the middle of the material.
Best suited for:
- Garment-weight leather
- Large batch production
- Straight seams on soft leather goods
| Stitch Type | Durability | Appearance | Unravels If Broken? | Speed | Suitable For |
|---|---|---|---|---|---|
| Saddle Stitch | Excellent | Handcrafted & bold | No | Slow | Premium & rugged leather |
| Lockstitch | Good | Clean & consistent | Yes | Fast | Mass-produced items |
| Zigzag Stitch | Fair | Stretchy/decorative | Yes | Medium | Soft/stretch leather goods |
Limitations:
- Can cause puckering in thick leather
- Requires strong, leather-compatible machine
- Less control over seam depth and appearance
Tip: Use walking foot or compound feed machines with Teflon feet when machine sewing leather to prevent sticking or uneven feeding.
When to Use Hand Stitching Over a Machine
Choosing between hand and machine stitching depends on your product goals:
| Scenario | Recommended Stitch |
|---|---|
| Crafting high-end leather wallets | Saddle Stitch (hand) |
| Producing 500+ leather cases monthly | Lockstitch (machine) |
| Making reinforced belt loops | Saddle Stitch |
| Sewing curved bag seams or gussets | Saddle Stitch or Hybrid |
| Fashion accessories with consistent seams | Machine Lockstitch |
Hand Stitching Pros:
- Adds a premium “handmade” appeal
- Ideal for small-batch or bespoke goods
- Better tension and edge alignment on thick leather
Machine Stitching Pros:
- Faster and scalable
- More cost-effective for high-volume production
- Consistent stitch length and spacing
Saddle Stitch vs Lockstitch
| Feature | Saddle Stitch (Hand) | Lockstitch (Machine) |
|---|---|---|
| Strength | Extremely High | Medium to High |
| Appearance | Bold, visible, traditional | Clean, uniform |
| Time to Produce | Slow | Fast |
| Tools Required | Awl, Needles, Thread | Heavy-duty sewing machine |
| Risk of Unraveling | Low | High if broken |
| Ideal For | Luxury goods, belts | Bags, garments, bulk orders |
Do You Need Special Needles and Thread for Leather Sewing?
Yes, sewing leather requires specialty needles like glover’s or chisel point needles to penetrate thick hides cleanly. Thread should be heavy-duty, such as waxed polyester or nylon, sized to match your project’s weight.
Needle Types and Sizes (What number needle for sewing leather?)
The needle size depends on leather thickness:
- 90/14: Thin leather (garments, lining)
- 100/16–110/18: Medium (wallets, pouches)
- 120/19+: Thick leather (belts, holsters)
For hand stitching, use blunt-end needles with chisel tips. For machines, choose leather-point (LL or DI point) needles to slice through the material without tearing it.
Thread Options: Waxed Polyester vs. Nylon
| Thread Type | Best For | Pros | Thickness (mm) |
|---|---|---|---|
| Polyester | General purpose | UV resistance, strength | 0.6–1.0 |
| Nylon | Softer leathers | High flexibility, dye absorbent | 0.5–0.8 |
Waxed thread glides smoothly, prevents tangling, and adds a refined look. It also grips better inside the leather, improving seam strength.
Are There Common Mistakes to Avoid When Sewing Leather?
Yes,common leather sewing mistakes include using the wrong needle or thread, over-piercing the leather, poor alignment, and skipping burnishing. Avoid rushing the stitching process or using too-tight tension, which can damage leather.
Preventing Skipped Stitches and Puckering
This happens when the needle doesn’t fully penetrate or when the feed is uneven. Use Teflon or roller presser feet for smoother machine operation, and keep even pressure during hand sewing.
Misalignment and Seam Reinforcement
Use binder clips—not pins—to hold pieces. Misalignment is often due to lack of pre-marking or improper edge trimming.
Are Different Leather Products Sewn in Different Ways?
Absolutely. Here’s a comparison:
| Product Type | Stitching Technique | Notes |
|---|---|---|
| Belts | Saddle stitch | Thick leather, edge burnishing |
| Bags | Machine or hand | Mix of curves, gussets |
| Wallets | Hand-stitched | Requires fine, tight stitching |
| Shoes/Footwear | Goodyear welt, Blake | Advanced industrial methods |
| Leather Boxes | Hand-glued + stitched | Rigid sides, decorative seams |
How Can You Finish and Maintain Your Leather Sewing Projects?
To finish leather sewing projects, you should burnish the edges, apply protective treatments like edge paint or wax, and condition the surface with oils or balms. This enhances durability, improves water resistance, and adds a professional polish. Regular maintenance includes cleaning, conditioning every few months, and storing leather in a dry, cool place to prevent cracking or mildew.
Whether you’re creating a custom leather wallet or a rugged shoulder strap, the final treatment and care routine directly affect the product’s lifespan, feel, and how your brand is perceived by customers. Here’s how to get it right.
Edge Finishing Techniques and Protective Treatments
Leather edges are vulnerable to wear, moisture, and unraveling if not sealed properly. A raw edge can fray, collect grime, or peel—diminishing the product’s aesthetic and durability. Here are the industry-trusted methods for professional edge finishing:
Burnishing the Edges (Traditional Method)
Burnishing is the process of smoothing and sealing edges using friction, moisture, and sometimes heat.
Tools Required:
- Wooden or bone burnisher
- Gum tragacanth or water
- Edge beveler
Steps:
- Bevel the edges to round them slightly.
- Apply gum tragacanth along the edge.
- Rub with the burnisher until the edge darkens and smooths.
Burnished edges look refined, feel smooth, and resist fraying better than raw edges.
Edge Painting (Color-Matched or Decorative Finish)
If you want a polished or colored finish—common in fashion leather goods—use edge paint (usually polyurethane-based).
Application Steps:
- Apply thin layers using a roller pen or applicator.
- Let each layer dry fully.
- Sand between coats for smoothness.
- Repeat 2–3 layers until seamless.
- Optionally, seal with a final wax or clear coat.
| Finishing Type | Durability | Look | Use Case |
|---|---|---|---|
| Burnishing | High | Natural | Belts, wallets, vintage bags |
| Edge Painting | Medium | Clean, colored | Fashion handbags, high-end goods |
| Wax Sealing | Medium | Matte/Satin | Utility goods, casual accessories |
Leather Surface Protection
Once the stitching is done and edges are sealed, treat the leather’s surface:
- Beeswax or Mink Oil: Adds a layer of moisture protection and mild shine.
- Leather Conditioner or Balm: Keeps leather supple and prevents drying or cracking.
- Acrylic Finish (Optional): Adds water and stain resistance, especially for bags or accessories that face daily wear.
Important: Always spot-test any treatment, as it may darken the leather or affect sheen.
Cleaning, Conditioning, and Long-Term Care
A leather product is a living material. Over time, it develops patina, responds to environmental changes, and—if not cared for—can degrade prematurely.
Here’s a recommended care schedule:
| Maintenance Task | Frequency | Products to Use |
|---|---|---|
| Surface Wipe Down | Every 1–2 weeks | Dry microfiber or slightly damp cloth |
| Conditioning | Every 2–3 months | Leather balm, neatsfoot oil, or lanolin |
| Deep Clean | Every 6–12 months | Saddle soap or gentle leather cleaner |
| Storage Check | Seasonally | Ensure low humidity, airflow |
Seasonal and Use-Specific Considerations
- Rain-prone climates: Use a waterproofing spray every 3 months.
- High heat/humidity: Store with silica packets, avoid sealed plastic.
- Frequent contact with skin/oil: Clean more often, especially on straps or wallets.
Note: Leather that’s over-conditioned becomes sticky or soft. Balance is key.
Common Mistakes in Leather Finishing and Maintenance
| Mistake | Problem Caused | What to Do Instead |
|---|---|---|
| Skipping edge sealing | Fraying, water absorption | Always burnish or paint |
| Over-conditioning | Greasy texture, dirt buildup | Use minimal product per application |
| Using harsh cleaners | Cracks, discoloration | Use leather-specific soaps only |
| Poor storage (plastic bags) | Mildew, trapped moisture | Store in breathable dust bags |
Ready to Bring Your Leather Design to Life?
At Szoneier Leather, we’ve been mastering leather sewing techniques for over 18 years, producing premium-quality bags, wallets, straps, accessories, and leather boxes. We understand that every stitch matters—whether you’re launching a new private label or developing high-end prototypes.
Whether you need precise saddle-stitched samples, machine-finished belts, or embossed logo wallets, our team is ready to help. From raw material R&D to final packaging, we deliver customized, end-to-end leather product solutions for brands and wholesalers alike.
Contact us today to discuss your custom leather project, Let your brand story be told—one expertly sewn leather piece at a time.


