 Skip to content
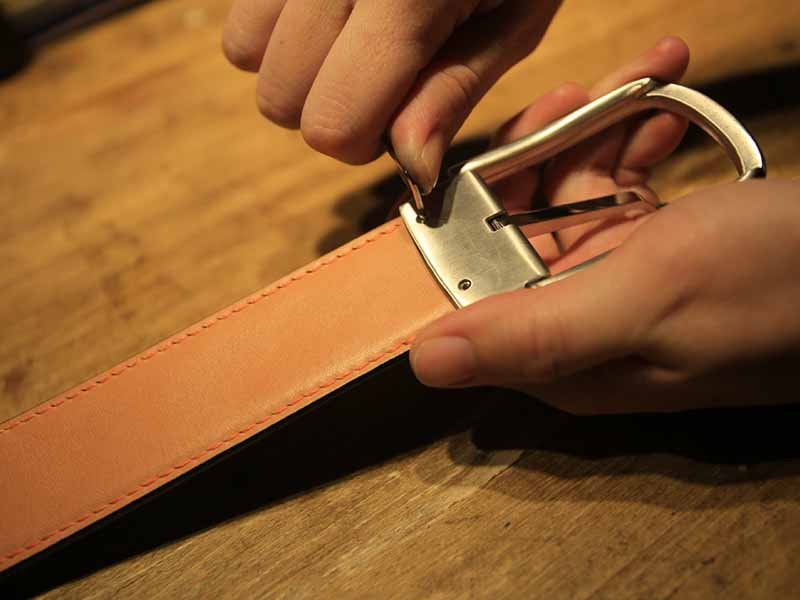
Leather belts are more than everyday accessories — they are symbols of durability, craftsmanship, and timeless style. But even the finest full-grain leather can crack, stretch, or lose its color after years of use. Many people assume a damaged belt must be replaced, but in truth, most quality leather belts can be fully restored with the right tools, techniques, and care.
To repair a leather belt, clean it thoroughly, apply leather glue or filler to cracks, re-stitch loose seams, and restore color with dye and conditioner. Using high-quality materials—such as pH-neutral cleaners and flexible adhesives—ensures the belt regains both its strength and finish for long-term wear.
From small surface cracks to broken holes or dull finishes, every issue has a specific fix. Whether you’re a DIY enthusiast or a brand sourcing custom leather products, understanding leather repair helps extend product life and preserve craftsmanship. Let’s explore, step by step, how to restore a belt back to its original elegance — and how Szoneier Leather ensures professional durability at the manufacturing level.
What Are the Common Problems Found in Leather Belts?
The most common leather belt problems include cracking, stretching, surface peeling, broken stitching, and fading. These issues arise from natural wear, moisture imbalance, and inadequate conditioning. Understanding the root causes—such as leather type, usage habits, and environmental exposure—is the first step toward proper repair. With correct cleaning, gluing, or refinishing, most leather belts can regain both strength and aesthetic appeal.
1. Cracks, Drying, and Surface Peeling
Cracks are the most frequent complaint among leather belt owners and a direct sign of dehydration and oil loss. Genuine leather contains natural oils that keep its fibers elastic. When these oils evaporate—often due to heat, UV exposure, or long-term neglect—the collagen fibers become brittle and start splitting.
- Early-stage cracks usually appear as light, hairline marks near bends or buckle holes. These can be reversed by conditioning or applying a leather balm.
- Deep cracks and peeling indicate that the surface coating (in top-grain or corrected-grain leather) has detached from the inner fibers. In such cases, sanding, filling, and re-dyeing are required to rebuild the finish.
- Overuse of alcohol-based cleaners or direct sunlight speeds up this process dramatically.
Professionally made belts, especially full-grain leather, resist cracking longer because their natural surface hasn’t been sanded or coated excessively. However, even these need regular conditioning every few months.
2. Stretched or Misshapen Belts
Stretching occurs gradually as the belt undergoes daily tension at the buckle area. Each tightening slightly stretches the leather fibers, and without rest periods or rotation, this deformation becomes permanent.
- Belts made from split leather or bonded leather stretch more easily because they lack the dense fiber structure of full-grain hides.
- Excess humidity also softens leather, causing it to stretch unevenly when worn.
- Over time, the shape distortion can cause warping, curling edges, or misalignment of the buckle holes.
Preventive tip: Rotating between belts and unbuckling carefully after wear allows leather to recover naturally. For restoration, light steaming and reshaping under gentle weight can help return the belt to its original contour, followed by conditioning to re-tighten fibers.
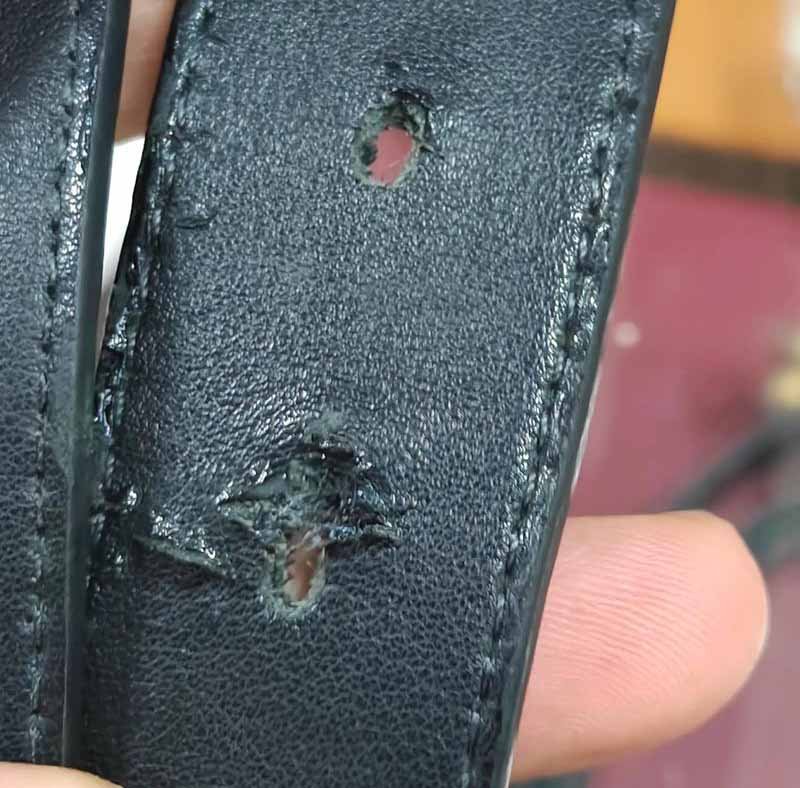
3. Broken Stitching or Torn Holes
Another major issue is mechanical damage — frayed seams, loose stitches, and ripped buckle holes. This type of wear usually appears in high-tension areas: around the buckle end, near belt loops, or along decorative stitching.
Common causes include:
- Excessive pulling when fastening.
- Weak thread or poor-quality stitching from the factory.
- Moisture exposure that softens thread wax and leads to breakage.
- Belts with stitched-on overlays or laminated layers tend to delaminate faster when exposed to friction.
Repair approach:
Loose stitching can be re-sewn using a waxed nylon or polyester thread with saddle-stitching techniques. Torn holes can be reinforced by gluing a thin backing leather piece beneath the damaged area, then re-punching holes evenly.
High-end manufacturers, such as Szoneier Leather, prevent this issue during production by using reinforced threading techniques and precision lock-stitch machines that maintain consistent tension.
4. Faded Color, Dull Finish, and Oxidation
Color fading is mostly caused by UV light exposure and oxidation. Even premium vegetable-tanned leathers darken or lose uniformity when exposed to sunlight for extended periods. Sweat, humidity, and friction also degrade surface dyes, leading to patchiness or dullness.
- Aniline-dyed leathers (commonly used in luxury belts) are particularly vulnerable, as their open pores absorb both moisture and dirt.
- Pigmented or semi-aniline leathers have protective coatings that extend color life, but these coatings can peel if cleaned harshly.
- Environmental pollutants and the pH of human sweat (around 4.5–6.0) accelerate fading and salt bloom formation.
To restore vibrancy, the belt can be cleaned, sanded lightly, and re-dyed using professional-grade leather dye. Conditioning afterward seals in the color and prevents future fading.
5. Edge Wear and Delamination
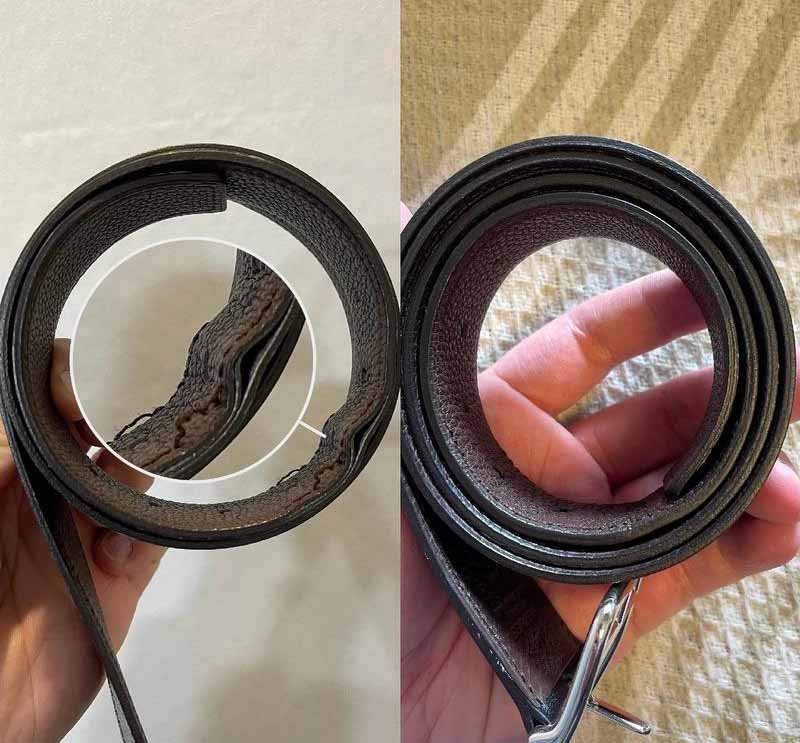
Belt edges experience constant rubbing against clothing loops and body movement, leading to edge cracking and separation. In layered belts, especially those made from split leather glued to a stiffener, the adhesive bond can fail over time.
- The first sign is a raised or curled edge line.
- Prolonged use causes delamination where layers peel apart.
- Poor-quality glue or exposure to heat worsens the issue.
Repair strategy: Re-bond edges using flexible PU leather adhesive, clamp securely during curing, then refinish using edge paint or burnishing compound for a smooth seal.
6. Odor, Sweat Stains, and Mold Spots
Leather’s porous structure can absorb sweat and oils from the skin, resulting in unpleasant odor or mold development if stored in humid areas. This problem is particularly common in tropical climates or for users who wear belts daily in warm environments.
- Mold typically appears as white or greenish spots, indicating fungal growth on organic leather proteins.
- Sweat stains may cause discoloration or stiff patches.
- Untreated odor can persist inside the fibers even after surface cleaning.
Solution:
Wipe gently with a diluted vinegar solution (1 part vinegar to 3 parts distilled water) to kill mold spores, then dry in a shaded, ventilated area. Use leather deodorizing spray or place the belt in a breathable bag with baking soda or charcoal sachets to neutralize odor.
7. Buckle and Hardware Corrosion
Metal buckles and rivets often corrode when exposed to moisture, which can stain or even tear nearby leather. Oxidized brass or iron components produce green or brown marks (known as verdigris) that penetrate the surface.
Preventive maintenance includes:
- Wiping metal components dry after wear.
- Applying a thin protective coat of wax or metal polish.
- Replacing rusted parts promptly to prevent staining.
Premium brands solve this problem by using nickel-free stainless steel or zinc alloy buckles, which resist corrosion and maintain shine for years.
8. Structural Weakness in Low-Grade Leather
Finally, not all “genuine leather” belts are created equal. Lower-quality bonded leather—made from shredded scraps and adhesives—inevitably deteriorates within months of use. These belts are difficult to repair because the material lacks consistent fiber strength.
In contrast, full-grain and top-grain cowhide belts can last 10–20 years with proper care and periodic restoration. For businesses sourcing belts, investing in higher-quality base material ensures fewer warranty claims and a better customer reputation.
Common Leather Belt Issues and Fixes
| Problem | Primary Cause | Visible Symptom | Recommended Fix |
|---|---|---|---|
| Cracking / Peeling | Dehydration, UV, heat | Fine surface lines, flaking | Clean, fill, condition |
| Stretching | Overuse, humidity | Elongated holes, deformation | Reshape, reinforce, condition |
| Broken Stitching | Tension, weak thread | Loose seams | Re-stitch, apply waxed thread |
| Fading / Dullness | UV, sweat, friction | Discoloration | Clean, re-dye, polish |
| Edge Wear / Peeling | Friction, weak glue | Rough edges, separation | Re-glue, edge paint |
| Odor / Mold | Sweat, moisture | Musty smell, white spots | Vinegar clean, air dry |
| Buckle Corrosion | Moisture, oxidation | Stains near hardware | Replace metal parts |
| Low-grade Leather | Bonded composition | Early cracks | Replace with full-grain belt |
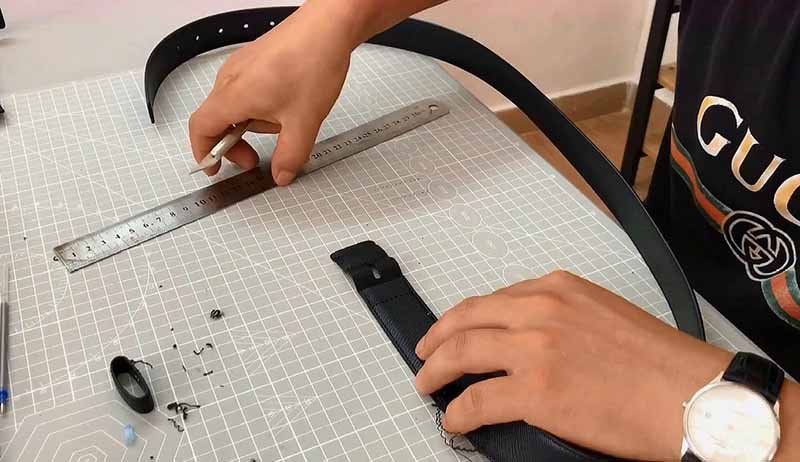
What Tools and Materials Are Needed for Repairing a Leather Belt?
Repairing a leather belt requires specialized tools and materials that protect the hide’s integrity. Core tools include awls, needles, clamps, and microfiber cloths, while essential materials range from flexible leather glue and filler to dyes, conditioners, and edge paints. Choosing pH-neutral, alcohol-free, and flexible products is critical for lasting restoration. High-quality tools ensure precision, prevent over-cutting, and maintain the belt’s structural strength during repair.
Essential Hand Tools for Leather Belt Repair
| Tool | Function | Professional Tip |
|---|---|---|
| Leather Awl | Punches or reopens stitching holes without tearing fibers. | Choose an awl with an ergonomic wooden handle and fine steel point; heat the tip slightly for dense hides. |
| Cutting Mat & Rotary Knife | Used for trimming cracked ends or shaping patches. | Always cut on a self-healing mat to prevent blade dulling and accidental gouging. |
| Edge Beveler & Burnisher | Shapes and polishes belt edges after repair. | For full-grain belts, use size #2-#3 beveler; finish with a wood or bone burnisher. |
| Needles & Stitching Pony | For re-stitching seams and holding belt firmly. | Use blunt saddle needles (size 0-2) with waxed thread for hand-sewing precision. |
| Clamps or Binder Clips | Holds glued sections in place while curing. | Rubber-tipped clamps prevent surface marking. |
| Soft Microfiber Cloths | For cleaning, buffing, and dye application. | Always keep multiple cloths: one for cleaning, one for conditioning, one for final buff. |
Key Repair Materials: Glues, Fillers, and Conditioners
Leather restoration is a chemistry process. Each compound interacts with the hide’s natural oils and surface coating differently.
a. Leather Glues and Adhesives
The most crucial material in belt repair is adhesive strength combined with flexibility. The wrong glue may hold temporarily but will cause stiffness or delamination over time.
| Adhesive Type | Properties | Use Case | Notes |
|---|---|---|---|
| Polyurethane (PU) Adhesive | Strong, elastic, transparent | General belt repair, cracks, delamination | Ideal for flexible joints; non-yellowing. |
| Contact Cement | Instant grip, strong bond | Bonding multiple layers | Apply thinly on both sides; allow 10-15 min tack time. |
| Rubber Cement | Temporary, repositionable | Alignment or pattern work | Not for long-term wear areas. |
| Cyanoacrylate (Super Glue) | Fast curing, rigid bond | Emergency patch | Avoid on visible surfaces; may cause discoloration. |
What Is the Best Glue for a Leather Belt?
Professionals widely recommend flexible PU-based adhesive or high-grade contact cement. They create a strong yet elastic bond that moves naturally with the leather fibers. Szoneier Leather uses ISO-certified adhesives tested for tensile strength and heat resistance during belt assembly to guarantee zero delamination during long-term use.
b. Leather Fillers and Repair Compounds
Leather fillers are semi-elastic pastes designed to fill cracks or depressions in dried surfaces.
- Acrylic-based fillers: Ideal for small surface cracks; easy to sand and re-dye.
- Polymer or latex-based fillers: Better for flexibility in bending areas.
- Two-part resin fillers: Used in professional repairs for restoring belt edges or severe damage; require precise mixing.
After application, fillers must dry fully (usually 4–6 hours) before sanding and coloring. Always apply thin, multiple layers instead of one thick coat to maintain texture fidelity.
c. Conditioners, Oils, and Balms
Conditioners are the lifeblood of leather repair. They reintroduce natural oils, preventing cracking and discoloration.
Common types:
- Lanolin-based balms: Excellent for restoring softness and shine.
- Beeswax conditioners: Provide protective coating against water and sweat.
- Neatsfoot oil: Traditional product that softens leather but darkens color — use cautiously.
- Silicone-free emulsions: Preferred in premium belts as they preserve breathability.
Application tip: Always apply conditioner after the belt has fully dried post-cleaning or gluing. Buff gently to seal pores.
4. Dyes, Paints, and Finishing Materials
Restoring color and finish requires careful layering of dye, sealer, and polish.
a. Leather Dyes
- Alcohol-based dyes: Deep penetration, rich color, but may dry leather.
- Water-based dyes: Gentle, less odor, ideal for fine belts.
- Aniline dyes: Used for high-end finishes that reveal natural grain.
Multiple thin coats give even coverage. Always finish with a protective top coat to seal color.
b. Edge Paints
Edge paint refines belt aesthetics and prevents moisture infiltration. Professional options include acrylic edge paint, available in matte, satin, or glossy finishes. After applying, sand lightly and burnish for smooth edges.
c. Leather Finishers and Sealants
After repair and dyeing, a thin coat of finisher adds resistance to sweat, oils, and friction. Choose non-toxic, water-resistant coatings that maintain the belt’s natural sheen.
5. Cleaning and Preparation Supplies
Before any repair, the belt must be free from dust, oils, and old coatings.
Recommended supplies:
- pH-neutral leather cleaner or mild saddle soap
- Distilled water (never tap water, which may leave mineral marks)
- Soft brushes or cotton swabs for cleaning corners and stitching lines
- Paper towels and absorbent cloths for blot drying
Avoid household detergents, alcohol wipes, or baby wipes — they strip oils and can cause cracking.
6. Safety and Workspace Considerations
Leather repair involves sharp tools and chemicals that require care:
- Always work in a well-ventilated area.
- Use gloves when applying adhesives or dyes.
- Store glues and conditioners in sealed containers away from sunlight.
- Test all products on a hidden section before full application.
Professional note:
In factory environments, Szoneier Leather technicians use temperature-controlled bonding stations (around 25°C) and humidity-balanced drying rooms to ensure adhesives cure optimally. This reduces bond failure rates and color inconsistency.
7. Optional but Valuable Tools for Advanced Restoration
For those aiming at a near-factory result or handling high-value belts:
- Creasing iron: To restore belt fold lines after repair.
- Spray gun or airbrush: For even dye application without streaks.
- Leather gauge: To measure thickness accurately before trimming.
- Edge roller: Ensures consistent paint application along belt sides.
- Digital scale: For precise mixing of resin fillers or conditioners.
These tools may not be essential for DIY work but are standard equipment in professional workshops and OEM manufacturing setups.
8. Choosing Safe, Eco-Friendly, and Certified Materials
Modern consumers and global brands increasingly prioritize sustainability. When repairing or producing belts for export, compliance with international standards is vital.
| Certification | Meaning | Why It Matters |
|---|---|---|
| REACH / RoHS | Restricts harmful chemicals in adhesives and dyes. | Ensures consumer safety and EU compliance. |
| ISO 9001 / 14001 | Quality and environmental management. | Demonstrates consistency and low environmental impact. |
| LWG (Leather Working Group) | Assesses tannery sustainability. | Guarantees responsibly sourced leather. |
Szoneier Leather selects only LWG-audited tanneries and REACH-approved chemicals, ensuring all products and repair materials meet international buyer expectations.
Example of a Basic Leather Belt Repair Kit
| Category | Item | Function | Approx. Cost (USD) |
|---|---|---|---|
| Tools | Awl, Needles, Clamps | Stitching & Assembly | $15–$25 |
| Adhesive | PU Leather Glue | Bonding Layers | $10 |
| Filler | Acrylic or Polymer Paste | Crack Filling | $8 |
| Conditioner | Beeswax Balm | Moisture Restoration | $12 |
| Dye & Finish | Water-based Dye, Sealer | Color Renewal | $15 |
| Cloths & Brushes | Microfiber, Applicators | Cleaning | $5 |
| Total Setup Cost | — | — | $60–$75 |
How to Fix Cracked or Dried Leather Belts
To repair cracked or dried leather belts, clean the surface thoroughly, rehydrate it using a leather conditioner, fill deeper cracks with leather filler, and sand gently before polishing and sealing. Avoid soaking or heating leather — both can worsen cracks. Using pH-neutral cleaners and flexible repair compounds helps restore the belt’s original strength, texture, and shine while preserving its natural fibers for long-term wear.
Step 1: Clean the Leather Surface
Cleaning is the foundation of all successful repairs. Any oil, dust, or old polish will block fillers and conditioners from penetrating properly.
Tools and Materials
- Soft microfiber cloths
- Mild pH-neutral leather cleaner or diluted saddle soap
- Small soft brush or toothbrush
- Distilled water
Process
- Wipe away surface dust with a dry microfiber cloth.
- Mix your cleaner with water (1:10 dilution). Dampen a cloth — never soak it.
- Gently wipe along the belt’s length, paying attention to creases and buckle holes.
- Use a soft brush to lift dirt from stitching lines.
- Wipe again with a clean, damp cloth to remove any soap residue.
- Let the belt air dry naturally for 4–6 hours in a shaded area.
Avoid: Direct sunlight, hair dryers, or radiators — heat accelerates dehydration.
Step 2: Rehydrate the Leather
Once clean and dry, the next step is to restore the leather’s flexibility and moisture balance.
Tools and Materials
- Leather conditioner or balm (lanolin or beeswax-based)
- Soft sponge or microfiber applicator
- Absorbent towel
Process
- Apply a small amount of conditioner onto a clean cloth.
- Work it gently into the belt using circular motions, focusing on cracks and dry spots.
- Allow 15–20 minutes for full absorption.
- Wipe off excess with a towel.
- Let rest overnight for deep penetration.
For extremely dry belts, apply two thin layers rather than one thick coat. Over-conditioning can oversoften the fibers, making them lose structure.
Expert Insight:
In professional settings, Szoneier’s technicians use heat-assisted oil penetration — gently warming the conditioner (below 40°C) before applying it to increase absorption efficiency and reduce surface tackiness.
Step 3: Apply Leather Filler or Repair Compound
If cracks are visible after conditioning, you’ll need to fill them. Leather fillers smooth out the surface and bond fractured fibers together.
Tools and Materials
- Leather filler (acrylic or polymer-based)
- Palette knife, spatula, or cotton swab
- Fine-grit sandpaper (800–1200)
Process
- Scoop a small amount of filler and press it into the cracks using a palette knife.
- Smooth excess filler along the grain direction.
- Let dry naturally (4–8 hours depending on product type).
- Lightly sand the repaired area until it blends seamlessly with the rest of the surface.
For wide cracks, apply filler in multiple thin layers, allowing each to dry fully before adding another.
If cracks extend near stitching, avoid covering threads — instead, repair them separately to prevent adhesion interference.
Tip:
Polymer-based fillers have a slightly elastic property that mimics leather’s stretch. This makes them ideal for high-flex areas near the buckle holes or tip ends.
Step 4: Smooth, Sand, and Prepare for Finishing
After filling, the belt’s surface must be evened out for dye and polish application.
Steps
- Use fine-grit sandpaper (1000–1200) to smooth the filled areas.
- Wipe away sanding dust with a dry cloth.
- Optionally, apply a light layer of leather prep solution or alcohol-free cleaner to remove micro-residues.
- Ensure the belt feels consistent in texture from end to end.
If the belt surface appears dull or unevenly matte, don’t worry — this stage is purely about texture leveling, not gloss restoration.
Step 5: Re-Dye and Polish the Leather
Crack repairs often leave slight discoloration, so color restoration is essential to achieve a uniform appearance.
Tools and Materials
- Leather dye (water- or alcohol-based)
- Applicator sponge or brush
- Leather finish or topcoat
- Buffing cloth
Process
- Apply thin, even coats of dye with a sponge. Avoid over-saturating.
- Let each coat dry (30–60 minutes) before applying the next.
- Once color is consistent, apply a finishing coat to seal the dye.
- Buff gently with a microfiber cloth for natural shine.
Important: Always test dye on a hidden part first to confirm color match. For luxury belts, water-based or aniline dyes preserve grain visibility better than pigment-heavy types
Step 6: Recondition and Seal for Longevity
After coloring, the final step is to seal in moisture and create a protective barrier.
- Apply a second round of conditioner, focusing on flexibility points.
- For added water resistance, use a beeswax-based sealant or leather protector spray.
- Buff the entire belt to a soft glow.
The leather should now feel supple but firm — a sign that the internal fibers are hydrated and resilient again.
Common Mistakes to Avoid During Repair
| Mistake | Why It’s Harmful | Correct Practice |
|---|---|---|
| Using too much water | Causes swelling or discoloration | Use slightly damp cloths only |
| Over-conditioning | Leads to limp, oily leather | Apply thin, spaced layers |
| Rushing drying | Cracks reopen due to trapped moisture | Allow natural air drying |
| Using superglue or harsh solvents | Hardens fibers, stains leather | Stick to PU or leather-specific glues |
| Ignoring deep cracks | Spreads damage under stress | Always fill and smooth properly |
Advanced Repair Techniques for Severe Cracking
For heavily damaged belts, especially those made from thick full-grain hides, advanced restoration methods can produce near-factory results.
a. Deep Crack Rebonding
Apply a thin layer of PU adhesive into the split using a fine brush. Press the area together and clamp lightly for 8–12 hours. After curing, sand lightly and refinish.
b. Overlay Patching
Cut a thin leather strip matching the belt’s color and texture. Glue it over the cracked zone, feathering edges with filler and sanding for seamless blending.
c. Heat Reconditioning
Some professionals use low heat (35–45°C) to open pores before applying filler and conditioner. This enhances absorption but must be done carefully to avoid scorching.
Final Finishing and Quality Check
When restoration is complete, inspect the belt under good lighting:
- The surface should feel smooth yet natural, not plastic-like.
- Bends should show no visible cracking or stiffness.
- Color should appear uniform across length and edges.
To finish, polish lightly with a clean cloth and apply a few drops of neutral leather balm. The belt is now fully restored — flexible, rich in tone, and ready for years of use.
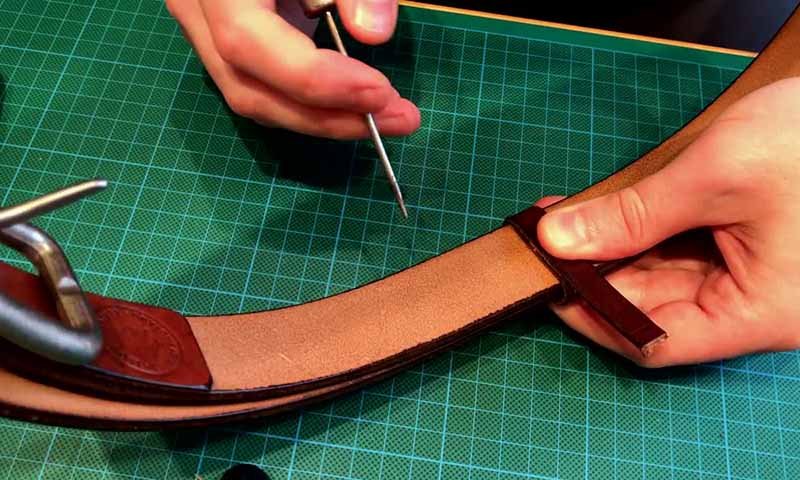
How to Repair Torn Stitching or Belt Holes
Repairing torn stitching or damaged belt holes requires precision re-stitching, reinforcement, and sometimes patching. Use strong waxed thread, saddle-stitching techniques, and flexible leather glue to restore strength and alignment. For enlarged or ripped holes, reinforce with a backing strip or re-punch new holes using a rotary punch. When done carefully, repairs can fully restore both the appearance and durability of high-quality leather belts.
Tools and Materials Required
| Category | Tool / Material | Purpose |
|---|---|---|
| Stitching | Awl, Blunt Saddle Needles | To reopen holes and sew through thick leather |
| Thread | Waxed polyester or nylon thread | Durable, flexible re-stitching material |
| Adhesive | PU leather glue | Reinforces layered seams before stitching |
| Support | Stitching pony or clamp | Holds belt securely while working |
| Hole Repair | Rotary punch or hole cutter | Re-punches new holes cleanly |
| Reinforcement | Leather patch or backing strip | Strengthens worn areas |
| Finishing | Edge paint, conditioner | Seals and restores smoothness |
Step 1: Evaluate the Damage
Before repair, inspect both sides of the belt.
- If only stitching is broken, and the leather is intact, re-stitching alone is sufficient.
- If the holes are stretched, torn, or irregularly shaped, reinforcement is needed.
- If fibers have delaminated or peeled, re-gluing the layers comes first.
Mark the damaged areas with chalk or tape to keep alignment during repair.
Step 2: Re-Stitching Loose or Broken Seams
Proper re-stitching is a hallmark of craftsmanship. While machine stitching is fast, hand saddle-stitching is stronger and visually more consistent for small repairs.
a. Prepare the Seam
- Use an awl to reopen old stitch holes. Never force the needle — it may expand or tear fibers.
- Apply a thin coat of PU adhesive between layers to secure the seam base (optional for added strength).
- Let the glue become tacky (5–10 minutes).
b. Stitching Process
- Thread two blunt needles at opposite ends of waxed thread (length = 4× seam).
- Starting from one end, insert both needles through the same hole from opposite sides.
- Pull evenly to create a locking saddle stitch.
- Continue in sequence, ensuring equal tension for each pass.
- At the final hole, loop back two stitches for reinforcement and trim excess thread.
- Gently burn the thread tips with a lighter or apply clear wax to prevent fraying.
c. Thread Type and Color
- Material: Waxed polyester (preferred) or bonded nylon.
- Gauge: 0.6–0.8 mm for casual belts; 1.0 mm for heavy-duty models.
- Color: Match to the original seam for subtle repairs, or contrast for decorative stitching.
Professional Tip:
At Szoneier Leather, technicians use double-needle saddle stitching with pre-marked spacing guides (4 mm–5 mm) for even tension, ensuring factory-grade consistency and clean, symmetrical lines.
Step 3: Repairing Torn or Stretched Belt Holes
Buckle holes are often the first area to show visible wear — especially when belts are repeatedly fastened at the same notch.
a. Cleaning and Preparation
- Wipe the area with a damp cloth to remove oils and dirt.
- Trim any frayed leather fibers using a precision knife.
- Apply a small amount of PU adhesive to stabilize torn edges.
- Let it cure for 20–30 minutes before reinforcement.
b. Reinforcing the Hole Area
If the damage is moderate (slightly stretched holes):
- Apply a thin leather patch (1–1.5 mm thick) on the belt’s back side using PU adhesive.
- Align carefully to avoid bulges.
- Press with a flat board or clamp for 8–12 hours for proper adhesion.
For more severe tearing:
- Cut out the damaged hole cleanly with a round punch.
- Place a backing strip (2–3 cm wide) behind the affected section.
- Glue, clamp, and let cure overnight.
- Re-punch new holes at measured intervals (2.5 cm apart) using a rotary punch.
- Finish edges with edge paint or conditioner.
This process restores not only function but also load distribution, ensuring future buckling stress spreads evenly across the surface.
Step 4: Combining Glue and Stitching for Maximum Strength
Leather glue alone holds temporarily; stitching alone may tear under stress. Combining the two methods provides structural reinforcement that rivals factory manufacturing.
Hybrid Repair Technique:
- Apply a thin coat of PU adhesive to both surfaces.
- Press and clamp lightly for 10–15 minutes until tacky.
- Re-stitch directly through the glued section using saddle stitch.
- Allow 12–24 hours curing time before flexing the belt.
Step 5: Refinishing and Sealing the Repaired Area
After stitching and patching, the repair must be finished properly to prevent future damage and blend visually with the rest of the belt.
Finishing Steps
- Edge Trimming: Use an edge beveler to smooth uneven edges.
- Burnishing: Rub edges with a wood burnisher or canvas cloth to restore polish.
- Edge Painting: Apply acrylic edge paint (matching color) with a fine brush; let dry.
- Conditioning: Finish with a small amount of conditioner or wax to restore sheen and flexibility.
Visual Tip:
If stitching appears too new or bright, lightly buff with a soft cloth dipped in a tiny bit of dye or antique finish to match the aged tone of the rest of the belt.
Step 6: Quality Check and Stress Test
A well-repaired belt should look natural and function reliably. Before regular use:
- Gently bend and unbend the repaired section several times to test flexibility.
- Pull both ends lightly to ensure no thread movement.
- Inspect the back for adhesive leaks or uneven surfaces.
Quality Benchmarks:
- Stitch tension: Even and symmetrical.
- Hole edges: Round, smooth, no fraying.
- Finish: Consistent color and shine.
In factory testing, Szoneier Leather’s QC team performs 50+ bending cycles under standard tension to ensure repaired belts maintain original strength and flexibility.
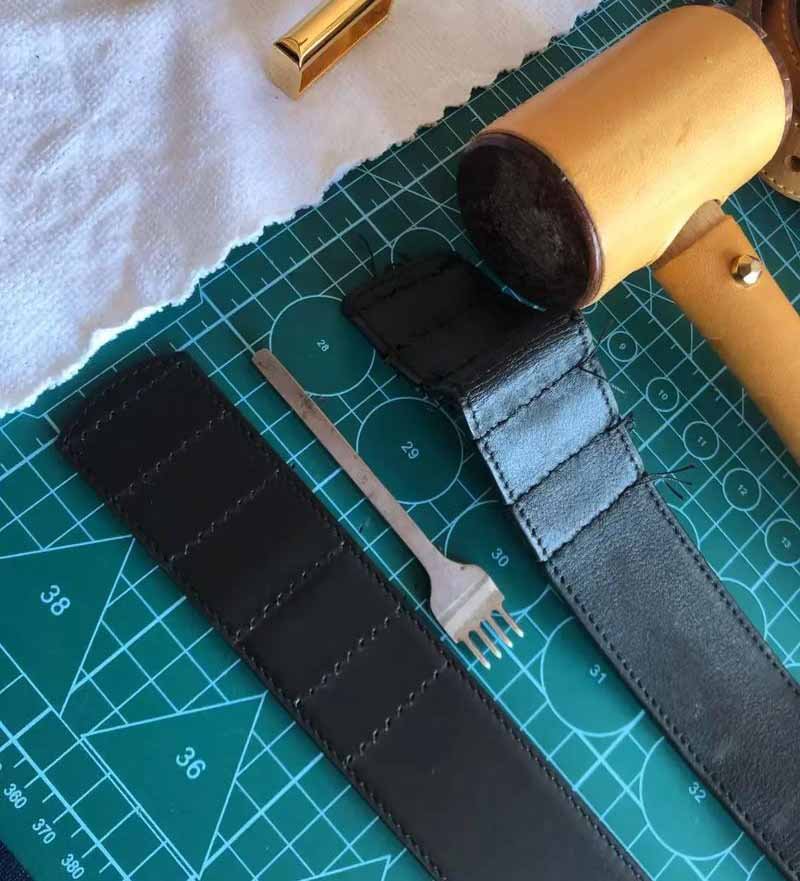
Step 7: Optional Upgrades — Reinforcement and Re-Styling
For clients or brands seeking enhanced durability or design updates:
- Double Layer Reinforcement: Add a secondary leather strip along the buckle area for visual thickness and strength.
- Decorative Rivets: Brass or stainless rivets can both reinforce and elevate the style.
- Stitch Embossing: Hot stamping along seams conceals repairs and gives a professional, uniform look.
These refinements are standard in Szoneier’s OEM/ODM service, where custom reinforcements and styling are built into the design stage for long-term reliability.
Common Mistakes to Avoid
| Mistake | Why It’s Harmful | Correct Practice |
|---|---|---|
| Using cotton thread | Breaks easily under tension | Use waxed nylon or polyester |
| Punching new holes too close | Weakens leather fibers | Maintain 2.5 cm spacing |
| Overapplying glue | Causes stiffness and discoloration | Apply thin, even layer |
| Failing to back damaged holes | Stress concentrates again | Use reinforcement patches |
| Using colored wax before dyeing | Blocks absorption | Always refinish after stitching |
Patience and accuracy matter more than speed. Rushed repairs create weak points that reopen after a few wears.
OEM-Level Reinforcement Standards
In modern manufacturing, belt reinforcement is both an art and a science.
Factories like Szoneier Leather implement several techniques that significantly extend belt lifespan compared to conventional retail-grade production:
| Technique | Description | Advantage |
|---|---|---|
| Double Lock Stitching | Two lines of interlocked thread near buckle | Prevents unraveling under pull |
| Reinforced Hole Backing | Inner cowhide patch under punched area | Distributes buckle pressure evenly |
| Heat Edge Sealing | Controlled edge temperature sealing (80–90°C) | Prevents fraying and delamination |
| Precision Punching Machines | Laser-aligned hole punching | Perfectly even spacing and roundness |
| Tensile Testing (QC) | Pull test before shipment | Ensures stitching integrity |
How to Restore a Leather Belt
To restore a leather belt, clean it thoroughly, rehydrate the hide with conditioner, repair cracks or worn areas with filler, and re-dye for uniform color. Then, apply protective wax or sealer and buff to a polished finish. Restoration revives both appearance and strength, extending the belt’s life by years when done correctly. Always use pH-neutral cleaners, flexible adhesives, and professional-grade dyes for safe, lasting results.
Step 1: Cleaning and Preparation
Before restoration, the surface must be completely clean and free of residue, dirt, and wax. Without proper preparation, new dye or conditioner won’t absorb evenly.
Tools & Materials
- pH-neutral leather cleaner or saddle soap
- Soft microfiber cloths
- Small brush or sponge
- Distilled water
- Paper towels
Process
- Use a dry cloth to remove surface dust.
- Dampen another cloth with cleaner (1:10 dilution in distilled water).
- Wipe gently along the entire length of the belt, including the edges.
- Use a soft brush to remove dirt from creases or stitching lines.
- Wipe again with a damp cloth to remove any soap residue.
- Air-dry naturally for 4–6 hours — never in direct sunlight.
Step 2: Rehydrating and Conditioning the Leather
Restoring flexibility is crucial. Conditioning revives lost oils and prevents further cracking.
Materials
- Leather conditioner or balm (lanolin- or beeswax-based)
- Sponge or soft applicator
- Absorbent towel
Process
- Apply a small amount of conditioner on a clean sponge.
- Rub in circular motions to distribute evenly.
- Let it absorb for 15–30 minutes.
- Wipe off excess oil with a soft cloth.
- For very dry belts, repeat after several hours.
For deep restoration, warm the belt slightly (below 40°C) to open the pores — enhancing absorption.
Expert Tip:
Szoneier Leather uses a two-phase hydration system combining natural oils and synthetic emollients to restore both the surface gloss and internal fiber elasticity, ensuring belts retain their natural pull and flexibility even under repeated use.
Step 3: Repairing Surface Damage and Cracks
Surface cracks or abrasions need filling before dyeing. This step restores smoothness and integrity.
Tools & Materials
- Leather filler (acrylic or polymer-based)
- Palette knife or spatula
- Fine sandpaper (1000–1500 grit)
Process
- Apply filler thinly over cracks or worn areas using a knife or cotton swab.
- Smooth it in the direction of the grain.
- Let dry for 4–6 hours.
- Sand gently until the area feels even with surrounding leather.
Repeat for deep cracks, applying multiple thin layers instead of one thick coat.
Advanced Tip:
Polymer fillers with elastic flexibility mimic natural leather movement — ideal for restoring belts near buckle stress zones.
Szoneier Leather technicians test each repair area’s tensile flexibility after filling, ensuring restored areas bend evenly with the belt body without splitting.
Step 4: Restoring Color and Finish
After repair, restoring the belt’s color is what gives it life again. Choose between re-dyeing for uniform tone or re-polishing for surface gloss enhancement.
a. Re-Dyeing Process
| Dye Type | Characteristics | Best Use |
|---|---|---|
| Water-based dyes | Soft finish, eco-friendly, minimal odor | For subtle recoloring |
| Alcohol-based dyes | Deep penetration, vibrant tone | For full recoloring |
| Aniline dyes | Transparent color preserving natural grain | For luxury belts |
Process:
- Apply dye with a sponge or applicator pad in long, even strokes.
- Let dry 30–60 minutes between coats.
- Apply multiple thin layers for best results.
- Once color is consistent, apply a protective finisher or sealant.
b. Polishing and Glazing
To restore natural luster:
- Apply a thin coat of neutral leather cream or wax polish.
- Allow 15 minutes of absorption.
- Buff using a clean microfiber cloth or soft horsehair brush.
- For mirror-like shine, finish with a dry cloth at high speed (“dry buffing”).
Industrial Practice:
In Szoneier’s factory, belts are polished using rotary soft-wheel machines and coated with UV-resistant micro-wax to lock in color and prevent oxidation. The result — a long-lasting, even sheen that resists fading and humidity changes.
Step 5: Refinishing Belt Edges
Edges are the most exposed and need reinforcement to maintain durability.
Tools & Materials
- Edge beveler
- Edge paint or gum tragacanth
- Burnishing stick or wheel
- Fine sandpaper
Process
- Bevel rough edges using an edge tool.
- Apply edge paint evenly (2–3 layers recommended).
- Let each layer dry completely (20–30 minutes).
- Burnish using a wooden or canvas tool until smooth and glossy.
- Optionally, finish with a coat of beeswax for waterproofing.
Step 6: Protecting and Sealing the Restored Belt
After cleaning, conditioning, and finishing, sealing protects your restoration work from environmental damage.
Recommended Sealants
- Acrylic leather finisher: Semi-gloss protection with flexibility.
- Beeswax balm: Natural shine and mild water resistance.
- Nano protector spray: Invisible hydrophobic layer preventing stains.
Application
- Apply evenly using a sponge or soft brush.
- Let dry for at least 1 hour.
- Buff gently to remove haze and enhance sheen.
Tip: Always choose non-toxic, REACH-compliant coatings for belts intended for export or frequent skin contact.
Step 7: Final Inspection and Testing
Once restoration is complete, evaluate the results:
| Test | Purpose | Result Criteria |
|---|---|---|
| Flex Test | Ensure flexibility | No cracking or stiffness |
| Color Rub Test | Check dye stability | No transfer to cloth |
| Surface Feel | Verify smoothness | Even texture, no grain bumps |
| Visual Check | Ensure uniform finish | Consistent color, edge gloss |
A successfully restored belt should bend smoothly, feel supple, and show an even, natural sheen under light.
Step 8: Long-Term Maintenance After Restoration
Restoration is not a one-time process. With proper aftercare, your belt can remain pristine for years.
Routine Maintenance
- Condition every 3 months: Use beeswax or lanolin conditioner.
- Avoid water and heat: Both can undo your restoration.
- Store flat or loosely rolled: Prevent bending stress.
- Polish lightly every 1–2 months: Maintain shine and hydration.
- Wipe with dry cloth after use: Remove body oils and sweat.
Tip:
Szoneier Leather recommends including a maintenance card with every OEM leather belt — educating customers on conditioning frequency, storage, and care. This not only extends product life but also elevates brand reputation through post-sale experience.
Common Mistakes in Belt Restoration
| Mistake | Why It’s Harmful | Correct Approach |
|---|---|---|
| Using household cleaners | Strips oils, causes discoloration | Use pH-neutral leather cleaners |
| Over-conditioning | Makes leather sticky, weakens structure | Apply light, even coats |
| Dyeing dirty leather | Causes uneven color | Always clean and dry before dye |
| Using hair dryer to dry | Leads to cracking | Air-dry naturally |
| Skipping edge sealing | Allows moisture intrusion | Always seal with edge paint or wax |
How to Prevent Future Damage and Extend Belt Lifespan
Regular conditioning, proper storage, and avoiding environmental stress preserve the natural oils and flexibility of leather belts.
Conditioning and Storage Best Practices
Apply conditioner every 2–3 months and store belts flat or hung loosely. Roll only when necessary. Avoid humid or sunlit areas.
Avoiding Heat, Humidity, and Chemical Exposure
Never dry wet leather with a hairdryer. Sweat and humidity should be wiped off promptly to prevent mildew. Avoid contact with perfumes or alcohol-based sprays.
Rotating Belts and Proper Buckle Handling
Using multiple belts prevents overstrain on one piece. Always unbuckle carefully—pulling aggressively can stretch the leather around holes.
Protective Coatings and Leather Treatments
Use wax-based protectants to create a moisture-resistant surface. For professional products, hydrophobic nano coatings can be applied for long-term defense.
Conclusion
A leather belt is not just an accessory — it is a reflection of quality, taste, and the craftsmanship behind it. Over time, exposure to moisture, heat, and friction naturally affects even the best leathers. Yet unlike synthetic materials that deteriorate irreversibly, genuine leather can be restored, refined, and maintained through proper care and expert techniques.
Partner with Szoneier Leather
Whether you’re a designer seeking premium private-label production or a retailer aiming to restore existing inventory to showroom quality, Szoneier Leather delivers expert craftsmanship with scalable precision.
Our team of technicians, designers, and finishing experts ensures that every belt — repaired or newly made — reflects durability, refinement, and brand value.
Contact Szoneier Leather today to discuss your leather belt repair or OEM/ODM manufacturing needs.


