 Skip to content
Ever wondered what it takes to craft your own leather purse that looks straight off a boutique shelf? From selecting the perfect hide to mastering edge burnishing, making a leather purse is as much science as it is art. Whether you’re a DIY enthusiast, a budding leatherworker, or a brand seeking a reliable OEM/ODM partner, understanding each step ensures your final product is both beautiful and built to last.
To make a leather purse, gather quality hides (1.0–1.2 mm thickness), cutting tools, durable thread, and hardware like zippers and rivets. Draft a precise pattern, cut with sharp blades, stitch with saddle or machine methods, then edge-finish by sanding and burnishing. Finally, attach closures and apply a protective finish.
Imagine unveiling a bespoke leather purse you made—from the satisfying click of snaps to the smooth glide of zippers. One stitch at a time, you’re not just creating an accessory; you’re telling a story of craftsmanship, heritage, and personal flair. Ready to dive into every cut, stitch, and polish? Let’s get started!
What Materials and Tools Do You Need to Make a Leather Purse?
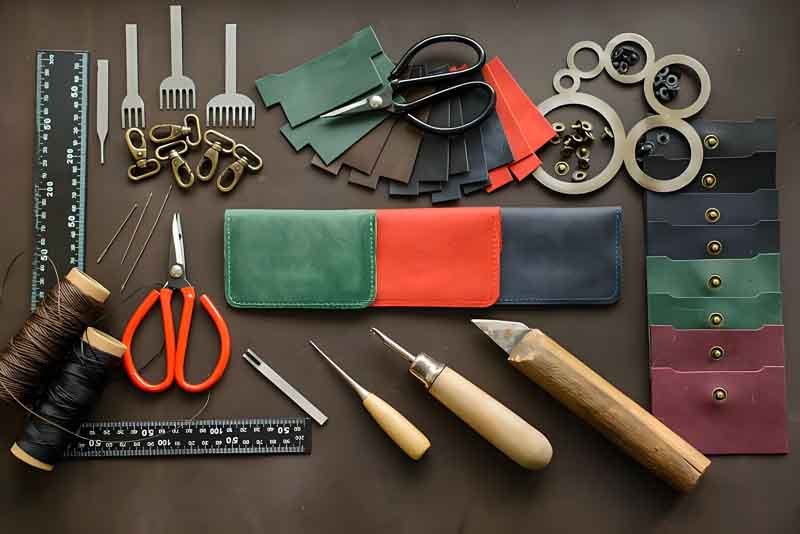
You’ll need quality cowhide or lambskin leather (1.0–1.2 mm for small purses), waxed polyester thread, stitching needles or a walking foot sewing machine, a precision rotary cutter, metal ruler, edge beveler, burnishing tool, snap setter, rivet press, and hardware (zippers, snaps, buckles). Optional supplies include leather conditioner, marking tools, and a cutting mat.
Crafting a leather purse begins with assembling the right materials and tools. Skimping here can lead to frustrating mistakes or a purse that wears out quickly. Let’s examine each component in detail:
1. Leather Hides & Characteristics
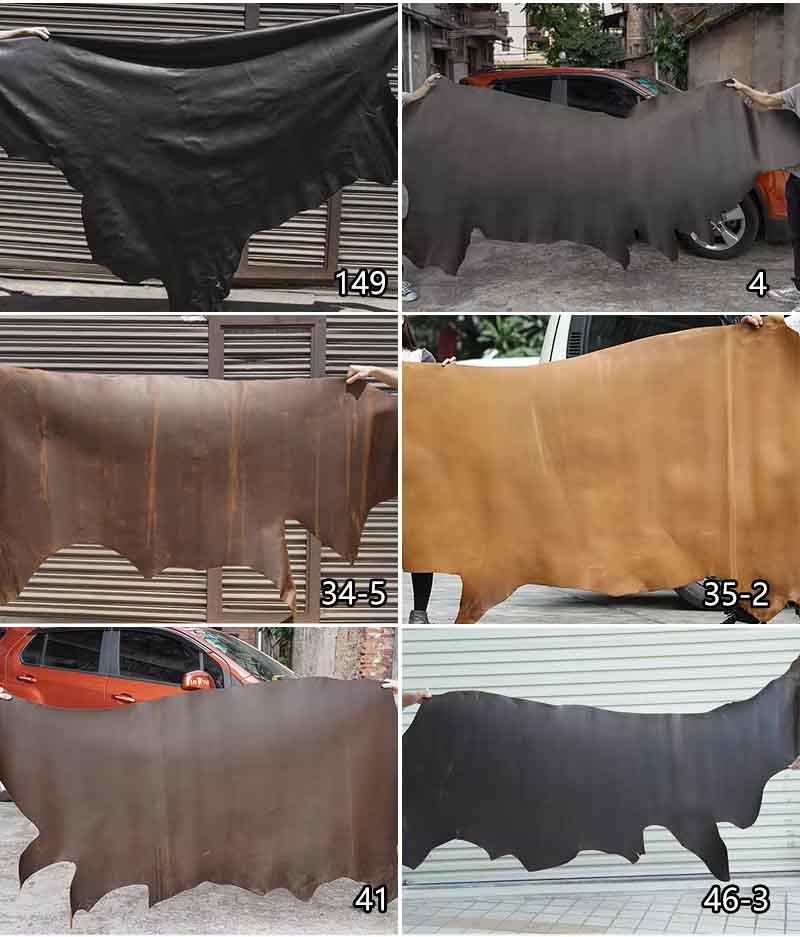
- Full-Grain vs Top-Grain: Full-grain leather preserves the natural surface and develops patina, ideal for long-lasting, elegant bags. Top-grain is sanded for uniform appearance and easier dye uptake, which appeals to brands seeking bold, consistent colors.
- Thickness Matters: For most purse bodies, 1.0–1.2 mm (2–3 oz) strikes the balance between structure and flexibility. Straps and reinforcing panels benefit from 1.4–1.6 mm (3–4 oz) to prevent stretching under load. Use a digital leather gauge or request thickness specs from your supplier.
2. Stitching Supplies
| Item | Purpose | Approx. Cost (USD) |
|---|---|---|
| Waxed Polyester Thread | Durable, water-resistant stitching | $8–$15 per spool |
| Glovers’ Needles (#2–#4) | Hand-saddle stitching | $5–$10 per pack |
| Leather Machine Needle | For walking-foot or cylinder machines | $3–$6 each |
- Hand vs Machine: Hand saddle stitching offers unmatched strength—if one stitch breaks, the rest hold. However, a leather-capable sewing machine speeds production and ensures uniformity, which matters for larger orders.
3. Cutting & Measuring
- Rotary Cutter + Mat: Ensures long, straight cuts on thick leather; replace blades often to avoid tearing edges.
- Utility Knife: Best for intricate curves. Keep multiple blades on hand.
- Metal Ruler & L-Square: Prevents wobble and guarantees right angles—critical for gussets and flap alignments.
- Templates/Patterns: Invest in acrylic or metal templates for repeated runs to maintain consistency across multiple bags.
4. Edge-Finishing & Burnishing
- Edge Beveler: Rounds sharp corners for a refined look and comfortable feel.
- Sanding Blocks (320–600 grit): Smooth out rough fibers before applying burnishing compound.
- Burnishing Slicker + Compound: Gum-tragacanth or beeswax slicked with firm pressure closes fibers into a glossy, water-resistant seal.
5. Hardware & Installation Tools
| Hardware Type | Recommended Brand | Tool Required |
|---|---|---|
| Zippers | YKK, RIRI | Zipper foot & tape clamp |
| Snaps/Rivets | Chicago Screws | Hand setter or arbor press |
| Buckles | Duraflex, Brass | Punch set & cap setter |
- Consistency is Key: Match finishes (antique brass, matte black, nickel) across all hardware. Test each snap/rivet on a leather scrap to confirm fit before installing on final pieces.
6. Optional Enhancements
- Leather Conditioners & Finishes: Neatsfoot oil or specialized creams hydrate hides and add water resistance—test on a scrap to check color change.
- Marking & Scribing Tools: Silver-point stylus or edge creasers help transfer patterns cleanly without permanent marks.
- Arbor Press: For high-volume production, a small press guarantees consistent pressure when setting rivets or snaps, reducing hand fatigue and errors.
By investing in quality materials and proper tools up front, you’ll save time, reduce frustration, and ensure your finished purse stands up to daily wear.
How Do You Choose the Right Leather Type and Thickness?
Select leather based on durability, feel, and appearance: full-grain for maximum strength and aging patina, top-grain for uniform color and softer hand, and lambskin for ultra-luxury but with more delicate care. Thickness is measured in ounces (1 oz ≈ 0.4 mm): 2–3 oz (0.8–1.2 mm) works for purse bodies, 3–4 oz (1.2–1.6 mm) for straps and reinforcement, and 4–5 oz (1.6–2.0 mm) for structured bases and heavy-duty panels.
Choosing the perfect leather type and thickness is one of the most critical decisions when crafting a purse that looks and performs like a luxury item. Let’s break down the key factors and considerations:
Leather Type Selection
Full-Grain Leather
- Pros: Retains natural surface grain, highest tensile strength (up to 75 MPa), and develops a rich patina over time. Ideal for customers who value longevity and character.
- Cons: Surface blemishes are visible, and price points are higher—best for premium, investment-grade lines that align with high-end brands.
Top-Grain Leather
- Pros: Sanded to remove imperfections, offers consistent dye absorption and smooth finish. Balances durability (≈ 65 MPa) with a refined look, appealing to brand clients seeking uniform colors.
- Cons: Slightly less robust than full-grain; patina development is more subtle.
Corrected-Grain & Split Leathers
- Pros: Economical, embossed to mimic grain. Enables colorful and textured finishes at lower cost.
- Cons: Susceptible to peeling and reduced lifespan. Use only for budget-friendly or fashion-forward collections.
Specialty & Exotic Leathers
- Examples: Ostrich (iconic quill pattern), alligator (luxury status), shark (abrasion resistance).
- Considerations: Require specialized tools and care, carry substantial markup—best for limited-edition or highly branded lines.
Determining Optimal Thickness
Leather thickness is crucial to balance structure with sewability. It’s expressed in ounces (oz) or millimeters (mm), where 1 oz ≈ 0.4 mm. Below is a recommended guideline for different purse components:
| Component | Thickness (oz) | Approx. Thickness (mm) | Purpose |
|---|---|---|---|
| Main Body Panel | 2–3 oz | 0.8–1.2 mm | Flexibility with shape retention |
| Straps & Handles | 3–4 oz | 1.2–1.6 mm | Prevents stretch and ensures comfort |
| Base & Structural Parts | 4–5 oz | 1.6–2.0 mm | Reinforces heavy-load stress points |
| Inner Lining (Optional) | 1–2 oz | 0.4–0.8 mm | Reduces bulk, adds slip resistance |
Why It Matters:
- Too Thin (< 2 oz): Lacks support—purse may sag or tear under weight.
- Too Thick (> 5 oz): Difficult to stitch, adds unnecessary bulk, and can strain hardware.
Matching Leather to Design & Use Case
Soft, Slouchy Styles:
- Use 2 oz lambskin or 2–3 oz full-grain for natural drape—appeals to fashion-forward customers who prioritize feel.
Structured Totes & Satchels:
- Opt for 3–4 oz top-grain or full-grain to maintain clean lines and durability under daily load.
Mini Clutches & Evening Bags:
- 1.5–2 oz top-grain or exotic leather offers slim profiles and premium aesthetics without overly stiff structure.
Szoneier’s OEM/ODM Advantage
At Szoneier Leather, we guide clients through material selection—leveraging our in-house R&D and extensive raw material supply chain. Whether you need eco-friendly, vegetable-tanned hides or high-consistency chrome-tanned top-grain, we calibrate thickness and finish to your exact specification, ensuring your leather purse line meets both your brand standards and end-user expectations.
What Pattern and Purse Design Should You Draft?
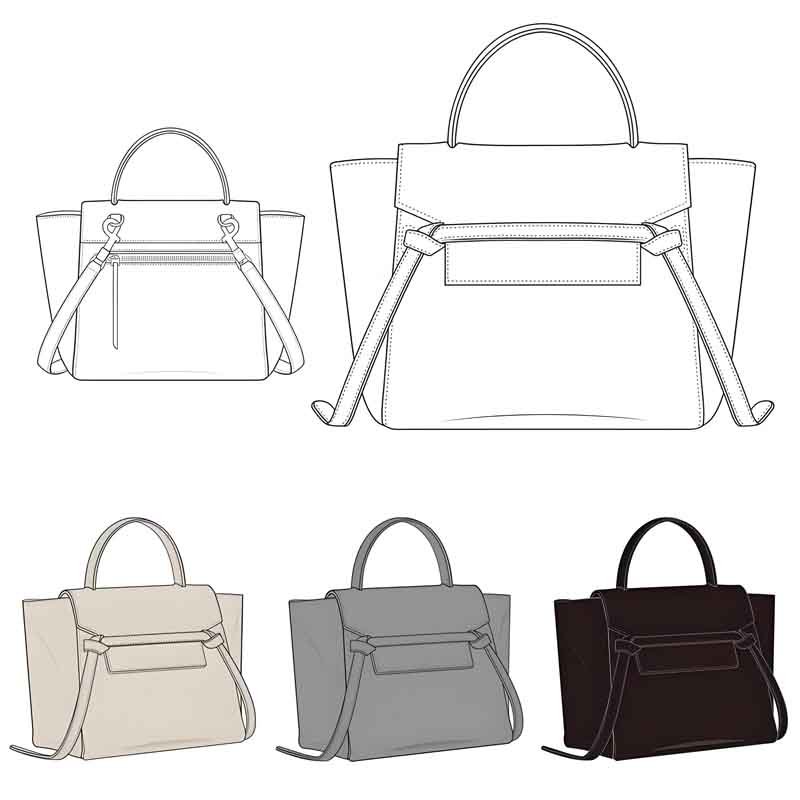
Start by sketching your purse style—tote, crossbody, clutch—then create a paper or cardstock pattern including all panels, flaps, pockets, and strap placements. Add 5 mm seam allowance and test-fit a muslin or cheap fabric mockup. Confirm dimensions against intended contents (wallet, phone) to ensure practicality before cutting into leather.
Drafting a precise pattern is the blueprint for a successful leather purse. A thoughtful pattern balances aesthetics, functionality, and efficient material use. Here’s how to develop and refine your purse design:
- Define Your Purse Style and Function
- Tote Bags: Large open compartment, sturdy handles. Ideal for shopping or work—draft simple rectangular panels with a reinforcement strip at the top edge.
- Crossbody Bags: Smaller body, long adjustable strap, often with a flap or zip closure. Plan for extras like phone or card pockets.
- Clutches and Wristlets: Compact, handheld, require precise dimensions to accommodate essentials. Include internal card slots directly on the pattern.
- Satchels or Structured Purses: Boxy shape, top handles, and optional shoulder straps. Incorporate gusset measurements carefully so the purse maintains its shape when empty or full.
- Establish Core Dimensions
- Measure typical contents: smartphone (e.g., 75 × 150 mm), wallet (100 × 120 mm), keys, cosmetics. Add at least 20 mm clearance around these items.
- Sketch rough proportions: a medium crossbody might be 220 × 150 × 60 mm; a tote 350 × 300 × 120 mm. Adjust height, width, and depth to suit user needs and style.
- Drafting the Initial Pattern
- Materials: Use stiff paper or lightweight cardstock so patterns hold shape during fitting.
- Panels: Draw each piece with labels for “Front,” “Back,” “Gusset,” “Flap,” and any pocket panels. Always indicate grainline arrows to ensure leather strength and correct drape.
- Seam Allowance: Add 5–7 mm around all pattern edges. Increase allowance to 10 mm where decorative topstitching is planned.
- Mockup for Fit and Ergonomics
- Create a quick mockup in canvas, cotton, or inexpensive upholstery vinyl.
- Assemble with basic stitching or fabric glue to check how pieces align, how the purse holds shape, and whether pockets sit at accessible heights.
- Test strap length and handle placement by wearing the mockup—this helps avoid unexpected discomfort in leather form.
- Refining and Scaling the Pattern
- Adjust panel dimensions based on mockup feedback: maybe the gusset is too narrow or the flap doesn’t cover the opening fully.
- For multiple sizes (small, medium, large), use digital tools like Adobe Illustrator or CAD-based pattern software. Digitally scaling ensures proportional accuracy across all sizes without manual redrafting.
- Optimizing Material Usage
- Nest pattern pieces when laying out on leather hides to minimize waste.
- Group small components (pocket panels, tabs) in tight clusters.
- Keep track of directional patterns on embossed or printed leathers to maintain a consistent look.
How Do You Cut and Prepare Leather Pieces Accurately?
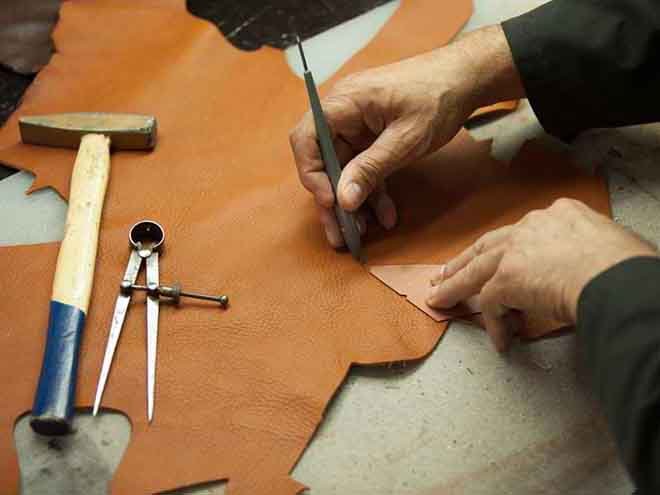
To cut and prepare leather pieces accurately, lay your hide flat on a self-healing mat, align each paper pattern with the grain direction, and secure with pattern weights. Use a sharp rotary cutter or fresh utility-knife blade guided by a straightedge for long cuts and a swivel knife for curves. After cutting, bevel edges, sand with fine-grit blocks, and lightly condition each piece to reduce stretch. Finally, label and flatten parts under weight to ensure perfect alignment during stitching.
Precision in cutting and preparing leather not only preserves material but also sets the stage for seamless assembly and professional finish. Below are key steps, tools, and best practices to achieve consistent, accurate results:
Setting Up an Optimal Workspace
A clean, stable surface is essential. Use a heavy-duty self-healing cutting mat to protect your blades and workbench. Ensure bright, even lighting so you can clearly see the hide’s grain, natural markings, and any imperfections that could affect your pattern layout. Keep stray debris and dust at bay—particles can scratch leather or interfere with cutting precision.
Grain Alignment and Pattern Layout
Leather has a distinct grain direction, which influences both strength and appearance. Run your finger along the hide to feel the grain—pattern pieces must align parallel to this direction to prevent distortion or stretch under load. Place larger panels (front, back, gusset) first, nesting smaller components (pocket linings, tabs) in remaining spaces to minimize waste. For embossed or printed leathers, ensure motifs align consistently across panels.
Cutting Techniques and Tools
- Rotary Cutter & Straightedge: Ideal for long, straight edges. Hold a metal ruler firmly against the leather and glide the rotary cutter along its edge, replacing blades frequently to avoid ragged cuts.
- Utility Knife: Better for tight curves and detailed shapes. Change blades often; a dull blade tears fibers, creating uneven edges.
- Swivel Knife: For complex curves or decorative cuts—allows controlled, smooth curves without jagged edges.
Always cut through the leather in a single, confident pass when possible. Multiple light passes can lead to unevenness. Test on scrap leather to dial in your cutting technique before working on final pieces.
Edge Beveling and Sanding
Once panels are cut, trim seam allowance to within 2–3 mm of the stitch line using fine curved scissors or nibbling shears. Then, use an edge beveler at a 45° angle to round all corners and sharp edges. Follow with sanding blocks—begin with 320-grit to knock down any rough fibers, progressing to 600-grit for a silky-smooth finish.
Conditioning and Flattening
Leather can warp or curl once cut. Lightly apply a leather conditioner or de-skiving solution to each piece’s flesh side to restore moisture balance and flexibility. Lay pieces between clean boards or under heavy books overnight to flatten completely. This step ensures accurate alignment when you later glue and stitch panels together.
Quality Control and Labeling
Before assembly, verify each cut piece against your paper pattern: measure height, width, and allowance tolerances (±1 mm). Use masking tape or chalk to label each part (e.g., “Front Panel,” “Strap Tab”) and mark stitch lines or hardware positions. This systematic approach prevents mix-ups during complex builds and maintains a smooth production flow—whether you’re crafting a single bespoke purse or scaling up with Szoneier’s OEM/ODM services.
Which Stitching Techniques Are Best for Leather Purses?
Saddle stitching by hand uses two needles for a durable, self-locking stitch ideal for high-stress areas. Machine stitching with a walking foot or cylinder arm offers speed and consistency. Use stitch length of 6–8 SPI (stitches per inch) and polyester or nylon thread. For decorative topstitching, increase spacing to 4 SPI and consider contrasting thread colors.
1. Hand Saddle Stitching
Process & Tools:
- Employ two glovers’ needles and a waxed polyester or nylon thread.
- Use a pricking iron (diamond chisel) to pre-mark evenly spaced holes, typically 6–8 SPI.
- Push one needle from each side; as you pull taut, the crossed threads lock in each hole.
Advantages:
- Strength: If a single stitch fails, the rest remain intact.
- Repairability: Individual stitches can be re-sewn.
- Artisanal Appeal: Visible, slightly raised thread line adds handcrafted character.
Considerations:
- Time-consuming: A small clutch can take 30–45 minutes of stitching.
- Slight variations in tension yield a more organic look.
2. Machine Stitching
Equipment & Settings:
- Use a walking-foot or cylinder-arm machine with leather-capable needles (#90/14 or #100/16).
- Polyester upholstery thread (#207) or bonded nylon offers consistent thickness.
- Adjust tension carefully: too tight skews leather; too loose creates loops.
Advantages:
- Speed: A full tote body can be stitched in minutes.
- Uniformity: Even stitch length and tension across long seams.
Considerations:
- Permanent Holes: Mistakes are harder to correct since holes cannot close.
- Equipment Cost: Industrial machines represent a significant investment.
3. Stitch Length & Reinforcement
| Seam Type | SPI (Stitches/Inch) | Purpose |
|---|---|---|
| Structural Seams | 6–8 | Strength under load |
| Decorative Topstitch | 4–5 | Emphasize thread, accent design |
| Reinforced Points | — | Bar tacks or triangular stitching |
- Backstitching: Lock the start and end of seams by stitching back 3–4 stitches.
- Bar Tacks: Create small, dense stitches at strap bases and zipper ends for extra security.
4. Hybrid Approaches
Many small brands combine both methods: machine-stitch main seams for efficiency, then saddle-stitch high-stress or visible areas (handles, strap anchors) by hand. This balances production speed with artisanal quality.
5. Thread Selection & Color
- Material: Polyester thread resists UV and mildew; nylon offers slightly higher tensile strength.
- Weight: Size #532 (0.6 mm) is a workhorse for most purse seams; #207 (0.8 mm) suits heavier hides and accent stitching.
- Aesthetics: Contrast stitching (e.g., natural thread on black leather) highlights seam lines, while tone-on-tone creates a subtle luxury feel.
6. Best Practices
- Test First: Always sew on leather scraps to dial in tension, stitch length, and thread choice.
- Maintain Equipment: Clean and oil your machine regularly; sharpen awls and replace needles often to prevent skipped stitches.
- Consistent Pressure: For burnishing after stitching, keep edges clean and straight to showcase precise seam work.
How Do You Edge-Finish and Burnish Leather Seam Lines?
After stitching, trim seam allowances to about 2–3 mm from the stitch line. Use an edge beveler to round corners, then sand with 320–600 grit blocks until smooth. Apply a thin layer of gum tragacanth or beeswax and rub edges with a wooden or canvas burnishing slicker until fibers fuse into a glossy, sealed finish. For extra protection and color consistency, finish with two coats of water-based edge paint, sanding lightly between applications.
Edge finishing and burnishing are the final touches that transform a hand-stitched purse from functional to truly refined. Done correctly, these steps seal exposed fibers, protect against moisture, and deliver that signature “shop-bought” shine. Below is a step-by-step breakdown, complete with critical dos and don’ts.
1. Trim and Bevel Edges
- Trim Seam Allowance: Use curved end cutters or fine scissors to reduce the raw edge to within 2–3 mm of your stitch line. This minimizes bulk and prevents uneven edge buildup.
- Bevel Corners: At every corner or flap edge, run an edge beveler along the cut edge at a 45° angle to remove that sharp lip. Be conservative—multiple light passes preserve thickness.
2. Sanding for Smoothness
- Progressive Grits: Start with a 320-grit sanding block to knock down any high spots or rough fibers. Follow with 400- and then 600-grit for a silky finish.
- Cloth Buffing: After sanding, wipe edges with a clean microfiber cloth to remove dust before applying any compound.
3. Applying Burnishing Compound
- Gum Tragacanth vs. Beeswax:
- Gum Tragacanth swells and glues fibers tightly; preferred for a glass-like sheen.
- Beeswax provides water resistance and a softer luster—best for vintage or matte styles.
- Application: Use a small brush or cloth to apply a thin, even coat to the flesh side of the edge. Avoid over-wetting; too much moisture warps the edge.
4. The Burnishing Process
- Tools: Wooden slicker, canvas paddle, or a rounded bone folder all work.
- Technique: Holding the tool at a slight upward angle, rub back and forth with firm, consistent pressure. Increase speed gently—heat from friction helps fibers close together. Burnish each edge for 1–2 minutes or until it gleams.
5. Edge Painting (Optional)
- Why Paint?: Edge paint hides any remaining imperfections, adds a pop of color, and seals against moisture.
- Method: Using a fine brush or edge-painting wheel, apply the first thin coat, let dry, then sand very lightly with 600-grit. Repeat for a total of two to three coats, always sanding between layers for uniform thickness.
What Hardware and Closures Should You Select?
Picking the right hardware—zippers, snaps, buckles, and rivets—is crucial for function and style. Choose YKK or Riri zippers for smooth action, stainless steel or brass snaps for corrosion resistance, and Duraflex or brass roller buckles for adjustable straps. Match finish (antique brass, matte black, polished nickel) to your leather’s tone. Use precise punches and an arbor press or hand setters to install hardware cleanly and securely.
Selecting high-quality hardware not only ensures your purse operates flawlessly day after day but also elevates its overall appearance and perceived value. Let’s break down the most common components, the criteria to consider, and practical installation tips.
1. Zippers: Reliability Meets Aesthetics
Types:
- Coil (Nylon) Zippers: Flexible and lightweight, perfect for curved openings and concealed pockets.
- Vislon (Plastic) Zippers: More rigid, excellent for outer compartments—often water-resistant.
- Metal Zippers: Premium feel and look; ideal for statement clutches or high-end totes.
Brands: YKK and Riri dominate the market for their tight tolerances and smooth sliders.
Installation Tips:
- Baste zipper tape to leather with temporary adhesive or stitching to prevent shifting.
- Use a zipper foot and tape clamp to maintain even distance from edge.
- Always test the zipper action before final topstitching.
2. Snaps & Rivets: Strength at Stress Points
| Component | Recommended Brand | Use Case | Installation Tool |
|---|---|---|---|
| Snaps | Chicago Screws | Flap closures, interchangeable | Hand setter or press |
| Rivets | Solid Brass | Strap anchors, handle mounts | Arbor press + dies |
| Grommets | Stainless Steel | Decorative holes, strap ends | Grommet pliers or press |
- Material Considerations: Brass and stainless steel resist rust and look great against leather. Black oxide snaps blend into dark hides.
- Installation: Always punch pilot holes slightly smaller than hardware shank. For production work, an arbor press ensures even pressure and perfect alignment.
3. Buckles & Adjusters: Functionality and Style
- Strap Buckles: Duraflex buckles provide lightweight durability for adjustable shoulder straps. Brass roller buckles add a luxury touch to hand straps.
- Tri-Glides & Sliders: Choose matching finish to buckle; they allow fine strap length adjustments.
- Swivel Hooks & D-Rings: Useful for detachable straps—opt for spring-loaded, heavy-duty hooks to prevent accidental release.
4. Custom Branding & Finishing Touches
- Logo Plates: Brass or stainless steel plates can be engraved or etched with your brand name—adds a polished, professional touch.
- Zipper Pull Charms: Custom leather tassels or metal pulls reinforce brand identity.
- Finishes: Coordinate hardware plating (antique brass, polished nickel, matte black) to complement leather color and overall design theme.
5. Szoneier’s OEM/ODM Advantage
At Szoneier Leather, we source a broad range of hardware to match your design vision and budget. Our in-house tooling, including arbor presses and hydraulic setters, ensures every snap, rivet, and zipper is fitted with precision. During prototyping, we provide hardware samples so you can test function and aesthetics before mass production.
By carefully selecting, testing, and installing each piece of hardware, you transform a simple leather purse into a reliable, stylish accessory that delights customers and stands up to daily use.
How Do You Assemble, Stitch, and Finalize Your Leather Purse?
Begin by gluing panels at seam lines to stabilize before stitching. Stitch seams with chosen method, then trim and finish edges. Install hardware—zippers first, then snaps/rivets. Attach straps, then apply leather conditioner and buff. Conduct final quality checks for smooth operation and even stitching.
- Panel Preparation & Adhesive Basting Before the first stitch, ensure all cut and beveled pieces are perfectly aligned. Lightly coat mating surfaces with a thin layer of contact cement, allowing the adhesive to become tacky (approximately 5–10 minutes). Press panels together—front to gusset, back to gusset, pocket to body—using binder clips or specialized masking tape. This “basting” step prevents shifting under needle or machine foot, reducing puckers and uneven seams. Properly aligned and glued panels set the stage for precision stitching, especially on multi-layer assemblies like lined pockets or flange seams.
- Stitching Sequence & Techniques
- Zipper & Pocket Installation: Always stitch zippers and internal pockets before closing the main body. Baste zipper tape into place, then sew with a zipper foot, maintaining a consistent 4–5 mm distance from the edge. For hidden pockets, stitch along pre-creased lines for a flush finish.
- Main Body Seams: Choose your method—hand saddle stitch for artisanal strength or walking-foot machine stitching for speed. Begin at one side of the base gusset, stitching around the perimeter in a continuous loop. Maintain 6–8 stitches per inch and lock termini with backstitching. If using a machine, reduce tension to prevent perforating the leather; if hand stitching, pull each stitch taut to sink threads into the grain side.
- Handle & Strap Attachment: Affix handle bases or strap tabs next. Pre-drill or punch holes for consistent rivet or screw placement. Reinforce with leather washers on the reverse to distribute load and prevent pull-through.
- Edge Finishing Post-Stitch Once stitching is complete, trim seam allowances to 2–3 mm from the stitch line using curved shears. Re-bevel any edges that gained bulk during sewing. Lightly sand edges with 400–600 grit blocks, then apply burnishing compound and finish burnishing to restore a polished profile. This step is critical for concealing raw fibers exposed by seam allowances and for achieving a professional look.
- Hardware Setting & Detailing Install decorative and functional hardware after edge work. Use an arbor press or hand setter for snaps, rivets, and grommets—ensure dies are correctly sized to avoid deforming leather. Check zipper stops and sliders operate smoothly. For adjustable buckles, thread straps carefully and test locking mechanisms under tension. Properly set hardware withstands repeated use without loosening or scratching adjacent leather.
- Conditioning, Buffing & Quality Control
- Surface Conditioning: Apply a thin coat of leather conditioner or neutral balm to protect and soften the hide. Avoid over-saturating; use a lint-free cloth to work product into the surface evenly.
- Buffing: After conditioning, buff the purse with a clean microfiber cloth to achieve the desired sheen—matte, semi-gloss, or high gloss.
- Final Inspection: Evaluate every seam for skipped stitches or loose threads; verify that zippered openings glide freely and closures snap securely. Measure the finished dimensions against your original pattern tolerances (±2 mm). Conduct a load test by filling the purse with typical items to ensure straps, handles, and seams hold under weight.
What Common Pitfalls Arise and How Do You Avoid Them?
Common mistakes include misaligned grain direction, uneven stitch spacing, over-beveling edges, and improper hardware fitting. Avoid these by double-checking pattern grain arrows, using pricking irons or templates for consistent stitch holes, making light, multiple passes with a beveler, and testing snaps or rivets on scrap leather first. Maintaining sharp tools and following a disciplined, step-by-step workflow prevents costly errors and ensures your finished purse meets both aesthetic and functional standards.
Leather purse making involves many precise steps—any misstep can compromise the final product’s look, durability, or usability. Here are the most frequent pitfalls and best practices to sidestep them:
- Grain Direction Errors
- Pitfall: Cutting panels without regard to leather grain can lead to uneven stretch, warping, or weak seams under load.
- Solution: Always run your finger along the hide to feel the grain, then align paper pattern arrows parallel to that direction. Mark grain lines clearly on every pattern piece to avoid confusion when laying out multiple panels.
- Inconsistent Stitch Spacing & Tension
- Pitfall: Varying stitch length or uneven tension results in puckering, skipped stitches, and an amateurish look.
- Solution: Use a pricking iron or diamond chisel to pre-mark holes at your chosen SPI (stitches per inch). For hand work, maintain consistent pull strength on each stitch; for machine sewing, test settings on scrap leather and adjust motor speed and thread tension until stitches lie flat without pulling.
- Over-Beveling and Edge Thinning
- Pitfall: Excessively beveling edges in one pass can remove too much material, weakening edges and creating uneven profiles.
- Solution: Bevel incrementally—take multiple light passes, checking thickness with a gauge. Keep an un-beveled sample edge nearby to compare and ensure uniformity across all panels.
- Incorrect Hardware Sizing & Placement
- Pitfall: Using the wrong-sized snap, rivet, or grommet can lead to loose fittings, leather tearing, or misaligned closures.
- Solution: Always test hardware on a scrap piece of the same leather thickness. Use precise punches sized 0.5 mm smaller than the shank diameter, and employ an arbor press with appropriate dies for even pressure. Lay out and mark hardware positions on masked pattern underlays to verify alignment before committing to the final piece.
- Skipping Mockups and Fit Tests
- Pitfall: Cutting leather and stitching without a fabric prototype often uncovers ergonomic flaws—flaps that don’t fully cover, straps too short, or pockets too shallow—only after irreversible leather cutting.
- Solution: Draft patterns on cardstock, then assemble a quick mockup in canvas. Wear or load-test the mockup to confirm dimensions, functionality, and comfort. Iterate your paper pattern until the fit is flawless before touching leather.
- Poor Tool Maintenance
- Pitfall: Dull blades tear fibers, misaligned rotary cutters yield wavy cuts, and dirty sewing machines skip stitches.
- Solution: Replace cutting blades regularly, clean and oil machines according to manufacturer recommendations, and sharpen hand tools (edge bevelers, punches) frequently. A well-maintained toolkit reduces frustration and elevates precision.
How To Properly Care and Maintain Your Leather Purse?
To keep your leather purse looking its best, clean it monthly with a soft, damp cloth; condition every 3–6 months using a pH-balanced leather conditioner; protect from rain and direct sunlight; store in a dust bag when not in use; and address stains immediately by blotting (never rubbing). Regular light maintenance prevents cracks, preserves color, and extends lifespan.
Leather is a natural material that responds to light, moisture, and oils. With proper care, your purse will develop a beautiful patina and serve you for years. Below, we’ll walk through a straightforward maintenance routine, troubleshooting tips, and product recommendations to keep your leather purse in prime condition.
1. Routine Cleaning
- Frequency: Once a month for regular use; more often in dusty or humid environments.
- Method:
- Wipe the surface with a soft microfiber or cotton cloth lightly dampened with distilled water.
- Gently remove surface dust and dirt, paying attention to seams, folds, and hardware areas.
- For deeper cleaning, use a mild leather soap (saddle soap or dedicated cleaner) applied with a damp sponge, then wipe off residue and allow to air dry away from heat.
2. Conditioning & Hydration
Leather fibers can dry out and crack if untreated. Conditioning replenishes natural oils, keeping leather supple and vibrant.
| Task | Recommended Product Type | Interval |
|---|---|---|
| Light Conditioning | pH-balanced leather conditioner | Every 3 months |
| Deep Nourishing | Neatsfoot or mink oil-based balm | Every 6 months |
| Water & Stain Protection | Silicone- or fluorocarbon-free DWR spray | Annually |
Application Tips:
- Test any conditioner on a hidden spot first to check for color change.
- Use a small amount—rub in thin, even layers with a lint-free cloth.
- Buff off excess to avoid sticky residue.
3. Protection from Elements
- Water: Although many leathers are somewhat water resistant, prolonged exposure causes dark spots and stiffness. In light rain, wipe dry immediately; for heavy exposure, invest in an eco-friendly DWR (durable water repellent) spray.
- Sunlight: Direct sun fades dyes and overheats the hide, leading to brittleness. Store your purse in a shaded area or dust bag when not in use.
- Heat & Humidity: Avoid leaving your purse in hot cars or damp basements; extreme temperatures warp leather and damage adhesives.
4. Stain & Spill Management
- Oil or Makeup: Blot immediately with a clean, dry cloth; sprinkle cornstarch on any grease spot for 24 hours, then brush off gently.
- Ink: Use a specialized ink-removal pen or take to a professional—DIY ink removers often worsen the mark.
- Mold or Mildew: Wipe with a cloth dampened in equal parts water and rubbing alcohol, then air dry fully; follow up with conditioner.
5. Proper Storage
- Dust Bag or Pillowcase: Keeps dust off while allowing leather to breathe.
- Shape Maintenance: Stuff your purse with acid-free tissue or unprinted paper to prevent collapsed sides and wrinkling.
- Hardware Protection: Close zippers and snaps to reduce stress on teeth and snaps during storage.
Conclusion
Crafting a leather purse from scratch is a rewarding journey that blends creativity, precision, and hands-on skill. From selecting premium hides and drafting meticulous patterns to mastering saddle stitch and burnishing edges, each step shapes not just a product but a testament to craftsmanship. Whether you’re making a one-off DIY piece or launching a custom line for your brand, understanding these foundations is key.
Ready to elevate your leather goods? Reach out to Szoneier Leather for free design consultation, low MOQ customization, rapid sampling, and 100% quality assurance. Let’s create leather purses that stand the test of time—and turn your ideas into polished reality.


