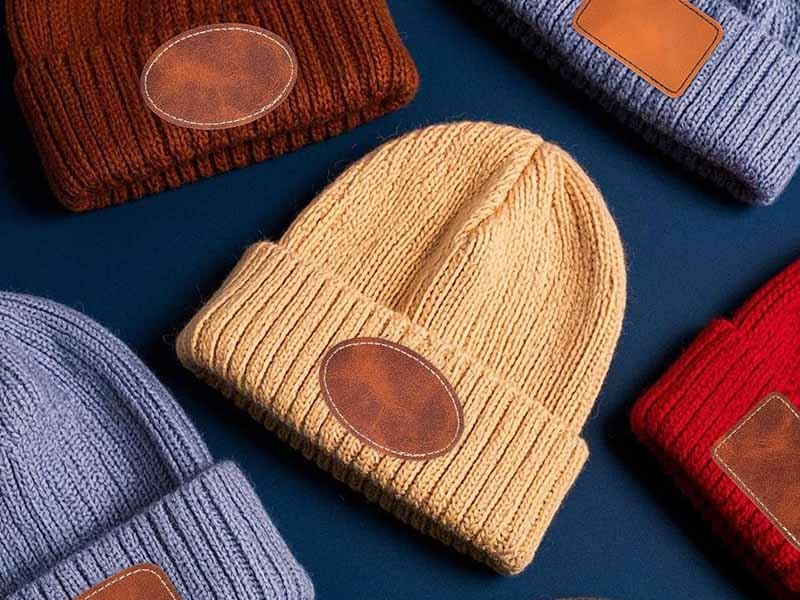
Leather patches on hats have become a hallmark of high-quality branding, making their way onto everything from streetwear to custom caps. However, placing a leather patch on a curved surface, like the crown of a hat, involves a lot more than simply sticking the leather to the fabric. Many brands have experienced the frustration of seeing their perfectly applied leather patches wrinkle, lift, or distort as the hat is worn. These issues arise because hats are not flat—they are three-dimensional structures that stretch, bend, and move with the wearer.
The success of a leather patch on a hat depends on three key elements: its ability to follow the curve of the hat, the stitching design that secures the patch without causing puckering, and the adhesive or bonding method that keeps the patch attached over time. Brands that understand these engineering challenges can avoid the common issues of lifting corners and wrinkling, creating a product that not only looks professional but also withstands daily use.
In this article, we’ll break down these crucial components of leather patch engineering for hats and explore the best methods to ensure a high-quality, durable result. If you’re a brand looking to incorporate leather patches into your custom hats, read on to learn how the right materials and design choices can make all the difference in the final product’s success.
What makes hat patches difficult compared to flat patches?
While flat patches can be attached to almost any surface with little concern for how they fit, hat patches are different. The curvature of the crown means that leather must be able to bend without losing its shape, texture, or adhesive bond. In addition to curvature, hats have seams, flexible panels, and tension from wear and movement, all of which can affect how the patch behaves over time.
What does hat curvature change in patch behavior?
The most significant challenge in using leather patches on hats is the curvature of the hat crown. Leather, like any material, is naturally stiff, so applying it to a curved surface requires it to bend. If the leather is too thick or too rigid, it will resist the curve and may create wrinkles, creases, or lifting at the edges.
This is why the thickness and type of leather used are crucial. Thin leather or PU (polyurethane) leather typically performs better on curved surfaces due to its flexibility. On the other hand, thicker leather might be more durable but can lose shape more easily when bent.
Leather thickness vs curvature performance
| Leather Type | Flexibility | Wrinkle Risk | Durability | Best Use Case |
|---|---|---|---|---|
| Thick Vegetable-Tanned | Low | High | Very High | Flat patches, rigid designs |
| Chrome-Tanned (Medium) | Medium | Medium | High | Standard caps with slight curvature |
| PU Leather (Thin) | High | Very Low | Medium | Curved caps, soft designs |
As shown in the table, thin PU leather performs best for curved patches, offering the highest flexibility with the least amount of risk for wrinkles or edge lifting.
How do crown panels and seams affect placement?
Hat crowns are not flat panels—they are made from multiple curved panels stitched together. When a patch crosses a seam, the stitching creates uneven pressure, leading to potential distortion.
To avoid this, patches are often placed between seams or in the mid-panels where the material is more stable. This helps avoid the uneven tension caused by panel seams that can cause lifting or warping of the patch.
| Placement Area | Risk of Distortion | Optimal Placement |
|---|---|---|
| Across a seam | High | Avoid if possible |
| Mid-panel (flat area) | Low | Ideal for most designs |
Which patch sizes distort most on curved hats?
While larger patches can be visually striking, they often don’t adapt well to curved surfaces. Larger patches tend to increase the likelihood of distortion at the edges, especially when applied to curved panels. Smaller patches, however, maintain better shape and are less likely to warp.
Patch size vs distortion tendency
| Patch Size | Curvature Fit | Distortion Risk | Common Use |
|---|---|---|---|
| Small (< 4 cm) | Excellent | Low | Custom logos, small patches |
| Medium (4-6 cm) | Very Good | Medium | Standard logo patches |
| Large (> 7 cm) | Limited | High | Bold logos, branding |
Smaller patches (4–6 cm) fit best on curved hats, as they are less prone to shifting or warping over time.
Which leather patch materials hold shape on curved hats?
When designing leather patches for hats, the material you choose is just as important as the patch’s size and placement. Certain leather materials perform better than others in terms of bendability and long-term adhesion.
Which leather thickness bends without wrinkling?
As we discussed, leather thickness directly affects the curvature performance of the patch. Thin leather (around 0.6–0.9 mm) bends easily around curves without losing its shape, while thicker leather (1.2 mm and above) offers better durability but is less flexible, which can lead to wrinkles or distortion on curved surfaces.
For best results on curved hats, leather should be thick enough to maintain strength but thin enough to bend easily.
Leather thickness and bending characteristics
| Leather Thickness | Bending Ability | Durability | Best Use Case |
|---|---|---|---|
| 0.6–0.9 mm (Thin) | High | Medium | Curved hats, flexible designs |
| 1.0–1.2 mm (Medium) | Moderate | High | Standard applications, mixed use |
| 1.2+ mm (Thick) | Low | Very High | Flat patches, high-durability items |
The 0.6–0.9 mm range is ideal for flexible and lightweight hats, offering a balance between bendability and durability.
What backing materials prevent bubbling or lifting?
The backing material is a key element in ensuring the leather patch adheres correctly without bubbling or peeling. Different backings offer varying levels of support for bending, adhesion, and durability.
Common backing materials include:
- Non-woven fabric: Lightweight and flexible, but may lack the strength to support heavy patches.
- Heat-activated adhesive film: Provides strong adhesion but requires precise heat control to prevent overheating or underheating.
- Foam: Offers a raised, 3D effect, but can increase the overall thickness of the patch, which may not be ideal for certain hats.
| Backing Type | Flexibility | Adhesion Strength | Durability | Best Use Case |
|---|---|---|---|---|
| Non-woven fabric | High | Medium | Medium | Lightweight applications |
| Heat-activated film | Medium | High | High | Strong adhesion for durability |
| Foam backing | Low | Medium | Medium | Raised 3D patches, aesthetic |
For most hat applications, heat-activated adhesive is the most reliable choice, offering strong, durable adhesion with minimal risk of lifting or bubbling.
Are PU leather patches easier to curve than real leather?
PU leather, or polyurethane leather, is often more flexible than real leather and can be easier to apply on curved surfaces. It is particularly useful for cost-effective production while still maintaining a premium appearance. However, PU leather may not have the same long-lasting durability as natural leather, particularly in extreme weather conditions.
Real leather, while less flexible, offers higher resilience and a luxury feel. For brands prioritizing premium quality and long-term durability, real leather patches are a better option, although they might require more careful planning when used on curved surfaces.
PU leather vs real leather for curved hats
| Leather Type | Flexibility | Durability | Cost | Best Use Case |
|---|---|---|---|---|
| PU Leather | High | Medium | Low | Budget-friendly patches |
| Real Leather | Medium | High | High | Premium quality, long-term use |
For custom designs requiring flexible and visually sharp patches, PU leather is ideal, but for luxury applications with a focus on quality and long-term strength, real leather is the best choice.
How should stitch lines be designed for clean edges on curved hats?
Stitching is more than decoration.
On a curved hat surface, the stitch line acts as a structural anchor that prevents edge lifting, controls leather tension, and maintains patch shape during movement, heat, and washing.
A well-engineered stitch line distributes force evenly around the patch perimeter.
Poor stitching concentrates stress at corners or along seams, which often leads to puckering, edge curl, or thread breakage after repeated wear.
For most hat programs, the most reliable stitch strategy balances:
- correct stitch distance from the edge
- stable stitch type matched to curvature
- controlled thread tension during sewing
These details are small in appearance but critical for long-term quality.
What stitch distance prevents edge lifting?
The distance between the stitch line and the leather edge determines how well the patch edge stays flat.
If stitching is too close to the edge, leather may tear or curl outward.
If stitching is too far from the edge, the outer leather rim remains unsupported and begins to lift over time.
Stitch distance vs edge stability
| Stitch Distance from Edge | Edge Support | Risk Level | Recommended Use |
|---|---|---|---|
| 1.0–1.5 mm | Very tight | Tear risk | Rarely used |
| 2.0–3.0 mm | Balanced | Low | Standard hat patches |
| 4.0+ mm | Weak edge hold | Lift risk | Decorative large patches |
For most leather hat patches, 2–3 mm provides the best balance between durability and appearance.
Which stitch types work best on curved surfaces?
Different stitch patterns respond differently to curvature and tension.
Common stitch types include:
- Single running stitch – clean appearance, moderate strength
- Lockstitch perimeter – strong and stable, widely used
- Zigzag stitch – flexible but visually casual
- Box or decorative stitch – aesthetic focus, limited structural benefit
| Stitch Type | Flexibility | Strength | Visual Style | Best Application |
|---|---|---|---|---|
| Running stitch | Medium | Medium | Minimal | Small patches |
| Lockstitch | Low stretch | High | Clean | Standard production |
| Zigzag | High | Medium | Sport style | Fabric or PU patches |
| Decorative box | Low | Medium | Bold | Branding accents |
Most premium hat programs rely on lockstitch perimeter sewing because it offers the most stable edge control.
How do you avoid puckering and wave stitching?
Puckering occurs when thread tension, leather stiffness, and hat fabric elasticity are not balanced.
Common causes include:
- thread tension too tight
- leather too thick for curvature
- hat fabric stretching during sewing
- inconsistent feed speed in production
Puckering causes and solutions
| Problem Source | Visible Result | Practical Fix |
|---|---|---|
| Excess thread tension | Wrinkled edge | Reduce tension setting |
| Thick leather | Wave distortion | Use thinner leather |
| Soft hat fabric | Uneven stitching | Stabilize with backing |
| Fast sewing speed | Irregular spacing | Slow controlled stitching |
Stable stitching requires material compatibility + machine calibration, not only operator skill.
What adhesion methods work best on hats?
Adhesion determines whether a patch stays attached through heat, sweat, bending, and washing.
Even when stitching is used, adhesive layers often provide initial positioning and surface bonding.
The most reliable systems combine:
- heat-activated adhesive film
- controlled temperature and pressure
- final perimeter stitching for reinforcement
Choosing the correct adhesion method depends on hat fabric type and production speed requirements.
Which adhesives suit cotton, polyester, and mesh hats?
Different hat fabrics respond differently to heat and bonding.
| Hat Fabric | Adhesion Behavior | Recommended Method |
|---|---|---|
| Cotton twill | Stable under heat | Heat-press + stitch |
| Polyester | Sensitive to overheating | Lower temp adhesive film |
| Mesh back | Limited bonding area | Stitch required |
Cotton hats allow the strongest adhesive bonding, while mesh structures rely more heavily on stitching.
How do heat-press settings influence bond strength?
Heat-press bonding depends on three variables:
- temperature
- pressure
- time
If temperature is too low → adhesive fails to melt fully.
If too high → leather surface hardens or fabric deforms.
| Parameter | Typical Range | Risk if Incorrect |
|---|---|---|
| Temperature | 130–160 °C | Weak bond or fabric damage |
| Pressure | Medium-high | Poor adhesion if too low |
| Time | 8–15 sec | Peeling if too short |
Precise control ensures consistent bonding across production batches.
Do peel tests and wash tests predict durability?
Yes. Reliable patch suppliers always validate durability through mechanical and environmental testing before shipment.
Key durability checks include:
- manual peel strength test
- repeated bending simulation
- wash and dry cycle exposure
- heat aging observation
| Test Type | Purpose | Failure Signal |
|---|---|---|
| Peel test | Bond strength | Edge separation |
| Flex test | Crack resistance | Surface fracture |
| Wash test | Long-term adhesion | Corner lift |
| Heat aging | Material stability | Hardening or curl |
These tests reveal problems before products reach customers, preventing large-scale returns.
How do brands choose the right leather patch process for production?
Selecting a leather patch process is not only a design decision—it is a manufacturing strategy that affects speed, durability, cost, and brand perception.
The correct combination of material, stitching method, and adhesion system determines whether a hat line performs smoothly in production or generates quality complaints after launch.
Most successful hat brands evaluate three core factors before confirming a patch process:
- Production efficiency for target order volume
- Durability expectations based on retail positioning
- Visual identity requirements such as embossing depth, stitch visibility, or texture
Balancing these factors ensures patches remain consistent, durable, and cost-efficient across large production runs.
What is faster in production: sewing, heat press, or hybrid methods?
Each attachment method has different implications for speed, labor cost, and durability.
| Method | Production Speed | Durability | Labor Cost | Typical Use |
|---|---|---|---|---|
| Heat press only | Very fast | Medium | Low | Promotional hats |
| Sewing only | Slow | Very high | High | Premium brands |
| Heat press + stitch | Balanced | High | Medium | Most commercial hats |
The hybrid method—heat positioning followed by perimeter stitching—has become the most widely used solution because it balances efficiency and long-term stability.
Which quality checks prevent crooked patches and edge lift?
Even when materials are correct, poor quality control can ruin final appearance.
Professional hat production typically includes:
- alignment templates to keep patches centered
- temperature monitoring during heat pressing
- thread tension inspection before sewing
- random peel-strength testing during bulk production
| QC Step | Purpose | Problem Prevented |
|---|---|---|
| Position template | Accurate placement | Crooked logos |
| Heat calibration | Stable adhesion | Edge peeling |
| Stitch tension check | Smooth sewing | Puckering |
| Random peel test | Bond reliability | Mass failure |
Consistent QC reduces customer complaints and return costs.
Conclusion
Producing reliable leather hat patches requires more than sourcing leather.
It demands engineering knowledge, controlled manufacturing, and strict quality validation.
With over 18 years of leather product manufacturing experience, SzoneierLeather supports global brands through:
- precision leather thickness selection for curvature
- optimized stitch-line engineering
- controlled heat-press adhesion systems
- rapid sampling and prototype testing
- strict durability and peel-strength inspection
- flexible MOQ for both emerging and established brands
Whether your project involves:
- classic embossed logo patches
- hybrid stitched heat-press patches
- or premium custom leather branding for caps
our engineering and production teams help transform ideas into stable, high-quality finished products ready for retail markets.
Ready to develop your custom leather hat patches?
If you are planning a new hat collection—or improving patch durability to reduce complaints—this is the right moment to collaborate with an experienced manufacturing partner.
Contact SzoneierLeather today to request samples, review material options, and receive a tailored quotation for your custom leather hat patch project.