How Do You Make a Leather Rifle Case:Step by Step Guide
Few projects combine craftsmanship, tradition, and practicality quite like creating your own leather rifle case. Whether you’re a hunter seeking reliable protection for your firearm in the field, a marksman transporting your prized rifle to the range, or a collector wanting a bespoke display piece, a handcrafted case adds unmatched character and durability. The tactile pleasure of full-grain leather, the satisfying pull of a perfectly tensioned stitch, and the peace of mind knowing every inch was measured to your exact specifications—this is leatherwork at its finest. To make a leather rifle case, start by gathering durable full-grain or veg-tan leather, heavy-duty buckles, rivets, and leatherworking tools (knife, stitching chisel, needles). Measure your rifle precisely, draft a pattern including seam allowances, then cut, bevel, dye, and assemble the pieces using saddle stitching. Finally, install hardware, edge-paint, and apply waterproofing. The result is a custom case tailored for protection, aesthetics, and lifelong service.
Imagine sliding a sleek, oiled-leather case into your Jeep before dawn, each buckle snap echoing the crackling campfire ahead. Now, let’s dive into the details.
What is a Leather Rifle Case
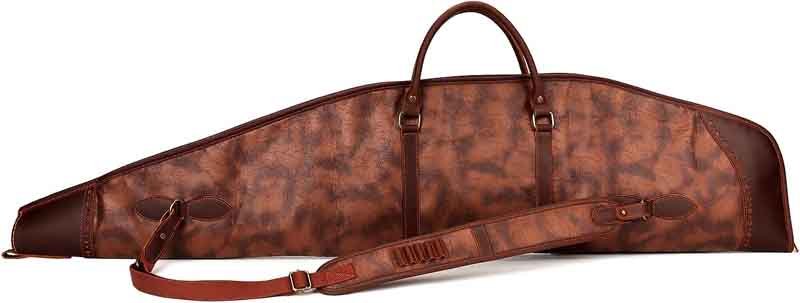
A leather rifle case is a purpose-built carrying and storage solution for long guns—typically shotguns or rifles—crafted primarily from high-quality leather. Unlike soft nylon or hard polymer cases, a leather rifle case combines durability with classic aesthetics, offering:
- Protective Shell: Thick full-grain or vegetable-tanned leather panels shield the firearm from scratches, dings, and light moisture.
- Structured Design: Reinforced seams, padding or a soft lining (often suede or fleece), and a secure closure (buckles, zippers, or straps) keep the rifle snug and immobile during transport.
- Functional Hardware: Solid-brass buckles, D-rings, and rivets resist corrosion and bear the weight, while adjustable straps or handles provide comfortable carrying.
- Custom Appearance: Leather can be tooled, dyed, or embossed for personalized styling—ideal for hunters, competitive shooters, or collectors who want a bespoke look.
In essence, a leather rifle case is both a practical piece of gear—protecting your firearm in the field or on the range—and a statement of craftsmanship, blending rugged utility with the timeless appeal of fine leather.
What Materials and Tools Are Needed to Make a Leather Rifle Case?
Essential materials include 3–4 oz full-grain or vegetable-tanned leather, 1–2 oz lining leather, heavy-duty nylon thread, buckles, D-rings, and rivets. Tools needed are a rotary cutter or harness knife, edge beveler, stitching chisel or groover, saddle-stitch needles, mallet, rivet setter, and stitching pony. Quality components and precision tools ensure clean cuts, consistent stitches, and a durable finished case designed to withstand rugged use.
Embarking on a leather rifle case project demands careful selection of both materials and tools. The right components not only streamline construction but also dictate the case’s longevity and performance under stress.
1. Leather Selection
- Full-Grain Leather (3–4 oz / 1.2–1.6 mm thickness): The gold standard for strength and patina development. Ideal for the exterior shell, it resists scratches and weathering.
- Vegetable-Tanned Leather: Offers ease of tooling and dye absorption. Use for decorative panels or embossed logos.
- Lining Leather (1–2 oz): A softer, thinner leather such as goat or lambskin creates a smooth interior that protects metal surfaces from abrasion.
- Synthetic Alternatives: Some prefer coated nylons for budget builds, but they lack the character and repairability of genuine leather.
| Material | Thickness | Purpose | Key Qualities |
|---|---|---|---|
| Full-Grain Leather | 3–4 oz | Exterior shell | Durability, patina |
| Veg-Tan Leather | 3 oz | Tooling, decorative work | Dye affinity |
| Lining Leather | 1–2 oz | Interior protection | Softness, abrasion resistance |
| Waxed Nylon Thread | — | Stitching | Strength, water resistance |
| Hardware (Brass/Steel) | — | Buckles, rivets | Corrosion resistance |
2. Hardware Components
- Buckles & Strap Adjusters: Choose solid brass or stainless steel to avoid rusting. Opt for 1″–1.5″ widths matching your strap leather.
- Rivets & Chicago Screws: Reinforce stress points—strap anchors, flap corners. Brass rivets complement warm leather tones.
- D-Rings & Swivels: For optional carrying straps or sling attachments. Ensure load rating meets or exceeds 50 lb.
3. Essential Tools
- Rotary Cutter / Harness Knife: Clean, straight cuts are the foundation of professional results.
- Stitching Groover & Edge Beveler: Creates consistent channels and rounds off edges for smooth finishing.
- Stitching Chisels (Pricking Irons): Even-spaced holes guide hand-stitching.
- Saddle-Stitch Needles & Waxed Thread: The saddle stitch locks each stitch independently—no single thread break can unravel your seam.
- Stitching Pony / Clamp: Holds pieces taut during stitching, improving accuracy and reducing hand fatigue.
- Rivet Setter & Mallet: Precise installation of hardware without marring leather.
- Burnishing Tools: Wood slickers or canvas strips to polish edges post-dye.
- Dye, Finish & Waterproofing: Alcohol-based dyes penetrate deeply; top-coats and waxes seal and protect.
4. Workspace Considerations
- Workbench with Cutting Mat: Prevents damage to both work surface and blades.
- Good Lighting: Natural or LED task lighting ensures accurate color matching and stitch alignment.
- Ventilation: Essential when using solvents, dyes, and waterproofing sprays.
5. Sourcing and Custom Options
At Szoneier, our integrated supply chain provides consistent batches of high-grade leather and custom-fabricated hardware. Need a unique buckle finish or proprietary lining? Our in-house R\&D can prototype at low MOQs to match your brand’s aesthetic and functional requirements.
By investing in quality materials and precise tools up front, you set the stage for a rifle case that not only looks handcrafted but performs exceptionally under real-world conditions. In the next sections, we’ll transform these raw ingredients into a fully assembled masterpiece.
Which Leather Grades and Hardware Options Work Best for Durability?
For a rifle case built to endure outdoor rigors, use 3–4 oz full-grain or veg-tan leather, paired with solid brass buckles and stainless-steel rivets. Full-grain provides superior tensile strength, while vegetable-tanned accepts edge finishes and conditioners deeply. Hardware choices—brass for corrosion resistance, stainless steel for tensile strength—combined with heavy-waxed nylon thread ensure your case weathers rain, mud, and years of handling without failing.
Durability in a leather rifle case hinges on two pillars: the inherent toughness of your leather and the resilience of your hardware. Let’s examine how grade selection and hardware specifications influence long-term performance.
1. Comparing Leather Grades
- Full-Grain Leather: Harvests the hide’s outermost layer, retaining natural grain and fiber integrity. This structure offers the highest tear resistance and stretch recovery. Over time, full-grain develops a rich patina, enhancing its protective qualities.
- Top-Grain vs. Corrected Grain: Top-grain is sanded to remove imperfections, then refinished—strong but less breathable; corrected grain adds embossed patterns. Both sacrifice some strength and patina potential.
- Veg-Tan Leather: The tanning method uses tree bark extracts, resulting in leather that’s firm, moldable, and receptive to dyes. Its rigid initial feel makes it ideal for structured cases; over time, it softens while maintaining toughness.
| Grade | Tensile Strength | Abrasion Resistance | Patina Potential | Cost Level |
|---|---|---|---|---|
| Full-Grain | Very High | Very High | Excellent | Premium |
| Top-Grain | High | High | Moderate | Mid-Tier |
| Veg-Tan (3 oz) | High | High | Excellent | Mid-Tier |
| Corrected Grain | Moderate | Moderate | Low | Budget |
2. Hardware Selection
- Brass Buckles & Rivets: Naturally corrosion-resistant and visually complementary to warm leather tones. Ideal for environments with frequent moisture exposure.
- Stainless Steel Components: Offer superior load ratings and resistance to pitting—best suited for heavy-duty straps and quick-release mechanisms.
- Solid vs. Die-Cast Hardware: Solid-machined pieces withstand greater stress than hollow or die-cast fittings, crucial for load-bearing applications like sling attachments.
| Hardware Type | Corrosion Resistance | Load Rating | Aesthetic |
|---|---|---|---|
| Solid Brass | Excellent | 200–300 lb | Classic, warm-tone |
| Stainless Steel | Excellent | 300–500 lb | Modern, cool-tone |
| Nickel-Plated | Moderate | 150–250 lb | Shiny finish, less durable |
| Zinc Alloy | Low | 100–150 lb | Budget-friendly |
3. Thread and Stitch Reinforcement
- Waxed Nylon Thread (0.6–0.8 mm): Combines water resistance with tensile strength; the wax coating eases needle passage and seals stitch holes.
- Saddle Stitch vs. Machine Stitch: While industrial machines can produce uniform stitches quickly, hand-saddle stitching embeds thread through each hole twice, creating redundant strength. In critical seams (flap edges, strap anchors), saddle stitching is superior.
4. Reinforcing Stress Points
- Double Layering: Fold leather layers at high-stress zones (bottom panel, strap ends) for added thickness.
- Riveted Backing Straps: Place backing washers under rivets to distribute load across a wider leather area, preventing pull-through.
- Edge Binding: Apply leather binding strips or bias-cut leather cord around openings to guard against abrasion.
5. Environmental and Ethical Considerations
- Tanning Certifications: Look for Leather Working Group (LWG) ratings to ensure your leather is produced with minimal environmental impact.
- Recycled Hardware Options: Some suppliers offer reclaimed brass buckles—eco-friendly yet equally durable.
By choosing the highest-grade leather paired with robust, corrosion-resistant hardware and employing hand-stitched reinforcement at critical junctures, your leather rifle case becomes more than a storage solution—it transforms into an heirloom built to protect both firearm and legacy.
How Do You Measure and Create a Custom Pattern for Your Rifle?
To draft a precise leather rifle case pattern, measure overall rifle length (including scope), barrel diameter, stock width, and trigger guard clearance. Add ¼″–½″ seam allowances, and include extra room for padding (foam or fleece). Transfer these dimensions onto kraft paper, sketching main body, flap, straps, and end caps. A well-fitted pattern ensures snug protection, prevents shifting, and streamlines assembly—key for both aesthetic appeal and functional security.
A custom leather rifle case starts with an accurate pattern that accommodates your firearm’s dimensions, shape variations (scopes, bipods), and additional padding. Mistakes here cascade into ill-fitting panels, misaligned stitches, and compromised protection.
Essential Measurements
- Overall Length: From muzzle tip to buttplate end—record to the nearest 1/8″.
- Barrel & Stock Width: Measure the widest points of both barrel and stock sections, noting any tapering.
- Scope & Accessories Clearance: If your rifle has a fixed scope or bipod, measure from the top of the scope to the side of the barrel, ensuring adequate height and width allowances.
- Trigger Guard & Sling Studs: Account for protrusions—measure from the guard’s outermost edge and strap stud locations.
Calculating Seam and Padding Allowances
- Seam Allowance: Standard ¼″–½″ around all pattern edges to accommodate stitching and avoid undercutting.
- Padding Space: If you plan to include foam or fleece lining (typically 1/4″–1/2″ thick), add this to interior dimensions. For a snug fit, use thinner padding around the barrel and thicker protection at the action area.
Drafting the Pattern on Paper
- Materials: Use heavy-weight kraft paper, pattern-making plastic, or cardstock—durable enough to trace multiple times.
- Layout Strategy:
- Main Body Panel: A rectangle equal to rifle length plus seam + overlap for flap—height covers the combined barrel and stock widths plus padding allowances.
- End Caps: Oval or rounded rectangles sized to barrel and butt dimensions, plus seam margin.
- Flap & Straps: Design a top flap that folds over the opening by at least 2″ to keep moisture out; sketch strap placements ensuring buckles land centrally.
- Mock Assembly: Cut the paper pieces and loosely tape them together around an unloaded rifle (or a PVC pipe of identical dimensions) to verify fit. Adjust as needed before transferring to leather.
Pattern Variations for Design Options
- With Scope Cutout: Incorporate a raised panel or cutout in the main body to accommodate scope height while maintaining flush exterior surfaces.
- External Pockets: If including magazine or accessory pockets, map pocket dimensions adjacent to the main body, ensuring they don’t interfere with barrel taper.
- Modular Dividers: For multi-rifle cases, draft internal divider panels that attach via snaps or hook-and-loop.
Digitizing Patterns for Replication
For small-batch production or future orders, consider scanning your final paper pattern and vectorizing it in CAD software. This enables precise CNC cutting, consistent dimensions, and easy scaling for different rifle models.
Szoneier’s Pattern Services
At Szoneier, we offer custom pattern drafting in-house. Provide us with rifle specs or a physical sample, and our design team will deliver digital patterns with built-in seam allowances and hardware placements—streamlining prototyping and reducing material waste.
A meticulously drafted pattern is the blueprint for success. It dictates how leather pieces align, how hardware integrates, and ultimately, how well your rifle is protected. Invest time here, and the assembly phases will flow seamlessly.
How Do You Cut, Stitch, and Assemble the Leather Pieces?
Cut leather with a sharp rotary cutter or harness knife using your paper pattern as a guide, then bevel and groove edges. Stitch panels together using saddle stitching for maximum strength—pre-punch holes every 3 mm with a stitching chisel. Secure hardware (buckles, rivets) before final stitch-closing. Reinforce stress points with double-stitching or backing washers. Proper cutting, consistent stitching tension, and precise hardware placement ensure a case that’s both beautiful and built to last.
With materials, patterns, and hardware in hand, the hands-on work begins: transforming flat leather into a three-dimensional rifle case. This process involves systematic cutting, surface preparation, stitching, and hardware installation.
1. Leather Cutting & Edge Preparation
- Transferring Patterns: Pin or tap wooden pattern pieces onto leather; use a silver-point stylus to trace outlines lightly.
- Cutting: Employ a rotary cutter on a self-healing mat for straight lines; use a harness knife for curves and detailed edges. Keep blades sharp—dull blades tear fibers and yield ragged edges.
- Edge Beveling: Run an edge beveler along cut edges to round corners; this improves aesthetics and makes subsequent burnishing easier.
- Grooving: With a stitching groover set to match your thread diameter, carve a shallow channel 2 mm from the edge to recess stitches—protecting them from abrasion.
2. Dyeing & Pre-Finishing (Optional)
- Edge Dye: Apply edge dye before assembly for uniform color—in multiple thin coats, allowing each to dry.
- Surface Dye or Finish: If you opted for veg-tan panels, apply alcohol-based dye and seal with a water-based top-coat. Always test on scrap.
3. Saddle Stitching Technique
- Punching Holes: Use a pricking iron or rotary punch to create evenly spaced holes along the grooved channel. A mallet ensures consistent depth.
- Threading Needles: Cut a length of waxed nylon thread three times the stitch length—long enough to saddle stitch the entire seam without knotting.
- Stitching Process:
- Anchor Thread: Start in a mid-seam hole; lock with a square knot against the interior.
- Two-Needle Method: Pass needle A from the exterior to the interior, pull tight, then pass needle B opposite through the same hole. Each stitch locks.
- Tension Control: Maintain firm, even tension; too tight creases leather, too loose invites wear.
- Finishing: At seam ends, backstitch two holes, tie a secure knot, and burn thread ends with a lighter to prevent unraveling.
4. Hardware Installation
- Pre-Punching Holes: Mark hardware locations before stitching. Punch holes slightly smaller than rivet posts or buckle prongs to ensure a snug fit.
- Setting Rivets & Screws: Use a rivet setter and mallet, placing backing washers on the interior side to distribute load. Ensure rivet heads are flush.
- Buckle Attachment: Thread strap ends through buckles, fold back leather, and secure with rivets or stitching—reinforcing with backing straps when possible.
5. Reinforcing High-Stress Zones
- Double Stitching: In areas like flap hinge points or strap anchors, stitch two parallel seams for redundancy.
- Leather Backers: Glue and stitch small leather washers beneath rivets to prevent pull-through.
6. Quality Control & Fit Check
After major assembly, insert an unloaded rifle (or a mock-up) to verify fit. Adjust flap overlap, strap tension, and buckle alignment. Minor trimming or repositioning at this stage yields a tailored, professional finish.
How Do You Finish, Treat, and Maintain Your Leather Rifle Case?
Complete your rifle case by burnishing and sealing edges, applying leather conditioner and protective wax, and polishing hardware. Treat the surface with waterproofing spray or neatsfoot oil, ensuring flexibility without film formation. Store in a cool, dry place and perform quarterly maintenance—light cleaning, reconditioning, and hardware inspection. Proper finishing and care preserve leather suppleness, prevent cracking, and retain aesthetic appeal for years of reliable service.
A premium leather rifle case deserves a finishing regimen that enhances both form and function. This final phase protects against moisture, abrasion, and environmental aging—ensuring the case remains as robust as the firearm it houses.
1. Edge Burnishing & Sealing
- Burnishing: Moisten edges slightly, then rub vigorously with a hard wood slicker or canvas strip. The friction smooths fibers and generates a polished sheen.
- Edge Sealant: Apply a thin layer of gum tragacanth or edge paint to fill microscopic gaps—preventing water ingress and fraying. Multiple coats, sanded lightly between applications, yield glass-like edges.
2. Surface Conditioning & Waterproofing
- Leather Conditioner: Choose a non-silicone, pH-balanced conditioner. Apply sparingly with a lint-free cloth, working in circular motions to flex the leather and promote absorption. Let it rest 30 minutes before buffing off excess.
- Wax or Oil Treatment: For rugged outdoor use, apply a blend of beeswax and neatsfoot oil to exterior panels. Warm slightly and rub on evenly; buff to a low sheen. This treatment repels water while enhancing color depth.
- Commercial Waterproof Sprays: For full-grain surfaces, consider a silicone-free spray to bolster water resistance without altering breathability.
3. Hardware Polishing
- Metal Polish: Use a mild brass or stainless-steel polish on buckles and rivets, then wipe clean. Avoid contact with leather to prevent discoloration.
- Protective Lacquers: A thin lacquer coat on shiny hardware wards off fingerprints and tarnish.
4. Ongoing Maintenance Schedule
- Monthly: Wipe down exterior with a damp cloth; inspect seams and hardware for loosening.
- Quarterly: Re-apply conditioner and edge sealant; tighten or replace any worn rivets.
- Annually: Deep clean interior lining with mild saddle soap; allow full air-dry before reassembly.
5. Storage Best Practices
- Cool, Dry Environment: Avoid direct sunlight and high humidity, which cause leather to dry out or mold.
- Sling Position: Store the case lying flat or hung by the strap to prevent deforming the leather shell.
- Desiccant Packs: Place silica gel packs inside to absorb residual moisture when not in use.
6. Addressing Wear & Repairs
- Surface Scratches: Light scuffs can be buffed out with conditioner and a soft cloth. For deeper gouges, apply a matching leather filler before refinishing.
- Seam Restitching: If stitches loosen, use a leather awl to re-punch holes and saddle-stitch with matching thread.
- Hardware Replacement: Thanks to Szoneier’s global logistics, replacement buckles, rivets, and D-rings can be delivered on demand, minimizing downtime.
A well-finished, well-maintained leather rifle case not only looks elegant but withstands the rigors of outdoor adventures. By following these steps, you ensure your handcrafted creation remains a reliable companion for decades—reflecting the skill, care, and quality you invested from day one.
Conclusion
Crafting a leather rifle case is a rewarding journey—from selecting premium leathers and precision hardware to mastering saddle-stitching and finishing techniques. The result is a bespoke case that marries rugged protection with timeless aesthetic appeal.
Ready to elevate your own design? Partner with Szoneier Leather, leveraging 18 years of R\&D, prototyping, and in-house manufacturing expertise. Whether you need small batch custom cases for a boutique firearms line or OEM solutions with private-label branding, we deliver top-quality leather goods with fast sampling, low MOQ, and global logistics.
Contact us today for a free consultation and sample prototype: craft your perfect leather rifle case with Szoneier’s turnkey service.
What Can I Do For You?
Here, developing your OEM/ODM private label leather goods collection is no longer a challenge,it’s an excellent opportunity to bring your creative vision to life.
Make A Sample First?
If you have your own tech packs, logo design artwork, or just an idea,please provide details about your project requirements, including preferred fabric, color, and customization options,we’re excited to assist you in bringing your leather goods designs to life through our sample production process.