 Skip to content
 How to Make Leather Tote Bags: A Comprehensive Guide
Leather tote bags aren’t just fancy carryalls,they can be a statement of style, durability, and even a profitable craft if you do it right. People love them for their classic look and everyday utility. Whether you’re a budding leatherworker who wants to tackle a bigger project or a small business owner eyeing the tote market, understanding each step can keep your costs down, your quality up, and your customers smiling.
In this guide, we’ll:
- Talk about the best materials and tools.
- Explore different types (and thicknesses) of leather.
- Show you how to design a tote from scratch.
- Walk you through each assembly step in plain, easy-to-follow language.
- Offer real data on pricing, profitability, and production.
- Encourage you to customize, brand, and even scale up if you’re interested in selling.
A well-crafted leather tote needs quality hides (5–7 oz), precise cutting tools, sturdy thread, and a clear design plan. Start by sketching dimensions, ensure strong handle attachments, and consider a lining if you want a premium feel. Condition the finished bag regularly. With thoughtful planning, this process can be both creatively fulfilling and potentially profitable.
What Are the Essential Materials and Tools for Making a Leather Tote Bag?
Stock up on quality leather, sturdy needles, strong thread, adhesives, and the right finishing supplies. Reliable tools and materials help you create a tote that’s both beautiful and built to last.
Sometimes, folks think, “If I have the leather, I’m good.” But you’ll soon realize your tools and auxiliary materials can make or break your project. Let’s discuss them in a more casual, data-packed way.
Core Materials
| Material | Purpose | Approx. Cost Range |
|---|---|---|
| Leather (5–7 oz) | The main body and handles | $7–$15 per sq. ft. |
| Thread (waxed) | Secures seams; choose nylon/polyester | $10–$15 per spool |
| Adhesives (contact cement) | Helps hold edges before stitching | $5–$8 per can |
| Edge Finishers | Bevelers, burnishers, gum tragacanth | $5–$20 each |
| Hardware (rivets, snaps) | Reinforcement and closure | $0.50–$2 each |
- Leather: Typically sold by the square foot. For a basic tote, you might need 5–7 sq. ft. depending on size and design.
- Thread: Heavier thread stands up to daily wear. Waxed polyester or nylon with a thickness around 0.6–1.0 mm is standard.
- Hardware: Even if you only use four rivets and a snap, quality matters. An extra 50 cents for sturdy, rust-proof metal can save you from unhappy customers later.
Tool Essentials
- Cutting Tools
- Leather Shears: Great for minor trims. Average cost: $20–$40.
- Utility Knife / Rotary Cutter: Ideal for bigger pieces. Price range: $10–$30.
- Cutting Mat: Saves your table surface and extends blade life.
- Hole Punches & Stitching Equipment
- Pricking Iron: Ensures consistent hole spacing. Often $20–$60.
- Awl: A single awl can cost $10–$15. Use it to enlarge holes or guide your stitching line.
- Sewing Machine (Leather-Capable): Priced from $300 for basic to $2,000+ for industrial. If you’re serious or plan to sell in volume, consider at least a mid-tier model.
- Measuring & Marking
- Metal Ruler & Square: Keep lines straight and corners perfect.
- Marking Tools (Scratch Awl, Chalk Pencil): Lightly sketch your cut lines on the leather.
- Finishing Supplies
- Beveler: Shaves off edge corners to create a smooth, rounded profile.
- Burnisher / Slicker: Polishes edges with friction, water, or gum tragacanth.
- Conditioner / Oil: Mink oil or commercial leather balm to keep your tote supple.
Practical Tips for Cost-Effectiveness
- Buy in Bulk: If you foresee making multiple bags, purchasing a whole side of leather often lowers your per-square-foot cost.
- Secondhand or Refurbished Machines: Sometimes you can grab a used industrial sewing machine in excellent condition at half the retail price.
- DIY Burnisher: Can’t afford specialized gear? A simple dowel rod or smooth bone can burnish edges decently.
Profitability Angle
If you’re eyeing the leather tote niche for business, investing in better tools upfront can reduce wasted materials and time. For instance, a cheap punch can slip and ruin a cut, wasting $10–$15 worth of leather in an instant. Over the span of 50 or 100 bags, those mistakes add up.
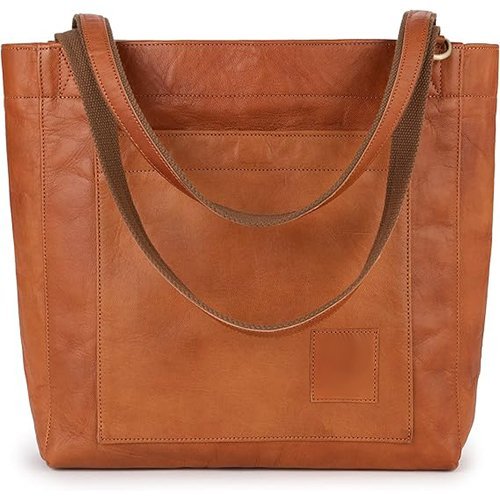
Which Types of Leather Work Best for a Durable Tote and What Ounces of Leather Are Ideal?
Full‑grain or vachetta leather in the 5–7 oz range ensures sturdiness, style, and a refined patina over time. This thickness strikes the perfect balance between flexibility and resilience.
Leather is surprisingly varied—think about it like coffee beans. Some are cheap, bland, and full of fillers. Others are premium, bursting with character. Let’s break it down.
Leather Type Comparison Table
| Leather Type | Characteristics | Price Range (per sq. ft.) | Ideal Thickness (oz) |
|---|---|---|---|
| Full-Grain | Highest quality; retains natural grain and imperfections; ages beautifully | $8–$15+ | 5–7 |
| Top-Grain | Sanded surface; slightly thinner; still decent quality | $6–$12 | 4–6 |
| Vachetta Leather | Light, vegetable-tanned; darkens to a caramel tone; often used in luxury brands | $12–$18+ | 5–6 |
| Genuine Leather | Lower-tier; sometimes multiple layers glued together | $4–$7 | 3–5 |
| Suede/Nubuck | Soft, textured surface; less water-resistant; good for accents | $5–$10 | 3–5 |
- Full-Grain Cowhide: Typically the go-to for tote bags. Durable, with the hide’s natural pores intact.
- Vachetta: Loved by high-end designers (e.g., Louis Vuitton). It starts pale and is known for water spot sensitivity. Over time, it develops a signature patina—part of its charm.
Why 5–7 oz?
- 5 oz = ~1/10 inch thickness. This is thick enough to hold shape without feeling rigid as a board.
- 6–7 oz suits big totes that might carry laptops or heavier loads. Some crafters prefer 5 oz for smaller or more flexible designs.
“But what about 3–4 oz?” That might be okay for smaller pouches, but heavier items can cause too much sag or corner tearing in a large tote.
Vachetta Leather
- Untreated, Vegetable-Tanned: No synthetic coatings. Absorbs oils and moisture readily—why it changes color.
- Luxury Market Appeal: Many big brands champion vachetta for straps, trim, or the entire bag.
- Careful with Water: Early in its life, water spots show easily. Over time, the leather darkens and these spots blend into the patina.
Minimizing Waste and Maximizing Yield
- Layout Efficiency: Place your tote pattern pieces carefully on the hide to avoid using oddly shaped scraps.
- Purchasing Extra: If you need, say, 6 sq. ft. to cut your pieces, consider buying 7–8 sq. ft. to account for imperfections or mistakes.
How Do You Plan and Sketch the Ideal Tote Bag Design?
Map out your tote’s shape, size, and handle style ahead of time. A clear blueprint reduces mistakes, saves leather, and helps you align with your functional or aesthetic goals.
Thinking about design is half the fun. Will it be a lean, tall tote perfect for a laptop or a wide shopper bag for groceries?
Common Tote Dimensions
| Bag Purpose | Width (in) | Height (in) | Depth (in) | Handle Drop (in) |
|---|---|---|---|---|
| Everyday Purse Tote | 12–14 | 10–12 | 4–5 | 8–10 |
| Laptop Work Tote | 14–16 | 12–14 | 5–6 | 10–12 |
| Shopper/Grocery Tote | 16–18 | 14–16 | 6–7 | 8–10 |
- Handle Drop: The distance from the top of the bag to the apex of the strap. If you’re wearing a thick coat in winter, consider extra length for easy shoulder carry.
- Pocket Planning: Decide if you want a main internal pocket (zippered or slip) and if you want quick-access external pockets.
Sketching
- Start Rough: Draw a rectangle or trapezoid representing the main panels.
- Add Depth: If you want a 5-inch depth, you might incorporate gussets or plan to box the corners.
- Focus on the Opening: Some totes have open tops, others add a magnetic snap or zipper. Factor that into your pattern.
Tip: If you’re new, cut out a “paper version” at actual size and tape the edges. This reveals proportions and helps you visualize handle placement.
Balancing Aesthetic with Practical Use
- Busy, On-the-Go People: Might want a dedicated phone pocket, pen slots, or a simple strap closure.
- Fashion-Forward Crowd: Might want a more sculpted shape, contrasting stitch color, or exotic leather panels.
- Minimalist Approach: Stick to a single big open compartment with strong, clean lines and minimal hardware.
Considering Branding & Scalability
If you plan on producing many totes:
- Logo Placement: A small embossed logo near the top can feel premium without cluttering.
- Batch Cutting: Standardize your pattern so that cutting multiple sets of panels is straightforward.
How to Make a Leather Tote Bag Step by Step and Which Cutting & Stitching Techniques Are Best?
Cut your pieces accurately, prepare stitch holes, and use either a strong saddle stitch or a heavy-duty machine for assembly. Meticulous alignment and reinforcement at stress points ensure a durable finished tote.
Let’s walk through the big steps in a more casual, everyday-friendly tone,but still loaded with practical details.
Lay Out Your Pattern and Cut
- Trace on Leather: Mark patterns with a scratch awl or a silver pen that shows on dark hides.
- Check Twice, Cut Once: Leather is unforgiving; any error can lead to wasted material.
- Cut Slowly: Using a fresh blade prevents ragged edges. If you see bunching or tugging, change or re-sharpen the blade.
Punching Holes
| Hole Punch Method | Typical Tools | Pros | Cons |
|---|---|---|---|
| Pricking Iron | Iron with spaced prongs, hammered in | Creates uniform stitching holes | Requires consistent angle, can be tricky on thick hides |
| Drive Punch | Single punch & mallet | Good for rivet or strap holes | Slow for large sections |
| Leather Chisel Set | Multiple prongs (2,4,6) sets | Faster hole punching | May sometimes create slightly larger holes |
Tips:
- Test punching on a scrap to confirm alignment.
- For straight lines, use a ruler to pencil in your stitch line 1/8–1/4 inch from the edge.
Stitching Approaches
- Hand Stitch (Saddle Stitch):
- Steps: Thread needles on both ends of a single thread. Pass each needle through from opposite sides of each hole.
- Benefit: If one thread breaks, the entire seam won’t unravel—gold standard for durability.
- Machine Stitch (Lockstitch):
- Steps: Use a heavy-duty machine with the correct needle (size 18 or 20). Adjust tension so the bobbin thread pulls neatly into the leather’s middle.
- Benefit: Much faster, easier for producing multiple bags.
Assembly Sequence
- Attach Pockets (if any) to the Main Panel:
- Usually glued, then stitched around edges.
- Sew the Main Body Seams:
- Connect front and back panels along the sides.
- If you have a separate bottom piece, attach that next.
- Box or Fold the Corners (Optional):
- If you want a rectangular base, fold corners to create your depth.
- Attach Handles:
- Mark exact placement, ensuring symmetrical alignment.
- Reinforce with a second row of stitches or rivets—top of the bag sees the most tension.
- Inspect Stitch Quality:
- Look for frayed threads or missed holes. Re-stitch any weak spots.
- Edge Finish:
- Bevel corners, burnish with gum tragacanth or water for that glossy edge.
- Condition the Entire Surface:
- A light application of leather balm can remove surface scuffs and unify the bag’s look.
Common Pitfalls & Solutions
- Misaligned Panels: Caused by rushed cutting or sloppy marking. Double-check your pattern corners with a square.
- Thread Tension Issues: If stitching looks loose on one side, tighten your top thread tension or adjust the bobbin tension in machine sewing.
- Curved Seams Gone Awry: For curved edges, practice on scraps and proceed slowly, pivoting the material if machine sewing.
Are There Specific Steps for Adding Linings and Pockets and What Do You Line a Leather Bag With?
Choose sturdy linings like canvas or suede, pre-sew any pockets, then attach the lining to the leather shell. This approach elevates both durability and style, preventing raw edges and adding functional compartments.
Linings can transform an “okay bag” into a “wow” piece. Let’s detail this more intimately.
Lining Material
| Lining Material | Pros | Cons | Price Range (per yard) |
|---|---|---|---|
| Canvas | Durable, easy to sew, many colors | Heavier, can add bulk | $5–$10 |
| Cotton Twill | Soft, commonly available | Less water-resistant | $4–$8 |
| Suede/Nubuck | Luxurious feel | Prone to stains, higher cost | $8–$15 |
| Nylon/Polyester | Lightweight, water-resistant | Synthetic look, might lack “natural” vibe | $3–$6 |
Tip: If you’re going high-end or want that “artisan” feeling, consider using the same or contrasting color leather for partial lining (e.g., pockets or top edges).
Step-by-Step Pocket Attachment
- Cut Pocket Fabric: Decide if it’s zippered or slip style.
- Hem or Bind Edges: If it’s a slip pocket, fold the top edge 1/4 inch under, sew a neat finish.
- Place on Lining: Mark exact location (preferably near the top opening for easy access).
- Stitch All Around: For a zipped pocket, you might first fix the zipper, then attach the entire assembly to the lining.
Securing the Lining to Leather
Full Drop-In Method:
- Construct a separate “lining bag” with the same dimensions.
- Slide it inside the leather shell.
- Align top edges, topstitch or glue in place.
Partial Lining / Facing:
- Only line the top edges or add partial panels.
- This reduces weight and cost, but fewer coverage means you might see the raw underside of the leather in some areas.
How Do You Select and Attach Hardware for a Professional Finish?
Opt for solid metal hardware (brass, nickel, or stainless steel), align it with your bag’s theme, and secure it firmly using rivets or reinforced stitching. Quality hardware complements your leather, boosting durability and visual appeal.
Hardware might seem like an afterthought, but it can significantly elevate (or detract from) your bag’s perceived value.
Hardware Cheat Sheet
| Hardware Type | Uses | Cost (each) | Durability |
|---|---|---|---|
| Rivets | Reinforce stress points, decorative touches | $0.30–$1.00 | Very high |
| D-Rings | Strap attachments, clip-on accessories | $0.50–$1.50 | High |
| Buckles | Adjustable straps or flap closures | $1.00–$3.00+ | High |
| Magnetic Snaps | Quick closure for open-top designs | $0.50–$1.50 | Medium (watch out for rust if cheap quality) |
- Material: Brass is often praised for resisting corrosion and developing a unique patina. Stainless steel offers a sleek modern look. Nickel is bright but can show scratches.
Application Methods
- Rivets:
- Punch or chisel holes through layers, insert rivet post from one side, cap on the other.
- Use a rivet setter or a mallet with a proper anvil base to avoid bending or incomplete setting.
- Screws (Chicago Screws):
- Threaded posts that fasten from both sides. Great for straps you may need to remove or replace.
- If you notice them loosening over time, add a drop of thread locker.
- Buckles & Snaps:
- For buckles, fold your leather strap end around the buckle bar, stitch or rivet to lock.
- For snaps, cut small slits, push prongs through, and fold them around a backing plate.
Matching Hardware to Leather Colors
- Brown, Tan Leathers: Antique brass or gold-toned hardware often looks classic.
- Black or Gray Leathers: Silver, gunmetal, or nickel hardware can look sleek and contemporary.
- Vachetta: Gold or brushed brass pairs beautifully, accentuating that luxury vibe.
Tip: You can experiment with mismatched hardware (gold rivets + silver zipper) for a quirky, edgy style, but do so cautiously to maintain coherence.
What Methods Help Condition and Maintain a Leather Tote Long‑Term?
Clean your tote periodically, apply a leather conditioner every few months, and store it in a cool, dry place to prevent cracking or mold. Simple, consistent care ensures your tote lasts for years.
Leather’s an organic material—treat it like skin. Ignoring care leads to dryness, flaking, or unwelcome mold if left in humid corners.
Basic Care Table
| Care Step | Frequency | Tools Needed | Quick Tip |
|---|---|---|---|
| Dust & Wipe | Weekly | Soft cloth, mild soap | Remove surface dirt gently |
| Conditioning | Every 2–3 months | Leather balm or oil | Avoid over-saturating |
| Edge Check | 4–6 months | Burnisher, gum tragacanth | Re-burnish if edges start fraying |
| Deep Clean | Annually or if heavily soiled | Leather cleaner & brush | Test on a hidden patch first |
- Spills & Stains: Blot with a dry or slightly damp cloth. For vachetta, any water contact might leave a mark initially, but it typically blends in over time.
- Odor Control: If you store your bag near strong smells (e.g., smoke, pungent spices), it can absorb odors. Air it out or use odor-absorbing sachets.
Dealing with Extreme Conditions
- Humidity: Too high can cause mold or mildew. Let the bag “breathe,” or place silica gel packs in pockets.
- Dry Heat: Prolonged dryness (like near radiators or in car trunks during summer) saps moisture, leading to stiffness. Condition more frequently in these conditions.
Which Common Mistakes Should You Avoid When Crafting Leather Totes and Is a Tote Bag Business Profitable?
Cutting corners on leather quality, ignoring key reinforcements, or rushing stitching leads to poor results. If you commit to consistent craftsmanship and smart marketing, a leather tote business can turn a solid profit.
We’ve all been there,rushed a project or used leftover scraps that weren’t quite thick enough. Let’s highlight pitfalls, plus talk about money, because who doesn’t love a side gig that pays?
Top 5 Crafting Errors
Overly Thin Leather
- A 3–4 oz hide can leave your tote sagging under heavier loads. Stick to 5–7 oz for a stable structure.
Weak Handle Attachments
- Single-row stitching might fail if the bag’s loaded with books or groceries. Double up or add rivets.
Uneven Stitch Spacing
- Looks unprofessional. Use pricking irons or a sewing guide.
Poor Edge Finishing
- Raw edges can fray, absorb moisture, and degrade the overall look. Burnishing is quick, easy, and impactful.
Skipping Sample Runs
- Always create a test piece or smaller prototype. Adjust measurements and handle placement before burning through premium hides.
The Profitability Angle
Sample Cost : Suppose you’re making a standard everyday tote, around 14″ wide × 12″ high × 5″ deep.
| Cost Component | Approx. Cost (USD) | Notes |
|---|---|---|
| Leather (~6 sq. ft.) | $60 (@ $10/sq. ft.) | Full-grain or vachetta can be higher |
| Lining Fabric | $8 | Canvas or cotton twill |
| Hardware (rivets, snap) | $5 | 4 rivets + 1 snap (premium brass) |
| Thread & Adhesives | $3 | Enough for one bag |
| Labor (2–3 hours) | $40–$60 | If you value your time at $20/hr |
| Overhead (tools, shipping, packaging) | $5–$10 | Scaled down if you produce in batches |
| Total | $121–$146 |
- Potential Retail Price: $200–$300 for a quality handmade tote is not unusual, especially if you build a reputation and strong brand story. That leaves you $50–$150 margin per unit.
- Scaling Up: If you go from single-bag production to batch-making (say 10 at a time), your labor per bag could drop, increasing overall profit.
Marketing & Brand Tips
- Social Media & Etsy: A great way to start. Post behind-the-scenes videos of your leathercraft process.
- Unique Features: Maybe you do color-dyed edges, or you add a small personalization label with initials. People pay extra for that personal touch.
- Customer Reviews: Encourage buyers to share photos on Instagram. Word-of-mouth is powerful in the artisan goods niche.
Turning Leather into a Timeless Tote—Where to Go Next
Leather tote-making blends creativity, technique, and a dash of business savvy. Here’s the gist:
- Material & Tools: Prioritize quality hides (5–7 oz), well-made punches, and strong thread. This sets you up for success from the jump.
- Design Planning: Sketch your dimensions, factor in usage (laptop carry, daily commute, or shopping?), and test with paper patterns first.
- Construction: Cut carefully, consider a robust stitch (hand saddle or machine lockstitch), and reinforce stress spots with rivets.
- Finish & Maintenance: Condition regularly, store properly, and treat the edges for a pro-level finish.
- Profit Potential: Yes, you can make money off handcrafted totes. People value unique, high-quality pieces over mass-produced alternatives.
Want a Pro-Level Advantage?
If you’d rather partner with a seasoned leather manufacturer or you’re ready to scale your operation to bigger markets—Szoneier Leather is here to help. We specialize in full-cycle development: from raw material sourcing (including premium vachetta or full-grain hides) to design consultations, quality checks, and final packaging.
What Can I Do For You?
Here, developing your OEM/ODM private label leather goods collection is no longer a challenge,it’s an excellent opportunity to bring your creative vision to life.
Make A Sample First?
If you have your own tech packs, logo design artwork, or just an idea,please provide details about your project requirements, including preferred fabric, color, and customization options,we’re excited to assist you in bringing your leather goods designs to life through our sample production process.