

Most leather products do not fail across the middle of a large panel. Damage usually begins in a much smaller area where force is repeatedly concentrated. The base of a handbag handle, the fold around a buckle, the corner of a wallet card slot, the end of a shoulder strap, or the leather tab holding a metal ring may carry far more stress than the surrounding material.
This is why good leather alone cannot guarantee a durable finished product. A full-grain leather bag can still fail early if the handle tab is too narrow, the stitch holes are too close together, the thread is oversized, or the reinforcement layer ends directly beside the seam. At the same time, an appropriately engineered construction can help a thinner leather perform reliably without making the product unnecessarily bulky.
Reinforced stitching improves leather accessories by spreading pulling force across a wider area, preventing individual stitch holes from carrying too much load, and supporting high-stress parts with suitable thread, backing, seam geometry, and hardware placement. Common methods include double-row stitching, box-X patterns, saddle stitching, lockstitching, folded tabs, hidden reinforcement panels, webbing cores, and controlled rivet placement.
The real challenge is not adding more stitches. Every needle hole permanently changes the leather. When too many holes are placed too close together, the seam can begin to behave like a perforated tear line. A durable product therefore depends on carefully balancing stitch quantity, hole size, edge distance, leather strength, and the direction of use.
What Is Reinforced Stitching?
Reinforced stitching is a construction approach used to strengthen seams, attachments, folds, and hardware areas that experience repeated pulling, bending, twisting, or abrasion. It combines an appropriate stitch pattern with controlled needle holes, suitable thread, sufficient seam allowance, backing materials, adhesives, and load-distribution features.
Strong Leather Seams
A strong leather seam depends on several parts working together. Thread strength alone is not enough. If the leather around the stitch holes is weak, a stronger thread may simply cut through the material during repeated loading.
The following elements have the greatest influence on seam durability:
- Leather tear resistance and fiber structure
- Total thickness of all sewn layers
- Thread material and diameter
- Needle size and cutting-point shape
- Stitch length and hole spacing
- Distance between the stitch line and cut edge
- Seam allowance width
- Reinforcement layer size
- Direction of pulling force
- Machine tension and presser-foot pressure
The load should pass through a broad section of material rather than one short row of stitches. For example, a handle tab measuring 20 mm wide will normally concentrate force more heavily than a 40 mm-wide attachment using the same leather and stitch type.
A wider tab does not automatically solve every problem, but it creates more room for a larger stitch pattern, stronger backing, and better load distribution. This is especially important for handbags, business bags, travel bags, camera bags, and laptop bags that may carry several kilograms during daily use.
A strong seam also needs enough leather outside the stitch line. When holes are positioned too close to the cut edge, the remaining strip can tear away even if the thread remains unbroken.
| Seam Factor | Weak Construction | Better Construction |
|---|---|---|
| Stitch placement | Too close to the edge | Enough leather remains outside the stitch line |
| Attachment width | Narrow tab with one short row | Wider tab with distributed stitching |
| Thread size | Heavy thread in thin leather | Thread matched to leather thickness |
| Reinforcement | Small patch directly under holes | Wider backing extending beyond the seam |
| Load direction | Force pulls against one stitch row | Pattern spreads force in several directions |
| Layer control | Loose layers move separately | Bonded and stitched layers move together |
For many leather accessories, the strongest result comes from improving the entire attachment structure rather than increasing stitch density.
High-Stress Areas
The parts requiring reinforcement can usually be identified during product development. These areas should be reviewed before sample production because late changes may affect appearance, cost, thickness, hardware position, and material consumption.
Common high-stress areas include:
- Handbag handle bases
- Shoulder strap anchors
- D-ring and O-ring tabs
- Buckle folds
- Detachable strap hooks
- Zipper ends
- Flap hinges
- Wallet center folds
- Card-slot corners
- Belt adjustment holes
- Key-ring loops
- Snap-button areas
- Metal feet attachments
- Luggage handles
- Corners around rigid inserts
Each area experiences a different type of force. A handle base is repeatedly pulled upward and twisted sideways. A wallet fold bends thousands of times. A belt buckle area experiences both tension and a tight folding radius. A D-ring tab may be pulled in several directions as the bag moves.
Using the same reinforcement method everywhere often creates unnecessary bulk in low-stress areas while leaving critical parts under-engineered.
For example, the side seam of a small handbag mainly holds the body shape. The handle attachment carries the weight of the entire bag. These two parts should not automatically use the same thread size, stitch density, backing material, or seam allowance.
A practical development review should answer the following questions:
- What weight will the finished product carry?
- Will the force be static, repeated, or sudden?
- Does the attachment bend while loaded?
- Does metal hardware rub against the leather?
- Will the area be exposed to sweat, rain, heat, or sunlight?
- Is the leather soft and stretchy or firm and stable?
- Can reinforcement be hidden without increasing visible bulk?
These questions are especially important for custom orders because two bags with a similar appearance may have completely different performance requirements.
Stress-Point Failure
Leather seams generally fail in several recognizable ways. Understanding the failure type helps the factory correct the real cause instead of adding unnecessary material or heavier thread.
The most common failure modes are:
- Thread breakage
- Stitch loosening
- Leather tearing between adjacent holes
- Leather tearing from the stitch line to the edge
- Reinforcement delamination
- Tab pull-out
- Hardware cutting into the leather
- Rivet movement or pull-through
- Edge cracking near a stiff reinforcement
- Seam distortion before complete failure
Thread breakage often points to abrasion, excessive tension, poor thread selection, sharp hardware, or a needle that has damaged the thread during sewing.
Leather tearing between holes usually indicates excessive stitch density, oversized needle holes, low tear resistance, or unsuitable cutting direction. This failure can happen even when the thread remains completely intact.
Edge tear-out occurs when the stitch line sits too close to the cut edge. Once the remaining leather strip begins to split, the damage can spread quickly along the seam.
Reinforcement delamination often appears when the adhesive does not match the leather finish, the glue layer is too light, the curing time is insufficient, or the bonded materials have very different flexibility.
A useful sample inspection should not only record whether the part passed or failed. It should also record where the failure started and which component failed first.
| Failure Mode | Likely Cause | Possible Correction |
|---|---|---|
| Thread breaks first | Abrasion or insufficient thread strength | Change thread, reduce friction, review tension |
| Leather tears between holes | Holes too close or too large | Increase stitch length, reduce needle size |
| Leather tears to edge | Insufficient edge distance | Move stitch line inward |
| Tab pulls away | Attachment area too small | Widen tab and backing |
| Rivet pulls through | Cap too small or leather too soft | Add washer or reinforcement |
| Layers separate | Weak bonding or layer movement | Improve adhesive and stitch layout |
| Seam becomes wavy | Excess tension or feed pressure | Adjust machine settings |
The most reliable correction is normally the one that improves the load path without creating another weak point.
Which Stitching Techniques Are Strongest?
No single stitching technique is strongest for every leather product. Saddle stitching works well for premium small goods, while industrial lockstitching provides consistency for larger production runs. Double rows, box-X patterns, folded tabs, and reinforced stitch zones are often used for handles, straps, belts, and hardware attachments.
Saddle Stitching
Saddle stitching is formed with one length of thread and two needles. Each needle passes through the same prepared hole from opposite sides. The thread crosses inside the leather rather than relying on a separate upper and bobbin thread.
This construction is commonly used for:
- Premium wallets
- Watch straps
- Card holders
- Small leather cases
- Belts
- Knife sheaths
- Decorative leather accessories
- Limited-production leather goods
One advantage is that a local thread break does not normally cause a long section to unravel immediately. The remaining thread continues to hold the seam at surrounding holes.
Saddle stitching also creates a recognizable handcrafted appearance. The thread angle, hole spacing, tension, and edge distance become visible design elements, making it suitable for products where craftsmanship is part of the selling point.
However, saddle stitching is not always the best choice for larger orders. Hand production requires more time, skilled operators, and stricter workmanship control. Differences in pulling tension can make one section tighter than another, especially on long seams.
Thicker thread can also create problems when used on thin leather. The required hole may become too large, the edge may appear bulky, and the leather between adjacent holes may weaken.
For custom development, saddle stitching is most appropriate when the product value, expected order quantity, appearance, and production schedule can support handwork.
Lockstitch Construction
Industrial lockstitching uses an upper needle thread and a lower bobbin thread. The two threads interlock inside the sewn material.
It is widely used for:
- Bag panel assembly
- Zipper installation
- Pocket construction
- Strap production
- Handle components
- Wallet assembly
- Lining attachment
- Decorative edge stitching
- Leather box construction
- Belt stitching
Its main advantage is consistency. With the correct machine, operator, guide, and setting, a factory can maintain stable stitch length and alignment across a production batch.
For leather products, machine setup must account for the full construction thickness. A seam may begin with one layer and suddenly pass through four or six layers at a folded corner or handle tab. If the machine is only adjusted for the thin area, skipped stitches, uneven feed, thread damage, or compressed leather marks may appear at the thicker section.
The interlocking point should remain inside the material. When the upper tension is too high, the bobbin thread may be pulled toward the top surface. When it is too low, loops or loose stitches may appear underneath.
Backstitching at the seam ends must also be controlled. Repeatedly sewing over the same holes may weaken leather, particularly on thin wallets, soft lambskin, coated split leather, or synthetic leather.
In many cases, two or three controlled securing stitches are safer than a long, dense reverse section.
Double-Row Stitching
Double-row stitching uses two parallel stitch lines to stabilize layers and distribute force. It is often used on:
- Bag handles
- Shoulder straps
- Belts
- Luggage components
- Reinforced base panels
- Wide leather tabs
- Webbing and leather combinations
- Tool bags
- Camera straps
- Heavy-duty cases
The second row provides additional support if one line becomes damaged. It can also reduce layer movement and help a strap or belt maintain a flat shape.
The distance between rows needs careful control. Rows placed too close together create two lines of closely spaced holes. The narrow strip of leather between them may tear under tension.
Rows positioned too far apart may allow the material between them to lift, wrinkle, or separate. They may also make a refined product look too heavy.
A practical starting distance between two rows may fall between approximately 3 and 8 mm, depending on the width of the component, leather thickness, thread size, and visual design. This is not a fixed production rule. The selected spacing should be tested on the actual material combination.
For a 25 mm shoulder strap, two heavy stitch rows may leave too little unpunctured leather. A 40 mm or 50 mm strap provides more room for wider spacing and a stronger internal reinforcement.
Double-row stitching is therefore most effective when the part width, reinforcement, and stitch layout are designed together.
Box-X and Bar Tacks
A box-X pattern forms a stitched rectangle with diagonal lines crossing through the center. It is useful for attachments that experience pulling from several directions.
Common applications include:
- Shoulder strap tabs
- Handle anchors
- Webbing attachments
- D-ring tabs
- Backpack straps
- Luggage handles
- Work bags
- Tool-bag attachments
The outer box secures the perimeter of the attachment, while the diagonal lines help spread force across the center. This reduces dependence on one short horizontal stitch row.
The pattern needs sufficient area to work properly. A very small box-X made with heavy thread and closely spaced holes can damage the leather instead of strengthening it.
Bar tacks place many stitches into a short area. They are highly effective on woven webbing and fabric, but they must be used cautiously on leather. Dense needle penetration can create a perforated strip, especially on soft, thin, coated, or low-tear-strength leather.
A short rectangular lockstitch, compact box pattern, folded tab, or hidden backing panel may provide better results than a dense bar tack on certain leather accessories.
| Stitching Method | Suitable Products | Main Strength | Main Limitation |
|---|---|---|---|
| Saddle stitch | Wallets, belts, cases, watch straps | Secure hand-sewn structure | Slow and labor-intensive |
| Single lockstitch | Bags, pockets, zippers, linings | Consistent mass production | Requires careful tension control |
| Double-row stitch | Straps, handles, belts, base panels | Better load distribution | Can create parallel tear lines |
| Box-X pattern | Handle tabs, webbing, D-rings | Spreads force in several directions | Needs enough attachment space |
| Bar tack | Selected strap ends and webbing parts | Strong in a compact area | Too many holes may weaken leather |
| Folded stitched tab | Buckles, rings, handle loops | Combines extra layers and wider load path | Can add thickness and stiffness |
The correct technique should be selected according to product use, leather tear resistance, total thickness, order quantity, appearance, and manufacturing method. A decorative handbag, work bag, wallet, and travel case should not share one standard stitching specification.
How Do Materials Affect Stitch Strength?
Stitch strength depends on how the leather, thread, needle, reinforcement material, adhesive, and hardware perform together. A seam may use high-strength thread and still fail if the leather tears around the needle holes. In the same way, thick leather may appear durable but perform poorly when it is excessively skived, folded sharply, or stitched with an unsuitable needle point.
For custom leather products, material selection should begin with the finished construction rather than the appearance of one individual swatch. The factory needs to evaluate how many layers will be sewn, how the part will bend, where hardware will apply pressure, and how the product will be used after delivery. This is particularly important for handles, shoulder straps, belt ends, card slots, zipper ends, and hardware tabs.
Leather Sewing Thread
Bonded polyester and bonded nylon are widely used in the production of leather bags, wallets, belts, straps, cases, and accessories. Both can provide good strength and abrasion resistance, but they behave differently under moisture, sunlight, tension, and repeated flexing.
Bonded polyester is commonly selected for products that may be exposed to sunlight, moisture, temperature changes, or outdoor use. It generally offers good dimensional stability and color retention. It is often suitable for travel bags, outdoor accessories, golf bags, equipment cases, luggage, belts, and products sold in humid or sunny markets.
Bonded nylon is valued for toughness, flexibility, and resistance to repeated movement. It can work well on handbags, backpacks, soft leather goods, straps, belts, and accessories that bend frequently. Nylon may stretch slightly more than polyester, which can be useful in some constructions but less desirable where a seam must remain highly stable.
Thread selection should also consider the following factors:
- Product load
- Leather thickness
- Number of sewn layers
- Stitch length
- Needle size
- Exposure to sunlight
- Exposure to moisture
- Abrasion against hardware
- Required seam appearance
- Target product lifespan
- Cleaning and care conditions
- Market positioning
A thicker thread does not automatically create a better seam. Larger thread needs a larger needle, and a larger needle creates a wider hole. On thin leather, the increase in hole size may reduce tear resistance more than the stronger thread improves seam strength.
For example, a thick decorative thread may work well on a 3.5 mm belt but appear oversized and weaken the edge of a 0.8 mm card slot. A smaller thread may provide a cleaner appearance and leave more material between adjacent holes.
The visual effect also matters. Contrasting thread makes every stitch visible. Small variations in alignment, tension, and stitch length become easy to notice. Tone-on-tone thread is more forgiving, but inconsistent tension can still affect seam durability.
| Thread Type | Common Applications | Main Advantages | Points to Check |
|---|---|---|---|
| Bonded polyester | Outdoor bags, luggage, belts, travel accessories | Good sunlight and moisture resistance | Can feel slightly firmer on soft leather |
| Bonded nylon | Handbags, straps, backpacks, flexible accessories | Strong, flexible, abrasion-resistant | May stretch more under load |
| Waxed polyester | Hand-stitched wallets, cases, belts | Controlled hand sewing and clean appearance | Wax level must not stain leather |
| Braided thread | Decorative hand stitching and heavy leather goods | Strong visual character | Requires suitable hole size |
| Fine synthetic thread | Wallet interiors and card slots | Low bulk and refined seam | May not suit heavy attachments |
Thread quality should be checked before bulk production. Important inspection points include color consistency, surface smoothness, bonding quality, knot formation, abrasion resistance, and compatibility with the selected needle.
A factory should also control thread storage. Dust, moisture, sunlight, and excessive heat can affect performance. Large orders using custom-dyed thread should be produced from the same approved batch whenever possible to reduce visible color variation.
Leather Needle Points
Leather sewing needles cut through the material rather than pushing woven fibers apart. The shape and direction of the cutting point influence hole size, stitch angle, seam appearance, thread movement, and the risk of tearing.
Different needle points may create straight, slanted, raised, recessed, or decorative stitch lines. The correct point depends on leather type, thickness, firmness, coating, thread size, and the desired visual effect.
Common considerations include:
- Firm vegetable-tanned leather may require a stronger cutting action.
- Soft chrome-tanned leather may need a cleaner, less aggressive incision.
- Thin coated leather can tear if the cut is too wide.
- Suede and split leather may need testing because fiber density can vary.
- PU and PVC leather may contain a textile backing that reacts differently from genuine leather.
- Repeated sewing over the same area can enlarge holes and weaken the seam.
The needle diameter should match the thread. A needle that is too small may damage the thread, create friction, or cause skipped stitches. A needle that is too large creates unnecessary holes and may leave visible marks around the seam.
A practical needle trial should check:
- Whether the thread passes smoothly through the eye
- Whether the needle cuts the surface cleanly
- Whether the leather puckers around the hole
- Whether the stitch angle matches the approved sample
- Whether the thread is scratched or frayed
- Whether holes enlarge during backstitching
- Whether the lower surface shows tearing
- Whether repeated flexing causes holes to connect
Needles should also be replaced regularly. A dull, bent, damaged, or overheated needle may create inconsistent holes, skipped stitches, thread breakage, surface scratches, or irregular seam lines.
For premium leather goods, needle replacement should not be based only on complete breakage. A needle can become unsuitable long before it snaps. First-piece inspections and regular production checks help identify deterioration early.
Leather Thickness
Leather thickness affects nearly every sewing decision. It influences thread size, needle diameter, stitch length, skiving, folding, machine type, presser-foot pressure, seam allowance, edge finishing, and reinforcement selection.
The thickness listed for one leather sheet does not represent the thickness of the finished seam. A 1.2 mm leather panel may become a 4.5 mm section after folding, adding lining, applying reinforcement, and joining another component.
This increase can be even greater at:
- Handle bases
- Folded strap ends
- Buckle attachments
- Zipper ends
- Bag corners
- Layered wallet edges
- D-ring tabs
- Reinforced base seams
- Leather box corners
A thickness map is useful during product development. It records how many layers meet at each seam and identifies where skiving is needed.
For example:
| Product Area | Main Leather | Added Layers | Estimated Sewn Thickness |
|---|---|---|---|
| Handbag body seam | 1.2 mm | Lining and edge fold | 2.8–3.8 mm |
| Handle tab | 1.4 mm | Fold, backing and body panel | 4.5–6.5 mm |
| Wallet card slot | 0.8 mm | Fold and base layer | 1.8–2.6 mm |
| Belt edge | 1.8 mm | Two-layer lamination | 3.4–4.0 mm |
| D-ring attachment | 1.5 mm | Folded tab, reinforcement and panel | 5.0–7.0 mm |
These figures vary according to construction, compression, skiving, adhesive weight, and reinforcement material. They are useful for planning but should be confirmed on physical samples.
Thin leather offers a refined appearance and lower weight, but it may stretch or tear more easily around hardware. It often needs localized backing, especially at snap buttons, handles, card slots, and ring attachments.
Thick leather provides more material around the stitch holes but may become difficult to fold. If several thick layers meet at one point, the product can look bulky and the machine may struggle to feed the layers evenly.
Skiving reduces thickness in folded and overlapping areas. It should be controlled carefully. Over-skiving can weaken the exact area that needs reinforcement. Under-skiving creates hard edges, bulky folds, uneven topstitching, and poor hardware movement.
A reliable factory should define:
- Original leather thickness
- Skived thickness
- Skiving width
- Final folded thickness
- Reinforcement thickness
- Maximum seam stack
- Acceptable thickness tolerance
This information helps prevent unexpected changes between the first sample and bulk production.
Leather Temper
Leather temper describes how soft, flexible, firm, or rigid the material feels. Two leathers with the same measured thickness can perform very differently because of differences in temper, fiber structure, finishing, oil content, and backing.
Soft leather often stretches more around needle holes. It may require wider reinforcement, controlled presser-foot pressure, lower tension, and a more supportive backing.
Firm leather may retain shape well but can crack when folded too sharply. It may also need larger bending radiuses and carefully selected needle points.
Temper affects:
- Handle shape retention
- Strap stretch
- Wallet flexibility
- Edge stability
- Stitch appearance
- Surface marking
- Hardware support
- Fold durability
- Skiving behavior
- Adhesive penetration
For a soft handbag, the reinforcement should support the handle without creating a hard rectangular outline visible through the exterior. A gradual transition is usually better than a small, rigid patch.
For a structured briefcase, firmer reinforcement may be appropriate because the product needs clean edges and stable geometry. The backing can extend across a larger section of the panel to distribute force.
Material trials should therefore include not only thickness measurements but also stretch, bending, tear resistance, surface recovery, and visual appearance after sewing.
Reinforcement Layers
Reinforcement layers help distribute force beyond the stitch line and reduce local stretching. They are commonly used beneath handles, shoulder strap tabs, D-rings, snap buttons, buckles, metal feet, zipper ends, and other high-stress components.
Possible reinforcement materials include:
- Additional leather
- Split leather
- Microfiber board
- Nonwoven reinforcement
- Woven tape
- Polyester webbing
- Cotton tape
- Fiberboard
- Synthetic sheet material
- Plastic inserts
- Molded structural parts
- Foam-laminated support
The selected reinforcement should match the flexibility and expected movement of the product. A very rigid backing can strengthen one small area but create a hard transition where the surrounding leather begins to bend. Over time, cracking may start at the edge of the reinforcement.
A stronger construction usually uses gradual load transfer. This can be achieved by:
- Extending the backing beyond the stitch pattern
- Tapering the reinforcement edges
- Skiving the backing perimeter
- Using multiple reinforcement layers with different stiffness
- Avoiding sharp internal corners
- Aligning reinforcement with the pulling direction
- Connecting the reinforcement to a larger structural panel
For example, a handle tab measuring 35 mm wide may perform better with a backing patch measuring 60–80 mm wide than with a patch that only matches the visible tab. The wider patch distributes force across more of the bag body.
The reinforcement should also be bonded evenly. Air pockets, dry adhesive zones, and curled edges can reduce support and create visible marks on the exterior.
Adhesives
Adhesives are used to hold layers in position, support shape, prevent movement during stitching, and share some of the load across a wider area. They are important in belts, straps, wallet components, folded edges, handle tabs, leather boxes, and laminated panels.
Adhesive performance depends on:
- Leather surface treatment
- Oil and wax content
- Coating type
- Adhesive chemistry
- Application weight
- Drying time
- Activation temperature
- Pressing pressure
- Curing time
- Environmental temperature
- Humidity
- Repeated bending
A leather surface with heavy oils, waxes, silicone, or protective coating may resist bonding. Surface preparation may be required, but aggressive sanding can damage the finish or reduce material thickness.
Too much adhesive can create hard areas, staining, edge overflow, odor, or visible marks. Too little adhesive may allow layers to move and place greater stress on the stitches.
The adhesive should not be expected to replace stitching in structural areas. Glue is most effective when it stabilizes the layers while the stitch pattern provides the main mechanical connection.
During sample evaluation, the factory should check:
- Initial bond strength
- Bond strength after 24–72 hours
- Edge lifting
- Delamination after flexing
- Staining on light-colored leather
- Hardness changes
- Heat resistance
- Odor
- Adhesive overflow
- Compatibility with edge paint
For belts and laminated straps, delayed testing is important. A freshly bonded sample may appear strong before the adhesive has fully cured or before repeated bending reveals weak areas.
Hardware Compatibility
Hardware can strengthen or damage a leather attachment depending on its geometry, finish, edge condition, and placement.
Common risks include:
- Sharp ring edges cutting the leather
- Small rivet caps pulling through soft material
- Buckle corners creating local pressure
- Snap buttons deforming thin leather
- Strap hooks twisting narrow tabs
- Metal feet loosening from unsupported panels
- Zipper sliders rubbing against seam edges
- Screw posts rotating during use
The leather and reinforcement around hardware should be sized according to the hardware load. A heavy metal clasp should not be attached to a small decorative tab designed for a lighter component.
Rivet post length is especially important. A post that is too short may not close securely. A post that is too long may bend, leave movement, or damage the leather during setting.
Washers, backing plates, double-cap rivets, hidden reinforcement, and larger attachment areas can improve performance. However, hardware should not be added merely to cover weak stitching.
| Hardware Area | Common Risk | Recommended Control |
|---|---|---|
| D-ring tab | Ring edge cuts leather | Use smooth hardware and wider folded tab |
| Rivet attachment | Rivet pulls through | Add backing or washer |
| Buckle fold | Leather cracks at bend | Skive gradually and increase fold radius |
| Snap button | Thin panel deforms | Add hidden reinforcement |
| Metal feet | Base panel tears | Use backing plate or structural base |
| Strap hook | Tab twists under load | Increase tab width and stabilize direction |
How Are Stitching Parameters Set?
Stitching parameters should be established on the actual leather, thread, reinforcement, adhesive, and layer combination intended for production. Settings copied from another product may create poor results because leather thickness, firmness, coating, and seam structure can change significantly from one order to another.
The most important parameters include stitch length, edge distance, thread tension, needle size, presser-foot pressure, sewing speed, seam allowance, reverse-stitch length, and stitch-row spacing.
Stitch Length
Stitch length determines how much leather remains between adjacent needle holes. Short stitches create a refined appearance, but they also create more perforations within the same distance.
When stitch holes are too close together, the leather between them may tear and form a continuous split. This is especially likely in thin leather, soft leather, heavily coated leather, low-quality split leather, and synthetic materials with weak backing.
Longer stitches leave more leather between holes, but overly long stitches may allow the seam to open, shift, or look rough.
A practical development range may include:
| Product Area | Possible Starting Stitch Length |
|---|---|
| Fine wallet details | 2.8–3.4 mm |
| Card slots | 3.0–3.5 mm |
| Handbag topstitching | 3.2–4.0 mm |
| Panel assembly | 3.5–4.2 mm |
| Handle tabs | 3.5–4.5 mm |
| Belts and heavy straps | 4.0–5.0 mm |
| Thick decorative leather | 4.5–6.0 mm |
These figures are starting references rather than fixed standards. Final approval should depend on the actual material and required performance.
Stitch length should be checked after sewing, not only on the machine setting. Soft materials may compress and produce a shorter visible distance than expected. Curves and corners can also reduce spacing if the operator turns the product too sharply.
At corners, stitches should not cluster. The operator may need to adjust the final stitch before turning or use a larger corner radius.
Edge Distance
Edge distance is the space between the stitch line and the cut edge. If it is too narrow, the leather may tear from the needle hole to the edge. If it is too wide, the seam may look heavy, allow the edge to roll, or interfere with the design.
Possible starting ranges include:
| Product Area | Possible Edge Distance |
|---|---|
| Fine wallet edges | 2.5–3.5 mm |
| Card slots | 2.5–3.5 mm |
| Small accessory edges | 3.0–4.0 mm |
| Handbag panel seams | 3.5–5.0 mm |
| Handle tabs | 4.0–6.0 mm |
| Belts and heavy straps | 4.0–7.0 mm |
The correct distance depends on:
- Hole size
- Leather tear strength
- Edge finishing method
- Number of layers
- Thread size
- Product load
- Seam direction
- Component width
- Reinforcement structure
A 3 mm edge distance may work on a fine wallet edge but be unsuitable for a heavily loaded handle tab. The same visible margin does not provide the same performance across different products.
Corners need additional attention. Sharp corners reduce the amount of material around the stitch holes and concentrate stress. Rounded corners usually offer better durability and smoother sewing.
Thread Tension
Balanced thread tension keeps the interlocking point inside the sewn layers. The upper and lower threads should meet within the material rather than being pulled visibly toward one surface.
Signs of excessive upper tension include:
- Bobbin thread visible on the top
- Leather puckering
- Thread cutting into the surface
- Distorted stitch holes
- Curved or wavy seam lines
Signs of insufficient upper tension include:
- Loops on the underside
- Loose stitches
- Poor seam stability
- Visible upper thread beneath the product
- Uneven stitch formation
Tension should be checked when:
- Thread size changes
- Needle size changes
- Leather thickness changes
- The seam enters a folded area
- The bobbin is replaced
- Sewing speed changes
- A new production batch begins
- Adhesive or backing material changes
The test material should reproduce the actual seam stack. Testing on one flat leather layer is not useful when the production seam contains four layers, backing, glue, and lining.
Presser-Foot Pressure
Presser-foot pressure keeps the material stable during sewing, but too much pressure can leave permanent marks, stretch soft leather, disturb coatings, and create uneven feeding.
Too little pressure may cause:
- Layer movement
- Uneven stitch length
- Misaligned edges
- Skipped stitches
- Poor corner control
- Wavy topstitching
Too much pressure may cause:
- Surface dents
- Gloss changes
- Grain damage
- Edge distortion
- Stretching
- Uneven thickness
Soft lambskin, aniline leather, nubuck, suede, and lightly finished leather require particular care because marks may remain visible.
Possible controls include:
- Reducing foot pressure
- Using a roller foot
- Using a Teflon-coated foot
- Applying protective tape
- Adjusting feed mechanisms
- Slowing the sewing speed
- Testing on hidden material areas
The selected foot should not scratch the surface or drag against the leather.
Sewing Speed
High sewing speed increases productivity but can create needle heating, thread damage, irregular feeding, and surface marks. Thick leather and multiple-layer seams often require lower speed.
Heat may soften synthetic coatings, weaken thread finishes, enlarge holes, or create visible marks. Long continuous seams are more likely to generate heat than short wallet seams.
Production control may include:
- Lower machine speed
- Scheduled needle replacement
- Needle cooling systems
- Lubricated thread
- Shorter sewing intervals
- Pre-punched holes for selected handwork
- Testing thread after long seams
The acceptable speed should be based on stable seam quality rather than maximum machine capacity.
Backstitching
Backstitching secures the start and end of a seam, but repeated penetration of the same holes can weaken leather.
A long reverse section may create:
- Oversized holes
- Surface damage
- Thread buildup
- Visible misalignment
- Perforation
- Hard seam ends
For fine leather goods, two or three controlled reverse stitches may be sufficient. Some constructions use hidden thread locking, manual knotting, overlapping stitch paths, or adhesive support instead of a dense reverse section.
The securing method should be decided during sample approval and included in the workmanship standard.
Stitch-Row Spacing
Parallel stitch rows should be far enough apart to preserve leather between them but close enough to stabilize the component.
Factors affecting row spacing include:
- Strap width
- Handle-tab width
- Leather thickness
- Thread diameter
- Reinforcement width
- Edge distance
- Product load
- Visual design
A possible development range may be approximately 3–8 mm between rows, but wider heavy-duty components may require more.
The row spacing should be measured consistently along the full component. Uneven rows are visually noticeable and can create weak zones where one line sits too close to the edge.
Seam Allowance
Seam allowance provides material outside the structural stitch line. Too little allowance increases tear-out risk. Too much allowance creates bulk, especially at curved seams and corners.
Seam allowance must consider:
- Whether the seam is turned or exposed
- Whether the edge is skived
- Whether reinforcement is included
- Whether the lining is caught in the seam
- Whether the edge is painted, folded, or bound
- Whether the part will be trimmed after sewing
A turned handbag seam may need more allowance than an exposed edge-painted wallet seam. The factory should define the cut size, stitch line, trim allowance, and finished dimension separately.
Production Parameter Control
Approved parameters should be recorded before mass production. Verbal instructions are not enough for orders containing several product styles, colors, leathers, and thread sizes.
A useful production record may include:
| Control Item | Approved Requirement |
|---|---|
| Leather thickness | Measured range for each component |
| Skived thickness | Target range and skiving width |
| Thread type | Material, size, color and supplier |
| Needle | Size and cutting-point type |
| Stitch length | Approved range |
| Edge distance | Approved range |
| Row spacing | Approved range |
| Backstitch | Number of reverse stitches |
| Machine tension | Approved sample reference |
| Presser-foot type | Standard foot or protective foot |
| Reinforcement | Material, thickness and dimensions |
| Adhesive | Type, application and curing time |
These records help maintain consistency when multiple operators, lines, or production batches are involved.
A first-piece inspection should compare production output with the approved sample before the full order continues. Checks should include stitch length, seam alignment, tension, edge distance, corner appearance, surface marks, thread color, and reinforcement position.
For custom leather products, small parameter changes can create major differences in durability and appearance. The most reliable approach is to approve the complete construction rather than approving leather, thread, and stitching as separate items.
How Are High-Stress Parts Reinforced?
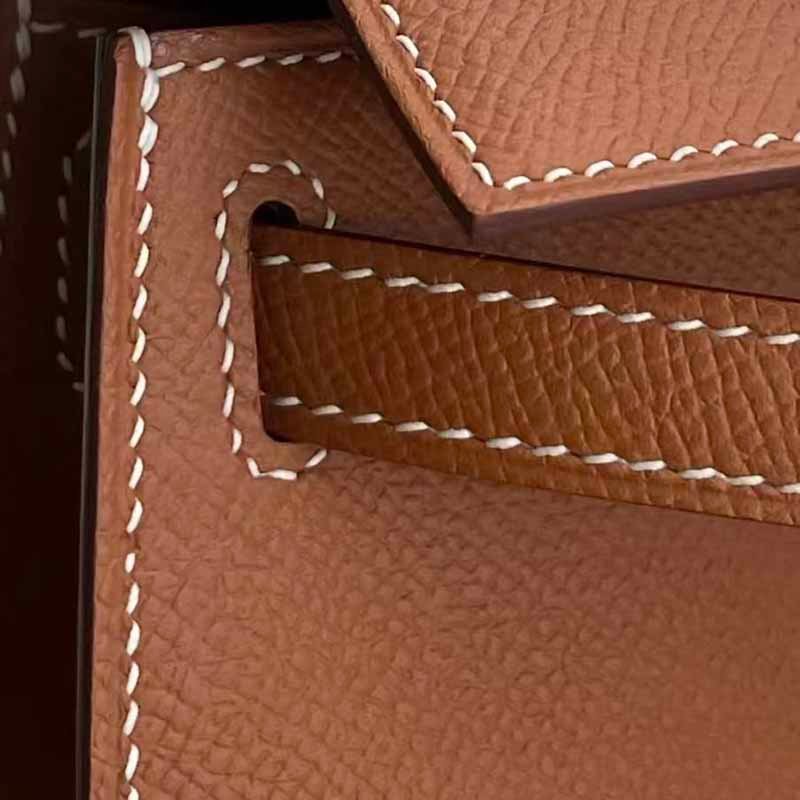
High-stress parts are reinforced by increasing the load-bearing area, supporting the leather from behind, controlling the direction of force, and preventing individual stitch holes from carrying too much pressure. Handles, shoulder straps, belt folds, wallet corners, buckles, D-rings, rivets, snaps, zipper ends, and metal fittings should each use a construction suited to their actual movement and expected load.
The strongest solution is rarely one extra stitch row added at the end of sampling. Reliable reinforcement begins with the shape of the part, the width of the attachment, the flexibility of the leather, the backing material, the hardware geometry, and the way force enters the product.
Bag Handle Reinforcement
Bag handles are among the most demanding parts of a leather bag. They are repeatedly lifted, dropped, twisted, pulled sideways, and pressed against metal fittings. The handle base may carry the full weight of the bag while also responding to sudden movement when the user walks, places the bag on a surface, or lifts it quickly.
A narrow handle tab concentrates force within a small area. Even when the thread remains intact, the leather around the stitch holes may elongate, wrinkle, or tear. A wider attachment usually performs better because it gives the factory more room for reinforcement, edge distance, and stitch distribution.
Common handle constructions include:
- Folded leather tabs
- Hidden backing panels
- Box-X stitching
- Double-row stitching
- Webbing or tape cores
- Layered leather bases
- Rivet-and-stitch combinations
- Reinforced body panels
- Full-length internal support strips
- Molded handle inserts
The reinforcement should extend beyond the visible stitch pattern. A backing piece that ends directly beside the final stitch row can create a hard boundary. Repeated bending may then cause the outer leather to crack along the edge of the reinforcement.
For a medium-sized handbag, a visible handle tab may measure 30–45 mm wide, while the hidden reinforcement beneath it may extend 60–100 mm across the body panel. Larger business bags and travel bags may require an even broader support area.
The correct dimensions depend on:
- Finished bag weight
- Expected carrying load
- Handle width
- Leather thickness
- Leather stretch
- Lining structure
- Number of attachment points
- Hardware weight
- Body-panel stiffness
- Product shape
A handle attached to a structured briefcase can transfer force into a firm body panel. The same handle attached to soft leather may need a larger hidden backing because the exterior panel stretches more easily.
Handle height also affects stress. A long handle creates more leverage and sideways movement than a short top handle. Adjustable handles with buckles or rings create additional weak points where the leather bends around hardware.
During sample evaluation, the handle base should be checked for:
- Stitch-hole elongation
- Leather wrinkling
- Panel distortion
- Reinforcement outlines
- Tab movement
- Thread abrasion
- Rivet loosening
- Hardware rotation
- Uneven handle height
- Color change from repeated bending
A handle may pass a short pull test and still perform poorly in daily use. Repeated lifting and sideways movement should therefore be included in development testing.
Shoulder Strap Reinforcement
Shoulder straps experience continuous tension and repeated flexing. They also rub against clothing, metal rings, adjustment buckles, hooks, and the edge of the bag. A strap may remain under load for hours, which makes stretch resistance and layer bonding especially important.
The strap body can be built from:
- One-piece leather
- Folded leather
- Two laminated leather layers
- Leather with woven tape inside
- Leather with synthetic reinforcement
- Leather with foam padding
- Leather wrapped around webbing
- Leather with a rigid central core
A leather-only strap can provide a premium appearance, but soft leather may stretch over time. A hidden woven tape or webbing core can improve dimensional stability without changing the visible design.
The internal support should not be too stiff. A rigid strip can make the strap uncomfortable and may cause cracking at the point where the stiff section ends. Gradual tapering or a flexible reinforcement normally produces a smoother transition.
Strap attachments should also be wide enough to resist twisting. A narrow tab holding a heavy snap hook may rotate, fold, or tear when the bag swings.
For detachable straps, important control points include:
- Hook opening strength
- Swivel movement
- D-ring thickness
- Tab width
- Rivet position
- Stitch pattern
- Reinforcement length
- Buckle hole spacing
- Edge paint durability
- Layer adhesion
Adjustment holes reduce the remaining material in the strap. The stitch line should not sit too close to these holes. The distance between the hole edge and stitch line must leave enough leather to resist tearing during adjustment.
A strap should be tested at its longest usable position because this often places the greatest load on the buckle, slider, and attachment hardware.
| Shoulder Strap Area | Main Risk | Recommended Construction Control |
|---|---|---|
| Hook tab | Twisting and tear-out | Wider folded tab with internal backing |
| Adjustment holes | Leather splits toward stitch line | Increase spacing between holes and stitches |
| Buckle fold | Cracking at tight bend | Controlled skiving and larger fold radius |
| Strap body | Stretching under load | Add woven or synthetic support |
| Edge finish | Cracking from repeated flexing | Use flexible edge coating and bend testing |
| D-ring connection | Hardware cuts leather | Smooth ring edges and sufficient tab width |
Belt Reinforcement
Leather belts experience direct tension, repeated bending, buckle pressure, body heat, moisture, and abrasion. The buckle end and adjustment-hole area usually receive the highest stress.
A belt can be produced from:
- Single-layer vegetable-tanned leather
- Two laminated leather layers
- Leather with a reinforcement core
- Leather with a split-leather backing
- Leather with textile support
- Leather with a synthetic central layer
Single-layer belts can perform well when the leather is firm and thick enough, but they may stretch if the hide is soft or cut from an unstable section. Laminated belts provide better control over thickness, color, backing appearance, and shape, although the adhesive and stitching must withstand repeated bending.
The buckle fold should be skived gradually. A sharp, over-skived fold may look neat initially but can weaken the leather around the buckle bar. Under-skiving creates a bulky fold that may prevent the buckle from moving freely.
The buckle area should be reviewed for:
- Fold thickness
- Buckle-bar clearance
- Stitch-line position
- Rivet or screw placement
- Edge distance
- Keeper-loop attachment
- Leather cracking
- Hardware abrasion
- Reinforcement termination
- Strap flexibility
Adjustment holes should be clean, evenly spaced, and positioned away from the structural stitch line. A decorative border stitch placed too close to the holes can reduce the remaining leather section.
The center hole should generally align with the target belt size, while the remaining holes provide adjustment. The total number of holes and spacing should match the market and intended use.
For fashion belts, hole spacing may be relatively close. Heavy work belts may need greater spacing and larger holes because the buckle pin is thicker.
Belt testing should include repeated fastening, bending around the buckle, pull loading, hole deformation, edge cracking, and layer separation. A belt can appear strong while flat but fail after repeated folding.
Wallet Reinforcement
Wallets carry little weight compared with travel bags, but their construction is exposed to constant movement. Card slots are repeatedly stretched, center folds bend every time the wallet opens, and the edges rub against pockets and other objects.
The strongest wallet is not the thickest wallet. Too many reinforcement layers can make the product stiff, bulky, and difficult to close. Good wallet construction uses localized support and controlled thickness.
Important areas include:
- Card-slot corners
- Center folds
- Coin-pocket openings
- Zipper ends
- Snap-button areas
- ID-window openings
- Note compartments
- Folded edges
- Narrow leather bridges
- External pocket corners
Card-slot corners often fail because a sharp internal angle concentrates pressure. A small rounded corner can reduce tearing and give the stitch line more room.
Card pockets should also be sized for real card dimensions and stacking thickness. A pocket that is too tight creates excessive pressure on the corner stitches. A pocket that is too loose may lose shape.
The leather around card slots is often skived to reduce bulk. This process needs strict control. If the leather becomes too thin beside the seam, repeated card insertion may tear the material.
A practical wallet development review should include:
- Card insertion force
- Pocket opening size
- Number of cards per slot
- Fold thickness
- Closing pressure
- Stitch distance from cutouts
- Adhesive coverage
- Lining flexibility
- Edge-paint cracking
- Surface marking
Wallet folds should be thinner and more flexible than the surrounding panels. A rigid reinforcement running through the fold can cause cracking or prevent the wallet from closing naturally.
For bifold wallets, repeated opening tests should examine whether the center seam loosens, the leather wrinkles, or the lining pulls away.
Small Leather Goods
Key holders, card cases, passport covers, watch straps, luggage tags, phone sleeves, organizers, and leather boxes all contain narrow parts that can be weakened by oversized thread or dense stitching.
Small components require careful balance because there is less material available around the stitch holes.
For watch straps, high-stress areas include:
- Spring-bar ends
- Buckle folds
- Adjustment holes
- Keeper loops
- Padded transitions
- Edge paint around curves
The strap end near the watch case is repeatedly bent and exposed to sweat. Reinforcement materials must resist moisture and remain flexible.
For luggage tags, the strap opening and buckle area need support because the tag may swing and twist during transport.
For leather key rings, the loop holding the metal ring should be wide enough to prevent tearing. A dense bar tack in a small tab can weaken the leather. A folded tab with controlled stitching may perform better.
Leather boxes require different reinforcement because they depend on corner shape, panel rigidity, hinge movement, and adhesive stability. Reinforced corner joints should remain square without excessive stitch bulk.
Rivet Reinforcement
Rivets are often used at handle bases, belt ends, strap tabs, tool loops, and hardware attachments. They can improve resistance to peeling and provide a visible decorative element.
A rivet is only effective when the leather and backing around it can carry the load. The rivet itself may remain intact while pulling through soft material.
Important rivet variables include:
- Cap diameter
- Post diameter
- Post length
- Material thickness
- Setting pressure
- Washer use
- Reinforcement size
- Rivet finish
- Edge distance
- Distance from stitch lines
A larger cap spreads pressure over a wider area. A washer or hidden backing plate can further reduce pull-through risk.
Post length should match the compressed thickness of the assembled layers. Too short a post may not lock correctly. Too long a post may bend, move, or create an uneven cap.
Rivets should not sit too close to the edge or directly over a weak skived area. They should also be positioned so that the setting tool does not damage the surrounding leather.
A rivet-and-stitch construction should be designed as one system. The rivet should support the load without cutting across the most important stitch path.
Adhesive Support
Adhesive helps keep leather layers flat, improves edge alignment, and reduces movement between components. In reinforced sections, it can spread shear force across a broader area before the load reaches the stitch line.
Adhesive is particularly important for:
- Laminated belts
- Shoulder straps
- Wallet panels
- Folded edges
- Handle tabs
- Leather boxes
- Reinforcement panels
- Zipper assemblies
- Padded components
Adhesive coverage should be even. Dry zones allow layers to separate, while excessive glue may produce hard spots, staining, odor, or visible marks.
The bonded part should be allowed to dry or cure according to the adhesive system. Sewing immediately after application can cause movement, needle contamination, or uneven bonding.
A proper adhesive check should include:
- Bond strength after curing
- Flexibility
- Heat resistance
- Moisture resistance
- Surface staining
- Edge lifting
- Odor
- Hardness
- Compatibility with paint
- Long-term delamination
Light-colored leather needs particular attention because adhesive stains and dark marks are easier to see.
Stitch and Hardware Balance
Stitching and hardware should support each other. Hardware must not transfer all force into one narrow stitch line, and stitches should not be placed where hardware repeatedly rubs against the thread.
Common design errors include:
- A D-ring sitting directly on top of the seam
- A buckle edge cutting into the leather fold
- A snap hook twisting a narrow tab
- A rivet placed too close to a stitch row
- A zipper slider rubbing against exposed thread
- A metal foot attached without backing
- A screw post rotating inside soft leather
Hardware contact areas should be checked for smoothness. Rough edges, casting marks, burrs, and sharp corners can damage leather and thread.
The finish also matters. Heavy plated hardware may be attractive but increase the load on the attachment. Large clasps and buckles may require wider tabs and stronger backing.
Reinforcement Planning
A product-development team should create a reinforcement map before the sample is approved. The map identifies every area where additional support is required.
A useful reinforcement map may include:
| Component | Stress Direction | Reinforcement | Stitching Method | Hardware Support |
|---|---|---|---|---|
| Top handle | Upward and sideways | Wide hidden backing | Box-X or double row | Rivet optional |
| Shoulder strap | Continuous tension | Woven internal tape | Double-row lockstitch | Reinforced hook tab |
| D-ring tab | Multi-directional pull | Folded leather and backing | Box or rectangular stitch | Smooth D-ring |
| Belt buckle | Tension and bending | Skived folded section | Double row or perimeter stitch | Rivet or screw post |
| Wallet card slot | Repeated opening | Local thin backing | Fine lockstitch | None |
| Snap button | Concentrated pressure | Circular hidden patch | Perimeter stitching if needed | Washer or backing |
| Metal foot | Impact and compression | Rigid base support | Hidden structural seam | Backing plate |
This planning reduces late-stage changes and helps align appearance, cost, and performance before bulk production.
How Are Reinforced Seams Tested?
Reinforced seams should be tested according to the product’s actual use. A single pull test gives useful information, but it does not represent every condition a bag, wallet, belt, or strap will face.
Testing should examine strength, repeated movement, abrasion, deformation, and appearance after use.
Seam Strength Testing
A seam-strength test pulls a stitched specimen until the seam opens or one component fails. The result should include both the maximum load and the failure mode.
Possible failure modes include:
- Thread rupture
- Leather tear between holes
- Leather tear toward the edge
- Seam opening
- Reinforcement separation
- Stitch slippage
- Coating delamination
- Hardware pull-out
The failure mode often explains more than the final number. A high-strength thread that tears through the leather is not a successful result.
Test specimens should use the same:
- Leather batch
- Thread
- Needle
- Stitch length
- Edge distance
- Reinforcement
- Adhesive
- Layer count
- Sewing direction
Changing one of these factors can affect the outcome.
Handle Pull Testing
Handle testing evaluates the attachment between the handle and bag body. The bag may be loaded internally or the handle may be pulled through testing equipment.
The test should monitor:
- Initial deformation
- Stitch-hole growth
- Panel stretching
- Reinforcement movement
- Thread breakage
- Tab displacement
- Rivet loosening
- Hardware rotation
- Permanent shape change
A static load test places weight on the handle for a set period. A cyclic test repeatedly lifts and lowers the bag to simulate daily use.
A bag intended to carry a laptop, documents, or travel items should be tested at a load above the expected daily weight. The exact safety margin should be agreed during development because product size and use vary.
For example, a business bag expected to carry 6 kg may be tested at a higher static load and through repeated lifting cycles. The acceptance criteria should cover both structural safety and appearance.
Strap Attachment Testing
Shoulder straps should be tested at the hook, tab, buckle, slider, and strap body.
Testing may include:
- Straight pulling
- Sideways pulling
- Repeated swinging
- Buckle adjustment cycles
- Hook opening cycles
- Strap flexing
- Edge abrasion
- Humidity exposure
- Sweat resistance
The longest strap setting should be included because it places more leverage on the hardware and attachment points.
Adjustable straps should be checked for slipping through the buckle or slider. A strap that remains intact but gradually changes length under load still creates a quality problem.
Belt Testing
Belts should be tested for:
- Tensile resistance
- Buckle pull strength
- Hole deformation
- Repeated fastening
- Fold cracking
- Layer separation
- Stretch recovery
- Edge-paint durability
- Hardware corrosion
- Keeper-loop strength
The adjustment holes should be inspected after repeated use. Elongation, cracking, and surface damage may appear before complete failure.
The buckle fold should be bent repeatedly because this area receives constant movement. A belt that performs well in a straight pull may still crack around the buckle.
Wallet Testing
Wallet testing focuses on repeated movement and compact construction.
Useful checks include:
- Repeated opening and closing
- Card insertion and removal
- Pocket stretch
- Center-fold cracking
- Snap-button cycling
- Zipper cycling
- Edge abrasion
- Lining separation
- Surface color transfer
- Stitch loosening
Card slots should be tested with the intended number of cards. Overfilling can produce unrealistic results, while testing with one thin sample card may not reflect real use.
The wallet should still close naturally after the pockets are filled. Excessive pressure can damage the folds and stitching.
Hardware Testing
Hardware testing should cover both strength and surface quality.
Important checks include:
- Rivet pull strength
- Snap opening force
- Buckle movement
- Hook security
- D-ring deformation
- Screw-post loosening
- Corrosion resistance
- Plating wear
- Sharp edges
- Rotation under load
Metal components should be checked before assembly. Once installed, a rough edge may be hidden and difficult to identify until the product is used.
Repeated-Use Testing
Many leather products fail from repeated moderate stress rather than one extreme event.
Repeated-use tests may include:
- Thousands of handle lifts
- Repeated strap flexing
- Wallet opening cycles
- Zipper opening cycles
- Buckle fastening cycles
- Snap-button operation
- Strap-adjustment cycles
- Repeated loading and unloading
The test quantity should reflect product type, target market, price level, and expected lifespan.
The appearance after testing is also important. A component may remain structurally intact while becoming badly distorted, wrinkled, stretched, or discolored.
Environmental Testing
Leather accessories may be exposed to heat, humidity, moisture, sunlight, sweat, and temperature changes during transport and use.
Environmental checks may cover:
- High-temperature storage
- Humidity exposure
- Water spotting
- Sweat resistance
- Color transfer
- Adhesive softening
- Hardware corrosion
- Edge-paint cracking
- Leather hardening
- Lining shrinkage
A bag exported by sea may spend weeks in changing humidity and temperature. Adhesives, edge coatings, metal finishes, and packaging should be selected with transport conditions in mind.
Inspection After Testing
After testing, the sample should be inspected carefully rather than judged only by whether it remains in one piece.
The inspection should record:
- Maximum load
- Number of cycles
- Test duration
- Failure location
- Failure type
- Permanent deformation
- Stitch-hole enlargement
- Thread condition
- Reinforcement movement
- Hardware condition
- Surface appearance
- Edge condition
Photographs should be taken before and after testing. This makes it easier to compare sample revisions and communicate changes between the factory and client.
How Is Stitching Quality Controlled?
Quality control should begin before sewing and continue through cutting, skiving, reinforcement placement, stitching, assembly, finishing, and final inspection. Inspecting only the finished product may reveal defects after too much material and labor have already been used.
Material Inspection
Leather should be inspected for:
- Thickness
- Color variation
- Grain consistency
- Surface defects
- Stretch
- Scar placement
- Coating quality
- Odor
- Finish adhesion
- Moisture condition
High-stress components should not be cut from weak, overly stretchy, or damaged areas of the hide.
The cutting team should understand which pieces carry structural loads. Handle tabs and belt parts require stricter material placement than hidden decorative components.
Cutting Control
Cut parts should be checked for:
- Correct dimensions
- Grain direction
- Symmetry
- Clean edges
- Hole position
- Corner radius
- Hardware placement marks
- Leather stretch direction
A small cutting error can change the edge distance or leave insufficient material around a rivet.
Paired components such as handles, straps, and wallet sides should be matched for thickness, grain, and color.
Skiving Control
Skived areas should be measured and compared with the approved sample.
Important controls include:
- Skived thickness
- Skiving width
- Transition smoothness
- Edge condition
- Symmetry
- Surface damage
Over-skiving can weaken the seam. Under-skiving can create bulk and uneven stitching.
Reinforcement Placement
Reinforcement pieces should be positioned accurately before stitching.
QC should check:
- Material type
- Thickness
- Dimensions
- Direction
- Adhesive coverage
- Distance beyond stitch line
- Edge tapering
- Alignment with hardware
A reinforcement patch placed several millimeters away from the intended position may no longer support the highest-stress area.
Sewing Inspection
During sewing, operators and inspectors should check:
- Stitch length
- Edge distance
- Thread tension
- Seam alignment
- Needle marks
- Backstitch length
- Corner quality
- Thread damage
- Surface dents
- Skipped stitches
- Row spacing
- Thread color
First-piece inspection is important when production begins, after a machine adjustment, after thread or needle replacement, and when material thickness changes.
In-Line Quality Checks
In-line inspections catch problems before full assembly.
Useful checkpoints include:
- After handle-tab sewing
- After shoulder-strap assembly
- After zipper installation
- After wallet card-slot assembly
- After buckle and rivet setting
- Before lining closure
- Before edge painting
- Before final hardware installation
Parts that fail inspection should be corrected before they are built into the final product.
Final Inspection
Final inspection should evaluate both structure and appearance.
Common checks include:
- Seam straightness
- Stitch consistency
- Handle symmetry
- Strap length
- Hardware operation
- Rivet security
- Edge-paint condition
- Product dimensions
- Lining alignment
- Surface cleanliness
- Logo position
- Packaging condition
Load-bearing areas should be manually checked for movement, looseness, and visible distortion.
Bulk Consistency
An approved sample only proves that one unit can be produced correctly. Bulk production requires controls that keep hundreds or thousands of units within the same standard.
Consistency is supported by:
- Approved material standards
- Stitching parameter sheets
- Physical reference samples
- Reinforcement templates
- Sewing guides
- Operator training
- First-piece approval
- In-line inspection
- Random testing
- Final quality inspection
For larger orders, samples should be selected from different production times, operators, and material batches.
Custom Leather Product Development With SzoneierLeather
Reinforced stitching should be planned around the complete product rather than treated as a decorative detail. Leather type, thickness, thread, needle, stitch length, reinforcement, adhesive, hardware, and expected use all influence the final result.
SzoneierLeather has more than 18 years of experience in the development and production of leather goods. Our product range includes leather bags, wallets, belts, straps, accessories, leather boxes, and related custom products.
Clients can provide sketches, reference products, technical drawings, material requirements, logo files, expected order quantities, target price ranges, or product-performance requirements.
During development, our team can review:
- High-stress areas
- Handle and strap structures
- Leather thickness
- Thread and needle matching
- Stitch patterns
- Reinforcement dimensions
- Hardware compatibility
- Edge construction
- Packaging requirements
- Testing needs
A clear inquiry should include as much of the following information as possible:
| Project Information | Details to Provide |
|---|---|
| Product type | Bag, wallet, belt, strap, case, box or accessory |
| Dimensions | Length, width, height and component sizes |
| Leather | Genuine leather, PU leather, finish and thickness |
| Colors | Main leather, lining, thread and hardware colors |
| Branding | Logo method, size and position |
| Hardware | Buckles, hooks, rings, rivets, zippers and finishes |
| Construction | Stitching, edge paint, folding and reinforcement |
| Packaging | Polybag, box, dust bag, barcode and carton requirements |
| Quantity | Quantity per style and color |
| Target market | Retail, promotional, fashion, travel or professional use |
| Performance | Expected load, wear resistance and testing needs |
| Timeline | Sampling deadline and production delivery date |
Detailed product information helps reduce sampling changes and allows the factory to recommend a construction that fits the intended use, appearance, cost, and order quantity.
Contact SzoneierLeather to discuss custom leather bags, wallets, belts, straps, accessories, and leather boxes. Our team can review your design, recommend suitable materials and reinforced stitching structures, prepare samples, and provide a quotation for production.