
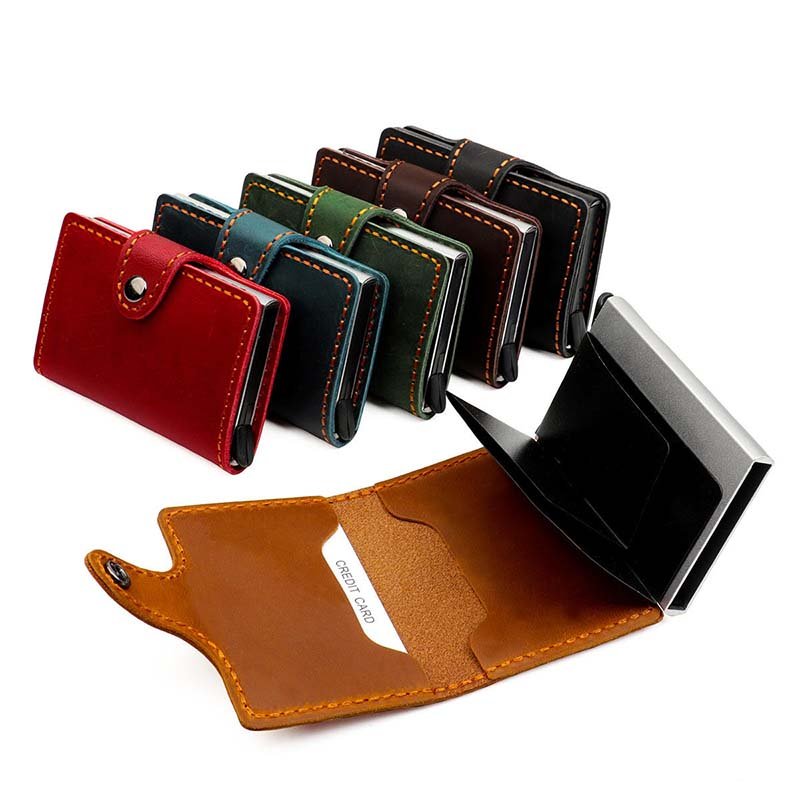
A leather card holder may appear to be one of the simplest leather accessories in a retail collection. It is small, light, easy to display, and usually made from only a few leather panels. Yet small dimensions leave almost no room for production error. A pocket opening that is 1 mm too narrow can make the product difficult to use. An edge-paint layer that is too thick may crack after repeated bending. A logo placed slightly off-center can make an entire shipment look inconsistent when several units are displayed together.
Retail chains also face challenges that do not appear in a single handmade sample. The same card holder may need to be produced in five colors, packed in three language versions, shipped to dozens of stores, scanned through different inventory systems, and reordered six months later with the same leather feel and color direction.
Leather card holders for retail chains are produced through controlled assortment planning, leather specification, component engineering, precision cutting, splitting, skiving, reinforcement, stitching, edge finishing, logo application, testing, packaging, barcode control, and batch inspection. Reliable production depends on converting every visible and hidden detail into measurable standards before mass manufacturing begins.
The product must work commercially as well as physically. It needs to fit the intended retail price, provide the advertised card capacity, survive daily use, display cleanly, ship efficiently, and generate enough margin for the retailer.
A successful project usually begins long before the leather is cut. It begins with clear answers to practical questions:
- Who will use the card holder?
- How many cards should it hold comfortably?
- Is the product designed for daily use, gifting, travel, or impulse purchase?
- Which leather appearance matches the retail price?
- How many colors can be ordered without creating weak SKU quantities?
- Does the package need to hang, stand, stack, or fit inside a gift set?
- Will the product need RFID protection?
- Can the same leather and edge color be repeated in future orders?
- Which defects would lead to customer returns?
- How will every color and package be identified in the warehouse?
SzoneierLeather works with retail chains, private-label companies, distributors, and customized wholesale programs that need more than a finished card holder. Product development may include raw-material selection, structure adjustment, pattern making, sampling, logo testing, packaging design, carton planning, production control, and repeat-order documentation.
What Do Retail Chains Require?
Retail chains require more than an attractive sample. They need a card holder that fits a defined retail position, remains consistent across several stores, passes internal quality checks, works with the required packaging system, and can be reordered without major changes in leather, color, dimensions, or workmanship.
The product specification should connect commercial requirements with factory instructions. A retail team may describe a card holder as “slim, premium, and suitable for six cards.” Production staff need more exact information:
- Finished width and height
- Number of visible card slots
- Number of cards allowed in each slot
- Central-pocket capacity
- Empty product thickness
- Loaded product thickness
- Leather thickness by component
- Slot-opening width
- Slot rise
- Sewing margin
- Edge-paint color
- Stitch density
- Logo size and position
- Packaging dimensions
- Carton quantity
- Barcode position
A retail-chain order often contains several product groups rather than one card holder. The factory may need to manage entry-level sleeves, mid-range bifold styles, RFID options, gift-box versions, and seasonal colors within one program.
The first commercial decision is the role of each item. Every SKU should have a clear reason to exist. Adding several similar black card holders with only minor construction differences can divide sales without improving customer choice.
A useful assortment may include:
- A slim two- or three-slot model for entry-level sales
- A central-pocket model for customers carrying four to six cards
- A bifold model for customers needing more organization
- An RFID version for travel or commuter ranges
- A premium boxed model for gifting
- One seasonal color based on the same approved construction
This structure creates visible price and function differences while keeping production manageable.
Retail chains should also decide which details are essential and which details can be standardized. Customizing every component may sound attractive, but it can increase cost, development time, packaging quantities, and repeat-order risk.
Standardization opportunities include:
- One leather family across several styles
- One thread color for multiple neutral leather colors
- One edge-paint system
- One logo size
- One box dimension
- One care-card size
- One carton footprint
- One master construction with several color versions
The commercial advantage is not only lower production cost. Standardization can also shorten sample development, reduce material waste, improve color control, and make replenishment easier.
Which Card Holder Styles Sell Best?
The strongest-selling card holder style depends on customer use, retail price, card capacity, store placement, and packaging. There is no single construction that works equally well for every retail chain.
Slim card sleeves perform well when customers want minimal bulk. They are also suitable for entry-price displays because they use fewer components and require less shelf space.
Central-pocket card holders usually offer a good balance between slimness and capacity. They may include two or three slots on each side and one central compartment for folded notes, receipts, or additional cards.
Bifold card holders provide more organization and allow the retailer to justify a higher selling price. They require tighter control of folding thickness, internal alignment, and opening balance.
Zipper card cases provide more security and can hold coins, keys, or folded banknotes. They need additional hardware, zipper testing, puller control, and thicker packaging.
The table below compares common retail constructions.
| Card Holder Style | Practical Capacity | Production Complexity | Retail Position | Main Risk |
|---|---|---|---|---|
| Two-slot sleeve | 2–4 cards | Low | Entry level | Limited function |
| Three-slot sleeve | 3–5 cards | Low | Entry to core | Lower slots may become tight |
| Central-pocket holder | 4–8 cards | Medium | Core range | Central pocket can become bulky |
| Bifold card holder | 6–12 cards | Medium to high | Core to premium | Fold area may become thick |
| ID-window holder | 3–7 cards | Medium | Commuter or work use | Window scratching or separation |
| RFID card holder | 4–10 cards | Medium | Travel and security | Shielding can increase stiffness |
| Zipper card case | 6–15 cards | High | Premium and travel | Hardware and zipper failures |
| Money-clip card holder | 4–8 cards | Medium | Men’s accessories | Clip strength and metal scratching |
A retail team should test at least two or three constructions before confirming the range. Testing should use real cards and normal daily movements rather than an empty sample placed on a table.
A style may look slim when empty but become too thick after cards are inserted. Another style may feel tight on the first day but loosen after repeated use. The final choice should be based on loaded performance.
How Should SKU Assortments Be Planned?
SKU planning determines whether the collection remains easy to produce, distribute, display, and reorder. Too few SKUs may make the range look incomplete. Too many SKUs can weaken production quantities and create slow-moving colors.
Every change in construction, color, leather, logo, package, or language may create another SKU. A program that appears to contain ten products can quickly become thirty or forty production combinations.
For example:
- 2 constructions
- 5 leather colors
- 2 packaging languages
- 2 logo colors
The total becomes 40 combinations.
A clearer system separates core SKUs from trial SKUs.
Core SKUs should use proven colors, stable leather supply, and repeatable packaging. Trial SKUs may use seasonal colors, limited quantities, or new materials.
A practical opening allocation may look like:
| SKU Group | Share of Initial Order | Purpose |
|---|---|---|
| Black and dark brown core colors | 40–50% | Stable year-round demand |
| Tan, navy, or dark green | 25–30% | Broader customer choice |
| Fashion or seasonal colors | 10–20% | Newness and visual display |
| Gift or premium editions | 10–15% | Higher order value |
The exact allocation should come from the retailer’s own category data, store locations, customer profile, and price structure.
Large retail programs should avoid assigning equal quantities to every color unless sales history supports that decision. Neutral colors usually provide a safer opening position. Bright or seasonal colors can be introduced through controlled quantities.
SKU planning should also account for material minimums. A custom leather color may require a larger production commitment than a stock black or brown. Printed boxes may have separate minimum quantities. A low-volume SKU can therefore create unused leather or packaging stock.
Before confirming the order matrix, the retail team should ask:
- Which colors use stock leather?
- Which colors require custom dyeing?
- Can different styles share the same hide lot?
- Can one box be used with different printed sleeves?
- Does every color need a separate barcode?
- Will each market require different language labels?
- Can online and store stock use the same package?
- Which SKUs are suitable for future replenishment?
SzoneierLeather can review the planned SKU matrix before sampling and identify where the assortment can be simplified without reducing meaningful choice.
What Card Capacity Do Customers Need?
Card capacity should be tested through the complete finished construction. It should not be estimated only by counting visible slots.
A three-slot card holder may carry three cards if each slot is designed for one card. It may carry five or six cards if the lower slots and central compartment are engineered for additional capacity.
Standard bank cards and many identification cards measure approximately 85.60 × 53.98 mm. Pocket dimensions must also allow for:
- Stitching margin
- Leather thickness
- Lining thickness
- Adhesive area
- Natural leather variation
- Card insertion angle
- Stretch after use
- Retention during movement
A pocket that is only 0.5–1.0 mm too narrow may become uncomfortable. A pocket that is too wide may release cards when the holder is inverted.
Card-capacity testing should include the following steps:
- Insert one standard plastic card into every slot.
- Load the central pocket to the claimed capacity.
- Measure the finished thickness.
- Remove and reinsert each card at least 20–50 times.
- Leave the holder fully loaded for 24–72 hours.
- Turn the product upside down and shake it gently.
- Remove all cards and check whether the pockets recover.
- Inspect the lining, stitching, and edge paint for stress.
- Repeat the test with cards from different issuers.
- Record whether the final feel is loose, firm, or overly tight.
Claims should be conservative and clear. If a card holder can physically accept ten cards but becomes difficult to close, it should not be marketed as a comfortable ten-card product.
Product-page information should distinguish between:
- One card per slot
- Maximum capacity
- Comfortable daily capacity
- Additional central-pocket storage
A product may be described as having six slots while comfortably holding eight cards. Such wording is more useful than simply stating “holds many cards.”
How Do Price Tiers Affect Design?
The factory cost and retail price influence leather selection, component count, lining, reinforcement, logo method, edge finish, package, and inspection level.
A lower-cost retail product can still be durable and attractive. The design needs to avoid unnecessary labor and material waste.
An entry-level leather card holder may use:
- Two to four leather components
- Unlined construction
- Corrected-grain or controlled top-grain leather
- Machine stitching
- Standard polyester thread
- One- or two-color edge paint
- Blind debossed logo
- Paper band or folding carton
A mid-range product may include:
- More card slots
- A central compartment
- Partial lining
- Hidden reinforcement
- Finer stitch spacing
- Multi-stage edge paint
- Foil branding
- Printed retail box
A premium product may use:
- Selected full-grain or calf leather
- Leather lining
- Fully controlled grain matching
- Fine skiving
- Detailed corner work
- More edge-paint stages
- Custom metal logo
- Rigid gift box
- Protective pouch
- Individual inspection records
The table below shows how construction decisions change with price position.
| Product Position | Component Count | Leather Direction | Edge Method | Packaging |
|---|---|---|---|---|
| Entry | 2–5 | Controlled cost and uniformity | Basic painted or raw edge | Band or carton |
| Core | 4–8 | Top-grain or selected corrected grain | Multi-coat painted edge | Folding box |
| Premium | 6–12 | Selected full-grain, calf, or specialty leather | Fine painted, turned, or polished edge | Rigid gift box |
| Corporate gift | Varies | Based on budget and branding | Clean commercial finish | Customized box or pouch |
Retail price should be discussed before final material approval. Developing a premium calfskin sample and later asking the factory to reduce the cost by 35% usually forces major changes.
A more efficient process begins with:
- Target factory-cost range
- Target retail price
- Expected retail margin
- Packaging allowance
- Freight allowance
- Import duty where applicable
- Quality-inspection allowance
- Discount or promotional allowance
The factory can then propose two or three material and construction options within the commercial range.
Are Retail and Gift Models Different?
Retail models and gift models may share the same card holder, but their packaging, logo visibility, personalization, and presentation often differ.
A standard retail product needs to be easy to identify and display. The customer may compare several products on a shelf, so size, color, leather texture, features, and price need to be clear.
A retail package may require:
- Hanging hole
- Product window
- Barcode
- Material statement
- Color name
- Product dimensions
- Card-capacity information
- Security tag
- Country-of-origin marking
- Multilingual text
- Compact carton size
A gift product places more emphasis on opening experience and emotional value.
Gift packaging may include:
- Rigid box
- Drawer box
- Magnetic box
- Protective pouch
- Tissue paper
- Message card
- Personalized name
- Foil logo
- Ribbon
- Event date
- Corporate insert
A corporate gift order may also require individual names, employee numbers, branch codes, or separate address labels. These requirements can create more data-management work than the leather production itself.
A modular packaging system can reduce cost. The same card holder may use:
- A paper band for standard retail
- A folding box for online sales
- A rigid box for holiday gifting
- A custom sleeve for corporate events
The product remains unchanged while presentation changes according to the sales channel.
Which Materials Work Best?
The best leather depends on the target price, structure, thickness, grain appearance, color range, expected use, edge method, and repeat-order requirements. Leather should not be selected only by a broad label such as full grain or top grain. Temper, finish, stretch, thickness, surface coating, and cutting yield often have a greater effect on production performance.
A leather card holder requires a material that can hold cards securely without becoming bulky. The leather must also survive repeated insertion, pocket flexing, hand contact, friction, and exposure to heat or moisture.
Material approval should cover more than one small swatch. A 10 × 10 cm sample may show color and grain but cannot show how the leather behaves after:
- Splitting
- Skiving
- Folding
- Gluing
- Sewing
- Edge painting
- Loading with cards
- Repeated flexing
- Packaging compression
A full development sample should be produced in the proposed leather before the order is confirmed.
Retail chains should define the following leather characteristics:
- Leather type
- Animal source where required
- Surface finish
- Grain size
- Gloss level
- Color reference
- Thickness range
- Firmness or softness
- Stretch direction
- Scratch resistance
- Rub resistance
- Colorfastness
- Odor level
- Natural-mark allowance
- Chemical requirements
- Traceability requirements
Natural leather is not visually identical across every panel. Full-grain and minimally corrected leathers may show pores, veins, healed marks, grain movement, and shade differences.
The retail team should decide whether the desired look is:
- Highly uniform
- Naturally varied
- Smooth and formal
- Pebbled and casual
- Soft and flexible
- Firm and structured
- Matte
- Semi-gloss
- Distressed
- Designed to develop patina
These decisions affect both price and production yield.
What Leather Types Suit Each Price Tier?
Different leather categories support different visual and commercial positions.
Full-grain cow leather retains the natural outer surface. It can develop character through use and works well for heritage, craft, and premium collections. Natural marks and grain variation are more visible.
Top-grain cow leather may be lightly corrected or finished to create a cleaner and more controlled appearance. It is widely suitable for core retail programs because it balances appearance, durability, and production consistency.
Corrected-grain leather uses surface correction and finishing to create a more uniform texture. It can provide better color repeatability and cutting yield for large multi-store orders.
Calf leather has a finer grain and refined hand feel. It is suitable for premium card holders but normally carries a higher material cost and stricter cutting requirements.
Goat leather can provide strength at relatively low thickness. Its natural grain makes it suitable for slim card cases and distinctive accessory collections.
Sheep leather is soft and lightweight. It often requires lining or reinforcement in card holders because softness alone may not maintain slot shape.
Vegetable-tanned leather is usually firmer and can develop a visible patina. It suits heritage products, but fold behavior, color variation, water marking, and break-in should be discussed before approval.
Chrome-tanned leather offers broad color and softness options. Its properties vary widely, so the final selection should be based on the actual article rather than the tanning name alone.
| Leather Type | Structure | Visual Consistency | Cost Direction | Best Use |
|---|---|---|---|---|
| Full-grain cow | Medium to firm | Moderate variation | Medium to high | Premium and heritage |
| Top-grain cow | Soft to firm | Good control | Medium | Core retail |
| Corrected grain | Medium | High uniformity | Low to medium | Volume programs |
| Calf leather | Fine and refined | Good with selection | High | Premium gifting |
| Goat leather | Thin and strong | Distinct natural grain | Medium | Slim card holders |
| Sheep leather | Soft | Moderate | Medium | Fashion-led lined products |
| Vegetable-tanned cow | Firm | Natural variation | Medium to high | Craft and patina ranges |
| Coated split leather | Medium | High uniformity | Lower | Entry-level programs |
The most expensive leather is not always the most appropriate. A retail chain requiring strict color uniformity across 100 stores may achieve better commercial results with a controlled top-grain or corrected-grain leather than with highly variable natural full-grain hides.
How Thick Should the Leather Be?
Leather thickness must be planned by component. Using the same thickness for the body, pockets, folds, and lining can create excessive bulk.
Practical development ranges may include:
| Component | Working Thickness Range |
|---|---|
| Main outer panel | 1.0–1.4 mm |
| Card-slot panel | 0.6–0.9 mm |
| Internal leather lining | 0.4–0.7 mm |
| Folded edge after skiving | 0.4–0.7 mm |
| Reinforcement layer | 0.1–0.4 mm |
| RFID shielding layer | Based on selected material |
These ranges are starting points rather than fixed rules. A firm leather may remain stable at 0.8 mm, while a soft leather at the same thickness may stretch too quickly.
Layer build-up should be calculated before pattern approval.
For example:
- Three overlapping slot panels at 0.8 mm
- One outer panel at 1.2 mm
- One lining layer at 0.4 mm
- Adhesive and edge paint
The lower corner may contain more than 4 mm of material before compression. Without controlled skiving, the card holder may feel heavy and uneven.
Thickness should be measured after splitting. A tannery may supply hides at 1.4–1.6 mm, but different parts may be split to different production thicknesses.
Production documents should state:
- Original leather thickness
- Final split thickness
- Skived thickness
- Skive width
- Skive direction
- Areas that must not be thinned
Variation needs close control. A difference of 0.2 mm can change slot tension and final product thickness noticeably.
Which Linings Improve Structure?
Linings influence pocket friction, stretch, shape retention, cleanliness, and perceived quality.
An unlined card holder can provide a natural and lightweight feel. It works best when the leather back is clean, compact, and free from loose fibers.
Microfiber lining creates a smooth internal surface without adding the same thickness as leather. It can also provide stable color and good abrasion resistance.
Textile lining can reduce cost and introduce pattern or color. Woven fabric needs edge and fraying control.
Leather lining creates a premium appearance but adds material, skiving, adhesive, and labor. It also increases thickness at the card slots.
Nonwoven or film reinforcement may be inserted between layers to limit stretching. Reinforcement should not create hard ridges or make the entire holder feel plastic.
The main lining options can be compared as follows:
| Lining | Thickness Effect | Structure | Visual Position | Main Concern |
|---|---|---|---|---|
| No lining | Lowest | Depends on leather | Natural and minimal | Fiber release or stretch |
| Microfiber | Low | Stable | Core to premium | Adhesive compatibility |
| Polyester fabric | Low | Moderate | Entry to core | Fraying |
| Cotton fabric | Low to medium | Moderate | Casual or lifestyle | Moisture absorption |
| Thin leather | High | Premium | Premium range | Bulk and cost |
| Nonwoven reinforcement | Very low | Strong support | Hidden | Stiffness lines |
| RFID material | Low to medium | Shielding and structure | Functional | Reading performance |
Lining and leather should be tested as one bonded panel. A lining may perform well alone but separate after repeated flexing if the adhesive system is unsuitable.
Is RFID Protection Necessary?
RFID protection is useful when the card holder is positioned for travel, commuting, business use, or security-conscious customers. It is not necessary for every retail program.
A shielded card holder places a conductive layer around the card-storage area. The construction must provide enough coverage to reduce unwanted scanning while maintaining acceptable thickness and flexibility.
Development questions should include:
- Which pockets require shielding?
- Does the customer need one quick-access pocket?
- Which card frequencies are being considered?
- How will shielding performance be tested?
- Will the RFID layer interfere with store inventory tags?
- How does the material affect sewing and edge thickness?
- What claim will appear on the packaging?
- Is a test report required?
A fully shielded product may be inconvenient for customers who want to tap a transit card without removing it. One external unshielded slot may provide better daily use.
The shielding material should remain completely enclosed. Exposed conductive edges can look unattractive and may affect durability.
RFID products also need clear packaging communication. The customer should understand:
- Which areas are protected
- Whether cards must be fully inserted
- Whether the product blocks every possible signal
- Whether an external slot remains active
Claims should be based on an agreed test rather than marketing language alone.
Which Threads and Edge Paints Last?
Thread and edge paint strongly influence both appearance and long-term performance.
Polyester thread is commonly used because it provides good abrasion resistance, stable color, and broad availability. Thread thickness should match the leather and the visual position of the product.
A very thick thread can make a slim card holder look heavy. A very fine thread may appear refined but provide less visual definition.
Important stitching variables include:
- Thread material
- Thread size
- Needle size
- Stitch length
- Stitch tension
- Distance from edge
- Corner stitch position
- Backstitch length
- Thread-end sealing
Stitch density should not be increased without considering leather strength. Holes placed too close together may create a perforation line that weakens the edge.
Edge paint performance depends on the complete process rather than only the paint brand.
A controlled painted-edge process may include:
- Edge trimming
- Surface alignment
- Initial sanding
- Cleaning
- Primer application
- Drying
- First color coat
- Fine sanding
- Second or third coat
- Final curing
- Flex inspection
- Rub inspection
Common edge defects include:
- Pinholes
- Waves
- Paint overflow
- Exposed fibers
- Cracks at corners
- Color variation
- Thick ridges
- Poor adhesion
- Sticky surfaces
A single heavy coat may appear smooth immediately after production but crack more easily during use. Several controlled thin coats generally produce a cleaner result.
Retail teams should decide whether the edge should be:
- Tone-on-tone
- Darker than the leather
- Contrasting
- Matte
- Semi-gloss
- Rounded
- Flat
- Highly polished
Thread and edge colors should be approved together with the leather. A matching edge color that looks correct under factory lighting may appear noticeably different under bright retail lighting.
How Are Card Holders Produced?
Leather card holder production begins with structure engineering rather than sewing. Every visible panel, hidden overlap, fold line, reinforcement layer, slot opening, stitching path, and edge treatment must be converted into a measurable production instruction.
A retail sample may contain only six leather pieces, but each piece influences thickness, card tension, alignment, and long-term shape. A change of 0.5 mm in a lower pocket can affect card insertion. An incorrect skiving angle can create a weak edge. A slightly uneven stitch path becomes obvious because the product is small and usually viewed at close range.
A controlled production process generally includes:
- Design and specification review
- Pattern development
- Paper or digital prototype
- Leather and lining approval
- Component thickness planning
- Cutting-die preparation
- Leather inspection
- Splitting
- Precision cutting
- Skiving
- Reinforcement placement
- Logo application
- Pocket assembly
- Stitching
- Trimming
- Edge preparation
- Edge painting or polishing
- Cleaning
- Functional testing
- Final inspection
- Retail packaging
- Carton packing
Production order matters. A logo may need to be applied before several panels are assembled. A pocket opening may need edge paint before the slot is stitched onto the body. A folded edge may need skiving before lining lamination. Changing the sequence can alter appearance, efficiency, or defect risk.
Retail-chain production also requires a repeatable reference system. One approved sample cannot explain hidden construction. Production files should record:
- Pattern version
- Component name
- Cutting quantity per unit
- Leather code
- Leather thickness
- Lining code
- Reinforcement position
- Skiving width and depth
- Adhesive area
- Stitch path
- Thread code
- Edge-paint formula
- Logo position
- Finished measurement
- Packaging method
A complete file helps the factory repeat the same result several months later, even when operators, leather lots, or production lines change.
How Are Card Slots Engineered?
Card-slot engineering determines whether the product feels secure, smooth, and convenient in daily use. Slot performance depends on more than opening width. Leather thickness, overlap, pocket depth, sewing margin, lining friction, skiving, and adhesive placement all affect the final result.
A standard payment card measures close to 85.60 × 53.98 mm. The finished pocket needs enough clearance for the card, but excessive clearance can cause poor retention.
Important slot dimensions include:
- Slot-opening width
- Pocket depth
- Visible slot rise
- Side stitching margin
- Bottom overlap
- Central-pocket width
- Corner radius
- Skived edge width
- Reinforcement width
Slot rise refers to the visible distance between one card-slot edge and the next. A small rise creates a compact appearance but can make lower cards difficult to identify. A large rise improves visibility but increases overall product height.
A three-slot side may use progressively deeper pocket components. Every lower panel must remain wide enough to hold the card securely without interfering with nearby layers.
During development, several pattern versions may be tested:
| Pattern Version | Opening Adjustment | Expected Result |
|---|---|---|
| A | Original opening | Baseline fit |
| B | +0.5 mm | Easier insertion |
| C | +1.0 mm | Risk of loose retention |
| D | Same opening with thinner skiving | Lower bulk |
| E | Same opening with reinforcement | Better recovery |
Testing should be completed with the final leather and lining. A paper prototype cannot predict leather stretch. Soft leather may need reinforcement, while firm leather may need slightly more clearance.
Adhesive must remain outside the usable card area. Excess glue can narrow the pocket or create hard internal ridges. A positioning template can control adhesive width.
Slot testing should check:
- First insertion
- One-card retention
- Maximum claimed capacity
- Repeated insertion
- Pocket recovery
- Loaded thickness
- Card removal speed
- Card corner damage
- Internal glue contamination
- Lining separation
The approved sample should define whether the product feels firm, medium, or easy-access. Production inspectors need a clear reference because “good card fit” can be interpreted differently by different people.
Why Do Skiving and Cutting Matter?
Cutting defines shape, grain direction, panel matching, and material yield. Skiving controls thickness at folds, overlaps, slot openings, seams, and corners. Poor control at either stage creates bulky construction, uneven edges, weak leather, and inconsistent card tension.
Leather is not uniform across an entire hide. The backbone area is usually firmer and more stable. Belly areas may be softer and stretch more. Shoulder areas may contain heavier grain movement.
Cutting plans should consider:
- Visible panel importance
- Grain direction
- Stretch direction
- Shade matching
- Surface markings
- Panel size
- Slot tension
- Fold behavior
Main outer panels should normally come from stable hide areas. Internal pocket pieces can sometimes use smaller acceptable zones, provided color, thickness, and structure remain suitable.
Common cutting methods include:
- Steel-rule die cutting
- Hydraulic press cutting
- Clicking press cutting
- CNC knife cutting
- Hand cutting
- Laser cutting for selected materials
Steel-rule dies offer fast, repeatable cutting for bulk production. Die quality affects corner shape, edge cleanliness, and final dimensions. Worn dies can create rough edges or dimensional drift.
CNC knife cutting is useful during sampling, limited runs, or pattern testing. It avoids die cost but may be slower for large quantities.
Laser cutting can create precise shapes but may darken, harden, or burn some leather edges. Laser use should be tested before approval, especially when edges remain visible.
Skiving removes selected leather thickness. Common skiving locations include:
- Slot openings
- Panel overlaps
- Side seams
- Bottom seams
- Fold lines
- Turned edges
- Logo patch edges
- Corner areas
- Lining transitions
A skiving instruction should state:
- Original thickness
- Final thickness
- Skive width
- Skive angle
- Skive direction
- Start and stop points
For example:
| Area | Original Thickness | Final Thickness | Skive Width |
|---|---|---|---|
| Slot opening | 0.8 mm | 0.5 mm | 6 mm |
| Side overlap | 0.8 mm | 0.4 mm | 8 mm |
| Fold line | 1.2 mm | 0.7 mm | 10 mm |
| Turned edge | 0.9 mm | 0.45 mm | 7 mm |
Over-skiving weakens the leather and may expose the grain layer. Under-skiving leaves visible steps and creates thick corners.
Skiving consistency should be checked throughout production. A first-piece sample may be correct, while blade wear or operator changes can alter later batches. Thickness gauges and visual references help maintain control.
How Are Reinforcements Added?
Reinforcement helps card slots retain shape, supports soft leather, limits stretching, and stabilizes logos or hardware. Reinforcement should improve performance without making the product feel stiff or artificial.
Common reinforcement materials include:
- Nonwoven sheet
- Microfiber backing
- Thin polyester film
- PU reinforcement film
- Bonded textile
- Thin board for selected gift products
- Leather split
- RFID shielding composite
Reinforcement may be placed:
- Behind slot openings
- Around central pockets
- Along fold lines
- Under metal logos
- Beneath snap fasteners
- Between outer leather and lining
- Around zipper openings
The reinforcement edge should not create a visible ridge. Tapered or recessed placement often gives a cleaner result.
Soft sheep or lamb leather may need more reinforcement than firm cow leather. A rigid vegetable-tanned leather may need little internal support but may require fold conditioning.
Adhesive coverage must remain controlled. Full-surface bonding can create stiffness, while limited bonding may allow bubbling or separation. The correct method depends on the leather, lining, and reinforcement combination.
Before approval, reinforced panels should be tested for:
- Flexing
- Peeling
- Heat exposure
- Humidity
- Repeated card insertion
- Surface ridges
- Adhesive marks
- Long-term shape retention
A card holder should not feel like a plastic board unless a deliberately rigid construction is required.
How Are Pieces Assembled?
Assembly begins after all components have passed material, cutting, thickness, and logo checks. Leather pieces are positioned using templates, alignment marks, jigs, or molded fixtures.
A common assembly sequence may include:
- Prepare individual card-slot edges.
- Apply logo to the outer panel.
- Laminate lining or reinforcement.
- Position lower card slot.
- Add middle and upper card slots.
- Check slot rise.
- Join assembled pocket group to the main body.
- Stitch outer perimeter.
- Trim exposed edges.
- Complete edge finishing.
- Clean and shape the product.
Positioning is critical because small errors accumulate. If each of three card slots shifts upward by only 0.5 mm, the top slot may move 1.5 mm away from the approved position.
Templates can control:
- Slot height
- Side margin
- Logo location
- Stitch line
- Corner shape
- Adhesive area
Adhesive is usually used to hold components before sewing. It should provide enough initial bond without creating stains, hard spots, odor, or edge contamination.
Pressing pressure should be controlled. Excessive pressure can flatten grain or leave marks. Insufficient pressure may allow components to shift during sewing.
After temporary assembly, operators should check:
- Left and right symmetry
- Slot rise
- Overall dimensions
- Edge alignment
- Surface cleanliness
- Grain direction
- Color match
Incorrect assemblies should be corrected before stitching. Once needle holes are created, leather cannot be restored to an unused condition.
How Are Pieces Stitched?
Stitching provides structural strength and creates one of the most visible quality signals on a leather card holder. Because the product is small, uneven stitch spacing, drifting lines, or poor corners are easy to notice.
Sewing settings should define:
- Machine type
- Needle type
- Needle size
- Thread material
- Thread size
- Stitch length
- Thread tension
- Edge distance
- Backstitch length
- Corner-turning method
A common stitch density may range around three to four stitches per centimeter, depending on leather thickness, thread size, construction, and visual direction. Finer luxury stitching may use shorter stitch lengths, but excessive hole density can weaken narrow leather margins.
The stitch line must remain parallel to the edge. A common production target may be approximately 2.5–3.5 mm from the finished edge, although the final distance depends on design and leather thickness.
A stitch guide or machine fixture can improve consistency.
Corner stitching requires special control. Operators should:
- Reduce speed before the corner
- Stop with the needle down
- Rotate at the approved point
- Avoid extra-short corner stitches
- Keep the corner radius smooth
- Prevent thread bunching
Thread tension should place the lock inside the leather layers. Incorrect tension can cause:
- Loose upper loops
- Visible lower thread
- Puckering
- Leather distortion
- Broken thread
- Uneven stitch appearance
Start and stop points should remain discreet. Long backstitch areas create visible thread buildup. Weak backstitching can allow the seam to open.
A production sewing inspection should check:
- Stitch count
- Edge distance
- Straightness
- Corner shape
- Backstitch length
- Thread color
- Skipped stitches
- Broken thread
- Needle marks
- Surface scratches
A first-piece approval is recommended after every machine setup, operator change, thread change, or leather-lot change.
How Are Edges Finished?
Edge finishing affects appearance, hand feel, moisture resistance, and long-term durability. Raw leather edges contain exposed fibers. Without proper treatment, they may appear rough, absorb dirt, or separate after use.
Common edge methods include:
- Painted edges
- Burnished edges
- Folded edges
- Turned edges
- Waxed raw edges
- Covered edges
Painted edges are widely used for modern card holders. A controlled process generally includes trimming, sanding, primer, color coats, drying, polishing, and final inspection.
A more detailed production sequence may include:
- Trim all assembled layers to one clean line.
- Sand the edge using a controlled abrasive grade.
- Remove dust and loose fibers.
- Apply filler or primer.
- Dry under controlled temperature and humidity.
- Sand the primer lightly.
- Apply the first color coat.
- Dry completely.
- Sand high points.
- Apply a second coat.
- Add a third coat where needed.
- Cure before flexing or packaging.
Drying time cannot be reduced carelessly. Edge paint may feel dry on the surface while remaining soft underneath. Packing too early can cause sticking, dents, or transfer marks.
Edge-paint inspection should look for:
- Smooth surface
- Even color
- Consistent thickness
- No exposed fibers
- No pinholes
- No bubbles
- No overflow
- No cracks
- No sharp corners
- No sticky areas
Corner zones experience more movement and often fail first. Flex tests should focus on folded or rounded corners.
Burnished edges suit firm vegetable-tanned leather. The fibers are compressed using friction, moisture, gum, wax, or polishing compounds. Soft chrome-tanned leather may not produce the same clean burnish.
Turned edges use a skived and folded leather margin. The method hides the raw edge and may suit premium internal pockets. Turned construction adds labor and can become bulky when skiving is inaccurate.
The chosen edge method should match the intended retail price and leather behavior. A complex luxury edge process adds little value when the base leather, stitching, or packaging remains weak.
Which Logo Methods Work Best?
Logo selection should match leather finish, product position, production volume, artwork detail, and required durability.
Common logo methods include:
- Blind debossing
- Raised embossing
- Foil stamping
- Screen printing
- UV printing
- Laser marking
- Metal logo plate
- Metal letters
- Woven label
- Printed textile label
Blind debossing is widely used because it creates a clean and understated result. Leather is pressed with a heated or unheated metal die. Final appearance depends on:
- Leather firmness
- Surface coating
- Grain depth
- Pressure
- Temperature
- Pressing time
- Die depth
- Logo line width
Soft leather may produce a deep impression that gradually relaxes. Firm leather may require more pressure. Heavily pebbled leather can reduce fine-logo clarity.
Foil stamping adds metallic or colored contrast. Foil adhesion should be tested on the final leather. Oily, waxy, rough, or heavily textured surfaces can reduce transfer quality.
Foil testing should review:
- Full transfer
- Sharp edges
- Adhesion
- Rub resistance
- Heat resistance
- Color consistency
- Fine-line clarity
Metal logos create stronger visual presence. They may be attached through pins, screws, rivets, adhesive, or backing plates. Internal protection is necessary so the hardware does not scratch cards.
Metal hardware also introduces:
- Plating requirements
- Corrosion testing
- Scratch risk
- Weight
- Backing thickness
- Attachment strength
- Metal-detection requirements
Laser marking can create a permanent effect on selected leathers, but results vary by color and finish. Some leathers darken cleanly; others produce uneven or burnt-looking marks.
Logo placement should be measured from fixed reference edges. A placement guide may define:
- Horizontal distance
- Vertical distance
- Logo width
- Logo height
- Orientation
- Depth
- Color
Approval should be completed on production leather, not on substitute material.
How Are Finished Products Shaped?
After stitching and edge finishing, card holders may need pressing, shaping, cleaning, and conditioning.
Shaping controls:
- Flatness
- Fold symmetry
- Corner form
- Pocket opening
- Overall profile
- Packaging fit
A bifold card holder may be placed on a folding jig to establish the correct center fold. Excessive pressing can flatten leather grain, while weak pressing can leave the product uneven.
Card-slot openings may be checked with standard cards after finishing. Edge paint and final assembly can slightly change pocket width.
Surface cleaning should remove:
- Glue marks
- Pencil marks
- Edge-paint residue
- Dust
- Thread fibers
- Fingerprints
- Metal particles
Cleaning products must be compatible with the leather finish. Strong solvents can alter color, gloss, or surface coating.
Conditioning may be used for selected leathers, especially waxed or vegetable-tanned articles. Application should remain even. Excess conditioner can stain packaging or create shade differences.
Finished units should rest long enough for adhesives and edge finishes to cure before packaging.
How Is Bulk Quality Controlled?
Bulk quality control begins before production and continues through material inspection, cutting, skiving, assembly, sewing, edge finishing, logo application, functional testing, packaging, and carton verification.
Final inspection alone cannot protect a large order. When a repeated defect is discovered after thousands of units are complete, repair may be expensive or impossible.
A stronger quality system uses several checkpoints:
| Inspection Stage | Main Control |
|---|---|
| Incoming materials | Leather, lining, thread, paint, packaging |
| Cutting | Dimensions, grain, shade, surface defects |
| Skiving | Thickness, width, leather strength |
| First assembly | Slot rise, alignment, glue control |
| First sewn unit | Stitching, dimensions, function |
| Inline inspection | Repeated workmanship issues |
| Edge inspection | Smoothness, color, curing |
| Functional inspection | Card capacity and retention |
| Packaging inspection | SKU, barcode, package fit |
| Final lot inspection | Quantity, appearance, function, carton |
The approved pre-production sample should remain available on the production floor and in the inspection area. Inspectors should also have:
- Measurement sheet
- Material swatches
- Color standard
- Stitching reference
- Edge-paint reference
- Logo-position template
- Packaging sample
- Barcode list
- Defect classification
Retail quality should be judged according to use and customer expectation, not only factory appearance.
Critical defects can involve safety, legal information, or total functional failure.
Major defects can include:
- Blocked card slot
- Loose stitching
- Wrong leather
- Wrong color
- Wrong logo
- Cracked edge paint
- Severe scratches
- Incorrect barcode
- Missing label
- Product outside functional dimensions
Minor defects may include:
- Small surface speck
- Slight stitch variation
- Light removable mark
- Minor internal color variation
Defect limits should be agreed before final inspection. Retailers may use their own AQL plan or require 100% checking for selected points.
How Is Card-Slot Tension Tested?
Card-slot tension should be tested during development, at the start of production, during inline inspection, and before final packing.
A reliable test uses standard plastic cards rather than thin paper inserts.
The test may include:
- Check empty slot width.
- Insert one card into every slot.
- Load the maximum claimed quantity.
- Measure loaded thickness.
- Pull each card out by hand.
- Repeat insertion 20–50 cycles.
- Leave cards loaded for 24 hours.
- Shake the holder horizontally.
- Turn the holder upside down.
- Remove all cards and inspect recovery.
The inspector should record whether the slot is:
- Too tight
- Firm but usable
- Comfortable
- Loose
- Unsafe for retention
Opening force can be measured in laboratory development, although many retail programs use approved-sample comparison.
Every slot should be tested. Upper slots may perform well while lower pockets remain too tight because of accumulated layers.
Central pockets require separate testing. They may be used for folded notes or extra cards, so the claimed use should be defined.
Functional failure should not be repaired only by manually stretching pockets. Manual stretching creates inconsistent results and may weaken some units more than others. The pattern, skiving, or assembly process should be corrected.
Which Size Tolerances Matter?
Dimensional tolerances should focus on points affecting card fit, visual symmetry, packaging, and function.
Example working controls may include:
| Control Point | Possible Production Tolerance |
|---|---|
| Overall width | ±1.0 mm |
| Overall height | ±1.0 mm |
| Slot rise | ±0.5 mm |
| Slot-opening width | ±0.5–1.0 mm |
| Logo position | ±0.5–1.0 mm |
| Stitch distance | ±0.5 mm |
| Empty thickness | Based on approved sample |
| Fold alignment | Visually centered |
| Corner symmetry | Template controlled |
Exact limits should be approved according to product size and leather behavior. Natural leather cannot always be controlled like molded plastic, but key functional measurements still need narrow limits.
Measurement methods should remain consistent:
- Place the product flat
- Avoid stretching soft leather
- Use the same measuring points
- Use calibrated rulers or calipers
- Measure after final curing
- Compare with the approved sample
Soft card holders may compress under calipers. Inspectors should avoid excessive pressure.
Visual templates can speed up inspection for:
- Logo placement
- Slot rise
- Stitch path
- Corner radius
- Overall outline
Measurements should be recorded by lot so trends can be identified before products move outside the acceptable range.
How Are Leather Defects Managed?
Leather inspection should separate natural characteristics from unacceptable production defects.
Acceptable natural characteristics may include:
- Fine pores
- Light veins
- Subtle grain variation
- Small healed marks
- Minor shade movement
Potentially unacceptable areas may include:
- Deep scars
- Holes
- Loose grain
- Finish cracks
- Severe wrinkles
- Heavy stains
- Uneven coating
- Excessive color difference
- Weak belly leather in high-stress panels
The allowed appearance depends on the leather description. A natural full-grain range may accept more variation than a smooth formal collection.
A leather appearance standard should include physical reference panels showing:
- Fully acceptable surface
- Conditionally acceptable surface
- Internal-use surface
- Rejected surface
Cutters should match panels within one unit. The front and back should not show extreme differences in grain or shade unless the design deliberately uses contrast.
Shade groups can be separated before cutting:
- Light shade
- Approved middle shade
- Dark shade
Components from different shade groups should not be mixed within one product.
Leather defects created during production should also be controlled:
- Cutting scratches
- Presser-foot marks
- Needle damage
- Glue stains
- Edge-paint marks
- Heat marks
- Flattened grain
- Packaging dents
Protective films, clean tables, padded trays, and controlled stacking help prevent surface damage.
How Is Color Consistency Controlled?
Color control begins with the approved leather standard and continues through hide sorting, cutting, assembly, edge painting, thread selection, packaging, and repeat orders.
A color standard can include:
- Physical leather panel
- Pantone reference for direction
- Instrumental color values where required
- Approved shade range
- Gloss limit
- Grain reference
- Edge-paint sample
- Thread sample
Pantone references alone are not sufficient for leather because surface texture and gloss change perceived color.
Color should be reviewed under agreed lighting conditions:
- Daylight-equivalent lighting
- Warm retail lighting
- Cool retail lighting
A leather can match under daylight but shift under warm light. Retail display conditions should therefore be considered.
Leather lots should be labeled and separated. Mixing hides from different dye lots within one product can create visible contrast.
Edge paint and thread may need separate color approval. A close match can look more refined than an approximate match that appears accidental.
For repeated orders, exact visual duplication may not be possible with natural leather. A controlled shade range gives the factory a realistic target while protecting store consistency.
What Should Inline Inspection Cover?
Inline inspection should focus on repeated defects while correction remains possible.
Inspectors may check a fixed number of units every hour or at each production stage. The frequency depends on order size, complexity, operator count, and defect risk.
Inline checks should cover:
- Correct material
- Correct panel orientation
- Cutting accuracy
- Skiving thickness
- Slot alignment
- Logo placement
- Adhesive overflow
- Stitching
- Edge preparation
- Finished dimensions
- Card capacity
When a repeated defect appears, production should be paused for root-cause review.
Common causes may include:
| Defect | Likely Cause |
|---|---|
| Tight lower slot | Excess glue, thick skiving, pattern error |
| Crooked slot rise | Positioning jig error |
| Uneven stitches | Guide setting or operator control |
| Cracked edge | Poor sanding, thick paint, short curing |
| Logo too light | Low pressure or leather variation |
| Color mismatch | Mixed leather lots |
| Bulky corner | Under-skiving |
| Surface scratch | Poor tray or stacking control |
Corrective action should address the process, not only repair finished units.
What Should Final Inspection Cover?
Final inspection should confirm that the shipment matches the approved product, packaging, quantity, and store data.
A complete final inspection may cover:
- Style number
- Color
- Leather
- Finished dimensions
- Slot count
- Card capacity
- Card retention
- Stitch quality
- Edge quality
- Logo method
- Logo placement
- Surface cleanliness
- Lining condition
- Odor
- Package type
- Label content
- Barcode number
- Barcode scan
- Country-of-origin marking
- Carton quantity
- Carton marks
- Assortment ratio
Every SKU should be checked separately. A shipment can pass overall quantity review while one color contains the wrong barcode or package language.
Barcode scanning should use actual scanners rather than visual review only.
Packaging inspection should include the product inside the box. Inspectors should confirm that:
- Leather is not compressed
- Logo remains visible
- Product does not move excessively
- Inserts do not scratch the surface
- Package closes correctly
- Barcode remains flat
- Window material stays clean
- Colors match approved artwork
Cartons should be checked for:
- Correct quantity
- Correct SKU
- Correct store allocation
- Gross weight
- Carton dimensions
- Shipping marks
- Damage
- Moisture protection
- Sealing method
SzoneierLeather can build project-specific inspection standards around card capacity, leather appearance, dimensions, stitching, edge finishing, branding, packaging, and shipment data. Production teams can also retain approved samples and material references for repeat orders.
How Should Retail Orders Be Scaled?
Retail-chain orders should be scaled by balancing total volume, SKU count, material requirements, production efficiency, packaging quantities, store allocation, and replenishment speed. A larger order does not automatically create a lower-risk program. When volume is divided across too many colors, styles, languages, and package versions, production complexity can increase faster than the total quantity.
A program containing 20,000 card holders may appear large, but the factory may need to manage:
- Three constructions
- Six leather colors
- Two logo methods
- Four language versions
- Three packaging formats
- Several barcode groups
- Different store-allocation ratios
The order may therefore behave like dozens of smaller jobs rather than one efficient production run.
Scaling should begin with a complete order matrix. Every variation should be listed before materials are purchased.
A useful matrix includes:
- Product style
- Leather type
- Leather color
- Lining
- Thread color
- Edge-paint color
- Logo method
- Packaging type
- Package language
- Barcode
- Order quantity
- Destination
- Required delivery date
The matrix helps identify combinations that create very small production quantities. It also shows where one material or package can be shared across several products.
A practical retail program may divide products into three groups:
- Core styles with stable year-round demand
- Trial styles used to test color, construction, or price
- Seasonal or campaign styles with a limited selling period
Core products should receive the most stable materials and the strongest repeat-order documentation. Trial products should use controlled quantities. Seasonal products should avoid unnecessary custom materials that cannot be reused.
Order scaling should also consider the slowest production stage. A simple card sleeve may move quickly through cutting and sewing, while a lined bifold with several edge-paint coats needs additional drying and inspection time.
Production capacity should therefore be reviewed by process:
| Production Stage | Main Capacity Risk | Planning Action |
|---|---|---|
| Leather inspection | Large shade variation | Sort lots before cutting |
| Splitting | Thickness inconsistency | Reserve calibrated equipment |
| Cutting | Too many dies and colors | Group production by material |
| Skiving | Operator-dependent variation | Use approved thickness records |
| Sewing | Multiple thread and guide changes | Sequence similar SKUs together |
| Edge painting | Drying bottleneck | Plan rack space and curing time |
| Logo application | Die or foil changeovers | Group by logo method |
| Packaging | Barcode and language errors | Use scan and visual verification |
The main production schedule should show when each SKU enters and exits every major stage. Retail delivery dates should not be based only on the final sewing date.
How Are MOQ and SKU Quantities Balanced?
MOQ should be reviewed at several levels rather than treated as one number for the whole order.
Different minimums may apply to:
- Leather color
- Custom leather finish
- Printed lining
- Thread color
- Edge paint
- Metal hardware
- Logo die
- Foil color
- Folding cartons
- Rigid boxes
- Printed care cards
- Barcode labels
A factory may accept a flexible total order quantity, but custom leather or packaging suppliers may require larger commitments.
For example, a retail order may include 6,000 units divided as follows:
| Color | Quantity | Material Position |
|---|---|---|
| Black | 2,000 | Stock leather |
| Dark brown | 1,500 | Stock leather |
| Tan | 1,000 | Stock or regular color |
| Navy | 800 | Limited stock |
| Burgundy | 500 | Custom color |
| Seasonal green | 200 | Custom color |
The two smallest colors may create poor leather utilization and high packaging cost. A stronger plan could increase one color, remove another, or use an available leather close to the intended shade.
SKU quantity should be high enough to support:
- Efficient cutting
- Stable sewing setup
- Consistent edge treatment
- Reasonable packaging cost
- Reliable inspection
- Acceptable unit price
Very small SKU quantities often increase cost because the factory still needs to prepare:
- Cutting dies
- Logo setup
- Edge-paint setup
- Thread setup
- Packaging files
- Barcode files
- Inspection records
A useful approach is to establish minimum quantities by confidence level.
| SKU Type | Suggested Order Approach |
|---|---|
| Proven core color | Highest opening quantity |
| New neutral color | Medium quantity |
| Fashion color | Controlled test quantity |
| Complex construction | Pilot run before scale |
| Seasonal product | Quantity based on selling window |
| Premium gift model | Lower volume with higher margin |
The lowest possible MOQ is not always the safest choice. If a quantity is too small, the unit cost may make the retail price uncompetitive.
SzoneierLeather can review the order matrix and identify where styles, colors, packaging, or materials can be combined to improve production efficiency.
How Should Pilot Runs Be Used?
A pilot run allows the retail team to check production consistency before the full quantity is completed.
Pilot quantities may be used for:
- New leather
- New construction
- New card-slot capacity
- RFID structure
- New edge-paint system
- New metal logo
- New packaging
- High-value premium products
A pilot run should use the same materials, equipment, operators, and production process planned for the main order.
The review should include:
- Finished measurements
- Card insertion
- Card retention
- Stitching
- Logo appearance
- Edge durability
- Leather shade
- Packaging fit
- Barcode scanning
- Carton packing
Pilot production is different from sampling. A sample is often made by skilled development staff in a small quantity. A pilot run tests whether the approved result can be repeated under real production conditions.
A pilot review may reveal problems such as:
- Slot openings becoming tighter during volume assembly
- Edge paint drying differently on large racks
- Metal logos damaging nearby units during packing
- Leather shade variation across hides
- Boxes becoming compressed in master cartons
- Barcode labels lifting from coated packaging
Correcting these problems before the full run protects the delivery schedule and reduces rework.
How Should Production Be Divided by SKU?
Production should be sequenced to reduce material changes, machine adjustments, and packing errors.
Similar SKUs can be grouped by:
- Leather
- Thread
- Edge paint
- Logo method
- Packaging size
For example, all black card holders using black thread and black edge paint can be produced together even when the constructions differ.
However, grouping should not create identification errors. Every SKU batch should remain separated and labeled throughout production.
Batch labels may include:
- Style number
- Color
- Quantity
- Production line
- Date
- Leather lot
- Operator group
- Inspection status
Physical separation is especially important after products look similar. A black RFID card holder and a black non-RFID card holder may appear nearly identical.
Color-coded trays, batch cards, barcode scans, or dedicated storage zones can reduce mixing.
Which Packaging Fits Retail Shelves?
Retail packaging must protect the card holder, communicate value, fit store fixtures, display product information, scan correctly, and remain efficient to ship. Packaging should be developed with the actual card holder, not from dimensions alone.
A card holder may be sold through:
- Hanging displays
- Countertop trays
- Locked cabinets
- Shelf boxes
- Gift sections
- Online fulfillment
- Corporate gift programs
Each channel needs a different packaging structure.
Hanging packaging may need:
- Euro slot
- Reinforced hanging area
- Clear product view
- Compact depth
- Anti-theft feature
- Barcode on a flat panel
Shelf packaging may need:
- Stable base
- Clear front panel
- Color identification
- Stack strength
- Easy replenishment
Gift packaging may need:
- Rigid construction
- Protective insert
- Tissue or pouch
- Strong logo presentation
- Clean opening experience
The packaging should not hide the strongest feature of the product. When leather texture and color are important, a window, open sleeve, or removable lid may help customers inspect the product.
Which Packaging Formats Work Best?
Common packaging formats include:
| Packaging Format | Cost Direction | Shelf Use | Main Advantage | Main Risk |
|---|---|---|---|---|
| Paper band | Low | Counter or tray | Minimal and compact | Limited protection |
| Hanging card | Low to medium | Peg display | Strong visibility | Leather remains exposed |
| Folding carton | Medium | Shelf or hanging | Good information area | Product hidden without window |
| Window box | Medium | Shelf display | Shows color and leather | Window scratching |
| Drawer box | Medium to high | Gift section | Strong opening experience | Larger shipping volume |
| Rigid box | High | Premium gifting | High perceived value | Cost and carton cube |
| Fabric pouch | Medium | Gift or online | Reusable | Weak shelf communication |
| Paper sleeve | Low to medium | Boxed or tray display | Easy color variation | Limited crush protection |
A paper band works well when the leather should remain visible and the product is protected in a display tray. It may not provide enough security for open retail environments.
A window box gives customers a view of the leather, but the internal insert must prevent the product from moving and rubbing against the window.
A rigid box can support a premium retail price, but package volume should be checked carefully. A box that is twice as large as necessary increases storage and freight cost.
How Is Package Size Controlled?
Package dimensions should be based on:
- Product dimensions
- Loaded thickness
- Protective tissue
- Insert thickness
- Display orientation
- Barcode area
- Hanging structure
- Carton plan
The package should allow enough clearance to avoid compressing the leather, but not so much space that the product moves during transport.
For example:
| Card Holder Size | Package Clearance |
|---|---|
| 100 × 70 × 8 mm | Add controlled space for insert and protection |
| Bifold 110 × 80 × 18 mm | Allow fold thickness and opening pressure |
| Zipper case 120 × 80 × 22 mm | Allow zipper pull and hardware protection |
Exact clearance should be confirmed through a physical package sample.
A card holder packed too tightly may develop:
- Flattened grain
- Edge marks
- Fold distortion
- Metal-logo impressions
- Zipper pressure marks
A package that is too loose may cause:
- Surface rubbing
- Scratches
- Bent corners
- Disorganized display
- Noise during handling
How Is Leather Protected Inside Packaging?
Leather can be damaged by rough paper, ink, adhesive, metal parts, moisture, and prolonged pressure.
Protection may include:
- Tissue paper
- Nonwoven pouch
- Soft paper wrap
- PE or biodegradable protective bag
- Molded pulp insert
- Paperboard tray
- Foam insert for premium programs
- Protective film over metal logos
The selected protection should not transfer color, oil, plasticizer, or adhesive onto the leather.
Dark leather can transfer color onto pale fabric pouches if rub fastness is weak. Light leather can pick up ink from printed inserts. Material contact tests should therefore be completed before bulk packing.
Metal logos should not contact another leather surface directly. A protective sheet or fixed insert may be needed.
Packaging materials should also be checked for odor. A premium leather product packed in a box with strong printing or adhesive odor can create a poor first impression.
How Are Retail Features Communicated?
Packaging should explain the product clearly without overcrowding the design.
Useful information may include:
- Leather type
- Card capacity
- RFID feature
- Dimensions
- Color name
- Care guidance
- Country of origin
- Product code
- Barcode
- Company information
- Sustainability claim
- Warranty or service information
Feature claims should be accurate.
For example:
Better wording:
- Holds up to six standard cards
- Two outer slots and one center pocket
- RFID-blocking lining in main compartment
- Genuine cow leather
- Designed for slim everyday carry
Weak wording:
- Holds everything
- Completely secure
- Premium quality
- Best leather
- Lifetime protection
Specific information helps customers make decisions and reduces returns caused by unclear expectations.
How Should Multilingual Packaging Be Managed?
Retail chains operating in several countries may require different package languages.
There are three common approaches:
- Separate printed boxes for each market
- One multilingual box
- One standard box with market-specific labels or sleeves
Separate boxes provide the cleanest presentation but increase printing quantities and inventory risk.
A multilingual box reduces SKU count but may become crowded.
A standard box with different sleeves or labels offers flexibility and can be useful for smaller market quantities.
Every version should be controlled through:
- Artwork number
- Revision date
- Language code
- Barcode
- Market
- Print quantity
- Approval record
Language files should be reviewed before printing. The factory should not be expected to interpret legal or commercial translations without approved text.
How Are Barcodes and Labels Managed?
Barcode and label accuracy is essential for warehouse receiving, inventory tracking, point-of-sale scanning, and replenishment. A card holder can be perfectly manufactured and still be rejected if the barcode, color code, or product description is wrong.
Every sellable variation may require a separate identifier.
Differences that may create a separate SKU include:
- Color
- Size
- Construction
- Leather type
- Packaging
- Market
- Gift set
- RFID feature
Barcode data should be approved before packaging production begins.
The control file should include:
- Style number
- Product name
- Color
- Barcode number
- Barcode format
- Package artwork
- Carton barcode
- Market
- Quantity
How Should Barcodes Be Printed?
Barcode printing should maintain:
- Correct number
- Correct format
- Adequate contrast
- Clear quiet zones
- Sufficient size
- Flat placement
- Sharp lines
- Scan reliability
Barcodes should not be placed over:
- Box folds
- Rough embossing
- Metallic foil
- Curved surfaces
- Glossy reflective areas
- Transparent windows
- Textured fabric
Dark bars on a light background generally provide strong readability.
Barcodes printed in metallic ink, pale gray, or low-contrast colors may fail.
Every production batch should include scan testing. Visual inspection alone cannot confirm readability.
How Are Product Labels Controlled?
Product labels may include:
- Style number
- Color
- Material
- Country of origin
- Care information
- Company name
- Barcode
- Price
- Batch code
- Compliance information
Label content should match the actual product.
Common errors include:
- Wrong color name
- Wrong leather description
- Wrong barcode
- Wrong country version
- Old company address
- Missing material statement
- Incorrect RFID claim
- Wrong retail price
A label-control process can include:
- Approve the data file.
- Approve the artwork.
- Print a proof.
- Scan the barcode.
- Compare with the SKU matrix.
- Approve bulk printing.
- Check first packed units.
- Recheck during final inspection.
Labels should be stored by SKU and separated physically.
How Is RFID Inventory Tagging Managed?
Some retail chains use RFID tags for inventory tracking. Item-level RFID can improve store visibility, stock counting, and replenishment.
The RFID tag may be placed:
- Inside the package
- On a hanging card
- On a package label
- Inside a removable paper insert
Placement should avoid:
- Metal logo plates
- RFID-blocking layers
- Thick leather folds
- Foil packaging
- Other conductive materials
RFID-blocking card holders require special attention. The retail inventory tag should usually remain outside the shielded area.
Testing should confirm:
- Tag readability
- Read distance
- Package orientation
- Carton-level reading
- No interference from metal or shielding
- Correct electronic product code
RFID labels and normal barcodes should refer to the same SKU data.
How Should Cartons Be Planned?
Carton planning influences freight cost, product protection, warehouse handling, store allocation, and damage rates.
Card holders are compact, but cartons can become heavy before the available volume is fully used. The target should balance carton utilization with safe handling.
A carton plan should define:
- Units per inner box
- Units per master carton
- Single-SKU or mixed-SKU packing
- Carton dimensions
- Net weight
- Gross weight
- Product orientation
- Protective material
- Carton marks
- Barcode
- Pallet pattern
How Many Units Should Go in One Carton?
The correct quantity depends on:
- Packaging size
- Package strength
- Product weight
- Carton weight limit
- Store allocation
- Warehouse handling
- Shipping method
For example:
| Package Type | Possible Units per Carton | Main Concern |
|---|---|---|
| Paper band | 100–200 | Surface rubbing |
| Folding carton | 50–120 | Box compression |
| Window box | 40–80 | Window damage |
| Rigid gift box | 20–50 | High carton volume |
These numbers are only planning examples. The final quantity should be confirmed through actual carton measurements and transport testing.
Cartons should not be packed so tightly that boxes deform. Empty space should also be limited because movement causes damage.
Should Cartons Contain One SKU or Mixed SKUs?
Single-SKU cartons are easier to count, scan, and replenish. They reduce packing errors and simplify warehouse storage.
Mixed cartons can support store allocation. A retail chain may want one carton containing:
- 10 black
- 8 brown
- 6 tan
- 4 navy
- 2 seasonal colors
Mixed cartons reduce store-level sorting, but they increase factory packing complexity.
Mixed-carton programs need:
- Clear packing charts
- Color-coded stations
- Scan verification
- Weight checks
- Final visual review
- Carton labels showing the full assortment
One missing or incorrect color can disrupt store inventory records.
How Are Cartons Protected During Shipping?
Transport protection may include:
- Strong corrugated board
- Edge protectors
- Inner dividers
- Moisture-resistant liners
- Desiccants
- Protective bags
- Pallet wrap
- Carton straps where appropriate
Sea freight can expose products to humidity and temperature changes. Leather and packaging should be fully dry before packing.
Excessive moisture can lead to:
- Mold
- Odor
- Box softening
- Metal corrosion
- Adhesive failure
- Surface marks
Desiccants should be selected according to carton volume, route, season, and package structure. They should not contact leather directly.
Carton compression should be reviewed, especially for rigid gift boxes and window packaging.
How Are Shipping Marks Managed?
Shipping marks may include:
- Company name
- Purchase order
- Style number
- Color
- Quantity
- Carton number
- Gross weight
- Net weight
- Dimensions
- Country of origin
- Destination
- Handling symbols
- Store allocation
Shipping marks should match the packing list.
Carton numbering may follow:
Carton 1 of 100
Carton 2 of 100
Carton 3 of 100
Mixed-SKU cartons should show the assortment clearly.
Barcode labels on cartons should be placed on flat, visible surfaces and protected from damage.
How Can Retail Chains Reorder Reliably?
Reliable replenishment depends on accurate product files, material references, previous quality records, and early demand communication. A repeat order should not be treated as a completely new project, but it should still be reviewed before production begins.
Materials, suppliers, and processes may change over time. The factory should confirm:
- Leather availability
- Color availability
- Lining availability
- Thread availability
- Edge-paint availability
- Logo die condition
- Packaging artwork
- Barcode data
- Carton plan
- Required delivery date
Which Documents Protect Repeat Orders?
A repeat-order file should include:
- Approved physical sample
- Pattern version
- Component list
- Leather code
- Leather thickness
- Color standard
- Lining code
- Reinforcement position
- Thread code
- Stitch specification
- Edge-paint formula
- Logo file
- Logo die reference
- Packaging artwork
- Barcode list
- Carton plan
- Inspection checklist
- Previous defect record
- Corrective actions
The approved sample should be stored carefully to prevent color fading, deformation, or damage.
Photographs alone are not enough. They cannot show leather thickness, slot tension, edge flexibility, or internal construction.
How Should Leather Be Managed for Reorders?
Leather may vary between batches even when the same color name is used. Repeat orders should compare new production leather with the approved standard.
The review should check:
- Color
- Grain
- Gloss
- Temper
- Thickness
- Surface finish
- Odor
- Stretch
- Edge-paint compatibility
If the original leather is unavailable, a replacement should be sampled and approved before mass production.
Retail chains planning regular replenishment may reserve leather or maintain approved supplier options.
A material-reservation plan can cover:
- Core black
- Core brown
- Standard lining
- Standard thread
- Standard edge paint
- Packaging components
Reserved materials reduce lead time but may require financial commitment and storage planning.
How Should Reorder Quantities Be Calculated?
Reorder quantities should be based on:
- Current stock
- Weekly sales
- Store count
- Online demand
- Lead time
- Safety stock
- Seasonal changes
- Planned promotions
- Return rate
A simple reorder formula can be:
Average weekly sales × replenishment lead time + safety stock
For example:
- Weekly sales: 800 units
- Replenishment lead time: 8 weeks
- Demand during lead time: 6,400 units
- Safety stock: 1,000 units
- Reorder point: 7,400 units
The calculation should be completed by SKU. Black may sell four times faster than a seasonal color.
A repeat order should not automatically copy the original color ratio.
How Are Previous Defects Prevented?
Every repeat order should review earlier inspection and return data.
Common recurring issues may include:
- Tight slots
- Loose slots
- Edge cracking
- Wrong barcode
- Color mismatch
- Packaging dents
- Crooked logo
- Lining separation
- Surface scratches
Corrective actions should be added to the new production file.
For example:
| Previous Problem | Corrective Action |
|---|---|
| Lower slot too tight | Increase opening and control glue width |
| Edge cracking | Improve sanding and curing |
| Logo position variation | Add metal placement template |
| Box compression | Increase board strength |
| Color mixing | Separate leather lots |
| Wrong barcode | Add scan verification before sealing |
Production staff and inspectors should be briefed before the repeat run begins.
How Can Lead Time Be Shortened?
Lead time can be reduced by:
- Keeping approved patterns
- Maintaining logo dies
- Reserving core leather
- Standardizing packaging
- Using regular colors
- Providing rolling forecasts
- Confirming barcodes early
- Avoiding late artwork changes
- Approving materials before order release
The safest way to shorten lead time is preparation, not removing inspection stages.
Rushing can create:
- Wrong materials
- Poor slot performance
- Packaging errors
- Color inconsistency
- Edge-paint defects
What Should Retail Chains Ask a Leather Factory?
A professional leather factory should be evaluated through development ability, material control, production discipline, quality systems, packaging capability, and repeat-order support.
Important questions include:
- How long has the factory produced leather goods?
- Can it develop structures from drawings or reference samples?
- Does it have leather sourcing and material-development capability?
- Can it control splitting and skiving?
- How are card slots tested?
- How are leather lots sorted?
- How are edges finished?
- Which logo methods are available?
- Can retail packaging be developed?
- How are barcodes controlled?
- Can mixed cartons be packed?
- How are repeat orders documented?
- Which inspection stages are used?
- Can the factory support several price levels?
- Can samples be adjusted before production?
The factory should be able to explain how the product will be made, not only provide a price.
Which Files Should Be Sent for Quotation?
A more accurate quotation can be prepared when the project includes:
- Product drawings
- Reference photos
- Finished dimensions
- Number of slots
- Required capacity
- Preferred leather
- Color list
- Logo file
- Packaging requirement
- Order quantity
- Number of SKUs
- Destination market
- Delivery date
Vector logo files are preferred for embossing, foil stamping, metal logos, and printed packaging.
Useful formats may include:
- AI
- EPS
- SVG
- High-resolution PSD
A physical reference sample can also be sent when the desired construction or hand feel is difficult to explain.
Which Sample Details Should Be Approved?
Before mass production, the final sample should confirm:
- Shape
- Dimensions
- Card capacity
- Leather
- Color
- Grain
- Thickness
- Lining
- Reinforcement
- Stitching
- Edge finish
- Logo
- Packaging
- Barcode position
The approved sample should represent the production standard.
Any later changes should be documented rather than agreed only through chat messages.
Why Work With SzoneierLeather?
SzoneierLeather has more than 18 years of experience in leather product research, material sourcing, product design, pattern development, sampling, manufacturing, packaging design, and quality control.
Retail-chain card holder projects can be developed for:
- Entry-price collections
- Core leather accessory ranges
- Premium gift programs
- Corporate gifts
- Travel collections
- RFID products
- Seasonal launches
- Private-label programs
A successful leather card holder program depends on more than appearance. It must provide comfortable card access, controlled retention, clean edges, stable color, accurate logos, reliable packaging, and consistent repeat production.
Contact SzoneierLeather to discuss your leather card holder project. The team can review the construction, recommend materials, prepare samples, develop retail packaging, and build a production plan for multi-store delivery and repeat orders.