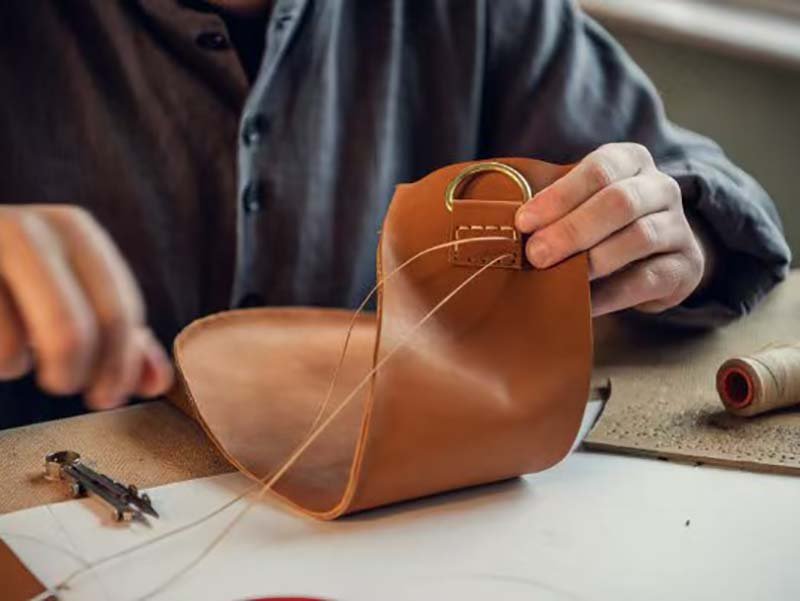
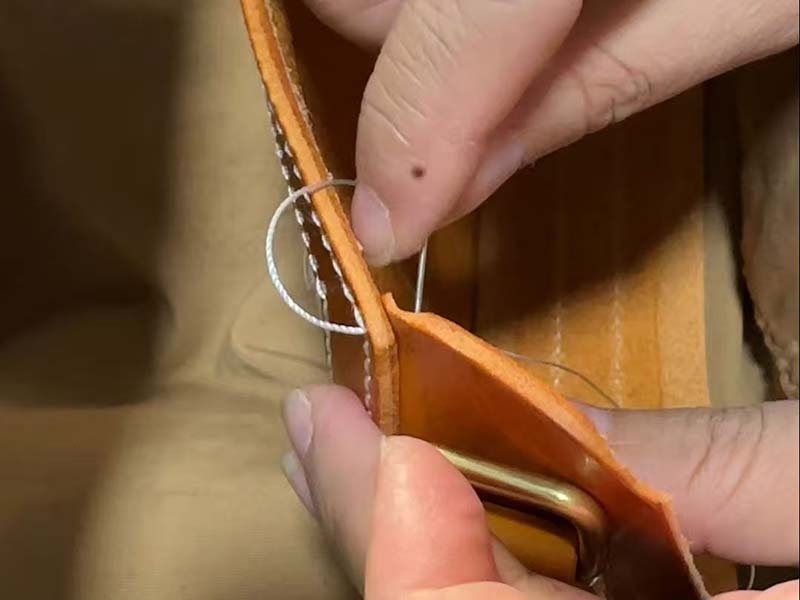
There’s a rhythm to leatherwork that no machine can imitate — the soft tap of the awl, the pull of waxed thread through firm hide, and the steady, meditative cadence of two needles crossing paths. Hand stitching leather isn’t just a technique; it’s a conversation between craftsman and material, a dance between patience and precision.
In an era where speed defines manufacturing, hand-stitched leather stands apart — durable, elegant, and deeply human. Each stitch locks not only the layers of leather together but also the maker’s skill and intent. A perfectly executed hand seam can outlast machine stitches by decades and develop a visual warmth that improves with time.
Hand stitching leather means sewing leather manually with two needles and waxed thread through pre-punched holes. The result is a stronger, more flexible, and visually refined seam that highlights craftsmanship and durability unmatched by machines.
From the classic saddle stitch that defines high-end belts and wallets to the subtle detailing found in luxury handbags, mastering hand stitching is what separates the artisan from the assembler. Let’s explore — step by step — how to bring timeless craftsmanship back into the heart of modern leather design.
What Is Hand Stitching Leather?
Hand stitching leather is the meticulous craft of joining pieces of leather manually using two needles, waxed thread, and pre-punched holes, without the use of a sewing machine. It’s a process rooted in centuries of craftsmanship — a skill that balances durability, precision, and artistry. In luxury leather goods, the visible symmetry and tactile feel of a hand-stitched seam often define the product’s authenticity and value.
Hand stitching leather involves sewing with two needles through pre-punched holes using strong waxed thread. It creates highly durable, flexible seams with balanced tension and visible craftsmanship that lasts longer and looks more refined than machine stitching.
Defining the Craft of Hand-Sewn Leatherwork
At its core, hand stitching is more than just a method of assembly — it’s an aesthetic statement. Each stitch is executed intentionally, with uniform spacing and precise tension. Unlike machine seams, which can appear mechanical and compressed, hand stitching adds character through its slight tactile rhythm and organic line.
The process begins with marking and punching holes along the seam line using pricking irons or stitching chisels. Then, the artisan threads two harness needles on either end of a single length of waxed thread. Each hole receives a needle from both sides, passing in opposite directions. This creates a balanced interlock, forming a knot inside the leather layers that provides exceptional strength and flexibility.
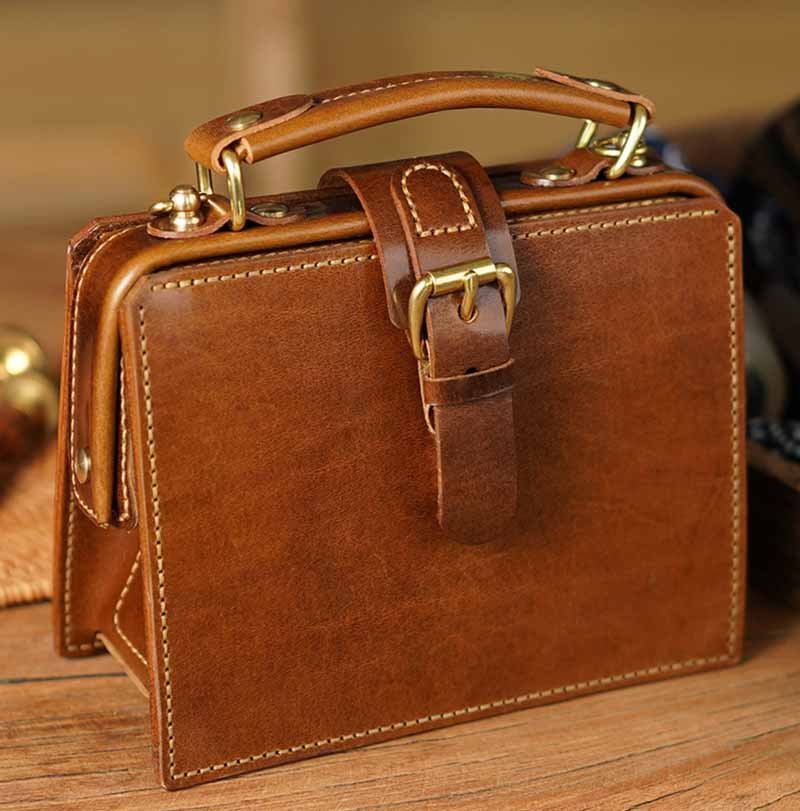
This traditional method dates back to saddle-making and early leather armor construction, where reliability mattered more than speed. Even today, the saddle stitch remains the foundation of luxury leather goods — from bespoke handbags and watch straps to premium belts and leather boxes.
Key Differences Between Hand and Machine Stitching
| Feature | Hand Stitching | Machine Stitching |
|---|---|---|
| Thread System | Two needles, one thread (balanced interlock) | Single needle + bobbin thread |
| Durability | Superior; if one side breaks, the seam holds | Weaker; breakage can unravel the seam |
| Flexibility | Adapts to curves and thick leather | Limited flexibility on dense or uneven surfaces |
| Visual Aesthetic | Textured, symmetrical, artisanal | Flat and uniform |
| Repairability | Easy to restitch by hand | Requires machine rework |
In a saddle stitch, the two threads pass through each hole and lock inside the material. If one thread ever snaps, the opposite side maintains tension — a vital feature for heavy-use products like belts, satchels, or straps. Machine stitching, by contrast, uses a looping system with a bobbin. If that loop breaks, the entire seam can unravel.
This difference is not merely structural; it represents a philosophical divide between industrial speed and artisanal integrity. Hand stitching prioritizes endurance, attention to detail, and a personal signature. Machine stitching focuses on consistency and throughput — important for mass production, but lacking in tactile richness.
Why Hand Stitching Still Matters in Modern Leatherwork
Despite advances in automation, hand stitching remains indispensable in premium manufacturing. For instance, Hermès, Louis Vuitton, and Berluti still train artisans in traditional saddle stitching, requiring hundreds of hours of practice before mastery. A single wallet can feature over 1,000 hand stitches, each checked for symmetry and tension.
From a functional standpoint, hand stitching withstands decades of bending, stretching, and environmental exposure. It resists seam separation where machine seams would fail, particularly along curved edges or thick folded areas.
From an aesthetic standpoint, it conveys craftsmanship and emotion — the sense that someone’s hands, not a robot, shaped and perfected this piece. Many luxury buyers instinctively associate visible, slightly raised stitches with authenticity and care.
The Role of Waxed Thread and Needle Technique
The use of waxed thread (usually polyester or linen) is crucial to the process. Wax strengthens fibers, adds weather resistance, and prevents friction as the thread moves through leather. It also helps “lock” stitches by friction once tensioned. Experienced artisans develop muscle memory in needle positioning and pulling rhythm, ensuring even thread tension. This tactile feedback cannot be replicated by machines — you feel the resistance, adjust the angle, and pull precisely to maintain symmetry.
Cultural and Industrial Significance
Hand stitching represents a link between tradition and timeless quality. Historically, saddlers and cobblers stitched by candlelight, producing durable gear for travelers, soldiers, and artisans. Today, the same stitch patterns are used in designer handbags, luxury car interiors, and watch straps, symbolizing a continuity of craftsmanship across generations.
In industrial contexts, Szoneier Leather and similar professional factories often integrate both hand and machine stitching strategically. While machines handle long, hidden seams efficiently, hand stitching is reserved for visible details — edges, handles, closures — where durability and design intersect.
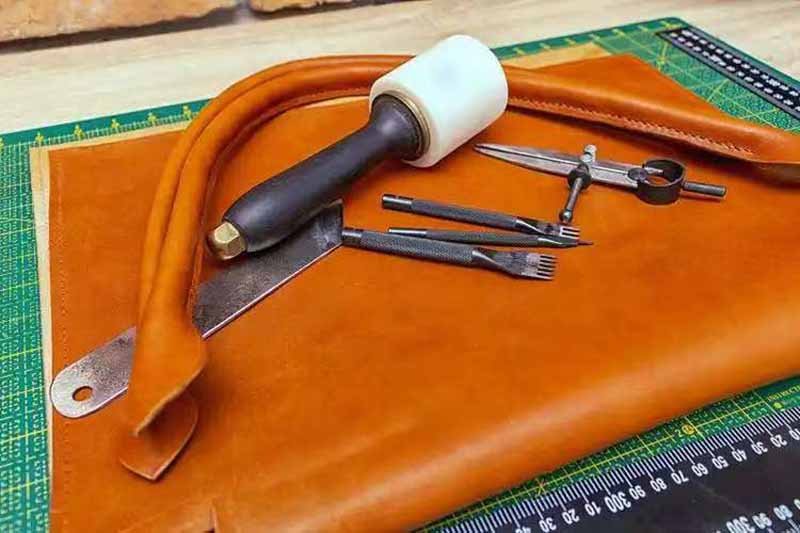
Which Tools and Materials Are Essential?

Essential hand-stitching tools include leather needles, waxed thread, pricking irons, awls, a stitching pony, and edge groovers. High-quality tools ensure clean holes, even tension, and strong, durable seams that define professional leather craftsmanship.
1. Needles, Threads, and Wax — The Stitching Trinity
The foundation of hand-stitched leatherwork lies in the holy trinity: needle, thread, and wax.
Leather Needles (Harness or Saddler’s Needles)
Unlike fabric needles, leather needles are blunt-tipped to prevent cutting fibers inside the holes. The most common are harness needles (size #002 to #004), known for their strength and smooth finish. Each project requires a matched pair of needles — one for each hand — to execute the saddle stitch. The key is finding the right balance between strength and finesse: too thick a needle enlarges holes, while too thin a needle bends easily.
Thread Selection
Leather thread must be strong, flexible, and resistant to abrasion. There are two main options:
| Thread Type | Material | Texture | Ideal For | Notes |
|---|---|---|---|---|
| Linen Thread | Natural fiber | Matte, soft | Heritage goods, wallets | Absorbs wax well; traditional hand-sewing material |
| Polyester Thread | Synthetic | Slight sheen | Belts, bags, outdoor gear | UV-resistant, stronger under tension |
| Nylon Thread | Synthetic | Smooth | Accessories, watch straps | High stretch tolerance but may fray without wax |
Thread thickness usually ranges between 0.4 mm to 1.0 mm, depending on leather thickness.
- For fine wallets or small goods, 0.5–0.6 mm is ideal.
- For belts or straps, 0.8–1.0 mm provides strength.
Color contrast also matters: neutral tones (tan, beige, black) give elegance; bright stitches create visual drama — common in modern luxury leather design.
Beeswax or Synthetic Wax
Thread is typically drawn across wax before sewing. The wax:
- Lubricates the thread to pass smoothly through holes.
- Seals the fibers against moisture.
- Locks tension once cooled, preventing unraveling.
Traditional beeswax adds a warm grip; modern synthetic wax resists temperature shifts better in humid or tropical climates.
2. Leather Type, Thickness, and Hole-Making Tools
Every leather behaves differently under a needle. Preparing the right type of hole ensures longevity and alignment.
Choosing the Right Leather
| Leather Type | Thickness Range | Typical Use | Notes |
|---|---|---|---|
| Full-Grain | 1.5–3.5 mm | Premium bags, belts | Tough, dense fibers — requires sharp tools |
| Top-Grain | 1–2.5 mm | Wallets, cases | Softer surface, easier to pierce |
| Split Leather | 1–1.8 mm | Lining, inexpensive goods | More porous; needs gentle stitching |
| Vegetable-Tanned | 1.5–3 mm | Handcrafted goods | Responds beautifully to hand stitching |
| Chrome-Tanned | 0.8–2 mm | Soft bags, fashion items | Stretchy; adjust tension carefully |
Pricking Irons and Stitching Chisels
These are the backbone of stitch consistency.
- Pricking Iron: Used to mark evenly spaced holes (not to punch through). The marks guide your awl later.
- Stitching Chisel: Punches fully through thinner leathers.
Spacing — called stitch per inch (SPI) or prong spacing — affects both appearance and durability:
| Stitch Spacing | Look | Typical Use |
|---|---|---|
| 3.0 mm (8 SPI) | Fine | Small leather goods |
| 4.0 mm (6 SPI) | Balanced | Bags and accessories |
| 5.0 mm (5 SPI) | Coarse | Belts and straps |
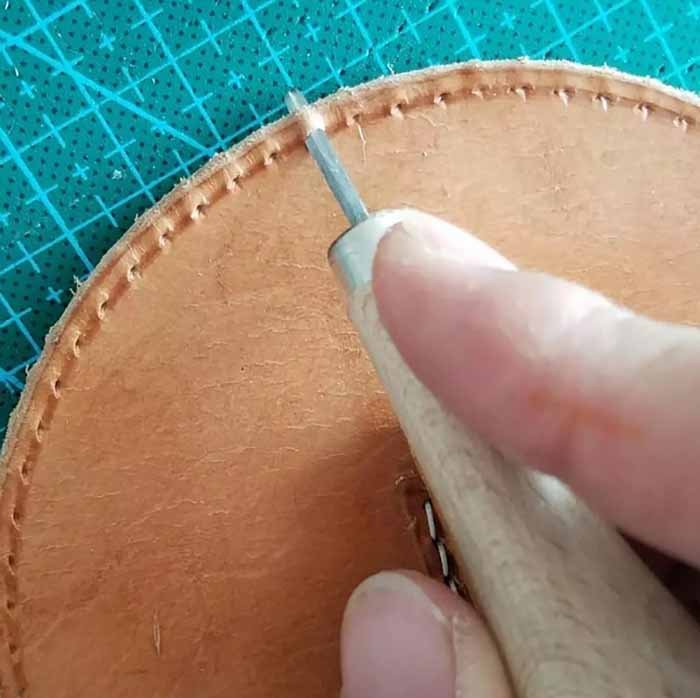
The Stitching Awl
The awl is the artisan’s scalpel — a diamond-shaped steel blade that pierces holes without removing leather fibers. This keeps the seam stronger and more flexible. A high-quality awl fits comfortably in hand and cuts cleanly through thick hides, forming a tiny slit rather than a circular hole.
When properly sharpened, it should glide with minimal pressure. A dull awl tears fibers and leads to uneven holes, which weaken the seam.
3. The Stitching Pony and Work Surface Setup
A stitching pony is an adjustable wooden clamp that holds your leather piece vertically, freeing both hands to handle needles efficiently. It improves accuracy, posture, and speed — especially for longer seams.
Tips for setup:
- Sit upright, leather at chest height.
- Maintain consistent lighting to catch alignment errors.
- Keep waxed thread pre-measured (about 3.5× seam length).
Supporting tools like cutting mats, rulers, and bench clamps add further precision, while a rotary punch or drill press can help with uniform holes on thick leathers.
4. Edge Groovers, Creasers, and Burnishers
The elegance of a leather seam often depends on its edge preparation.
Edge Groover
Creates a shallow channel parallel to the edge — this is where the thread sits. It not only protects the stitch from abrasion but also enhances alignment. Standard distance: 2–3 mm from the edge for most goods.
Edge Creaser
Used to mark decorative lines or compress the seam visually, creating that distinct “luxury edge” seen on premium bags.
Burnisher (Wood or Canvas)
After stitching, edges are smoothed using water or gum, then burnished with friction. It seals fibers, prevents fraying, and gives a glass-like shine.
5. Measuring, Marking, and Cutting Tools
Accuracy begins long before the needle meets leather.
- Scratch Awl: Marks lines or hole centers without leaving permanent ink.
- Ruler or Wing Divider: Ensures uniform seam distance.
- Rotary Cutter / Utility Knife: For precise trimming before assembly.
- Mallet: Used to tap punches and irons (preferably a non-marring nylon or wood mallet).
Clean tools prevent drag marks — an overlooked but critical aspect in professional leathercraft.
6. Glue, Clips, and Preparation Essentials
Before sewing, layers of leather are temporarily bonded using contact cement or water-based leather glue. This stabilizes edges and reduces slippage when punching holes. Avoid pins (which can permanently mark leather). Instead, use binder clips or double-sided leather tape to align panels cleanly.
Tip: Let glue dry until tacky (not wet) before joining surfaces. This ensures a stronger hold and prevents glue from oozing into your stitching line.
7. Recommended Starter Toolkit
| Tool Type | Example Size | Function | Pro Tip |
|---|---|---|---|
| Needles | #002 harness pair | Threading both sides of seam | Always match to thread diameter |
| Thread | 0.6–0.8 mm waxed polyester | Stitching strength | Wax lightly for smoother pull |
| Pricking Iron | 4.0 mm | Hole spacing | Keep perpendicular for even lines |
| Awl | Diamond blade | Piercing holes | Sharpen frequently |
| Stitching Pony | Adjustable | Hold work | Sit upright, leather at eye level |
| Edge Groover | 2 mm offset | Create recessed line | Groove before punching |
| Burnisher | Wood or bone | Polish edges | Add water or gum tragacanth |
| Glue | Water-based | Pre-bond edges | Apply thin, even coat |
| Mallet | Nylon | Strike tools | Avoid steel to prevent damage |
How Do You Prepare Leather for Hand Stitching?
Before thread ever meets needle, leather must be carefully measured, marked, punched, glued, Preparing leather for hand stitching involves cutting edges, marking seam lines, gluing layers, grooving the stitch path, and punching evenly spaced holes. Proper preparation ensures accuracy, durability, and a professional finish before actual stitching begins.
1. Trimming and Squaring the Leather
The first step in preparation is ensuring your leather pieces are perfectly trimmed and squared. Uneven edges lead to misaligned seams, twisted panels, or thread tension inconsistencies.
Steps:
- Use a rotary cutter or sharp utility knife along a metal ruler or cutting mat grid.
- Keep the blade perpendicular — angled cuts can create visible gaps after stitching.
- Check both sides for clean alignment before gluing or marking holes.
Tip: For thicker leathers (2.5–3 mm), a head knife offers more control on curves. Replace blades often — dull tools tear fibers and cause ragged edges that are hard to burnish later.
2. Marking the Stitch Line
Once your panels are aligned, it’s time to define where the stitch will run. Precision here ensures uniform spacing and an elegant aesthetic.
Tools Used:
- Wing Divider: To mark a parallel line from the edge.
- Edge Creaser or Groover: To score or remove a shallow groove for the thread to sit in.
| Stitch Line Distance | Typical Use | Notes |
|---|---|---|
| 2 mm | Fine wallets, watch straps | Compact edge appearance |
| 3 mm | Bags, small accessories | Balanced look |
| 4–5 mm | Belts, handles | More visible, stronger stitch line |
Technique:
- Set the divider or groover to desired width (2–5 mm).
- Glide it smoothly along the edge in one pass.
- The groove not only improves alignment but also protects the thread from abrasion, ensuring longer seam life.
Tip: Always mark the stitch line after cutting but before gluing layers — it allows correction if alignment shifts slightly.
3. Gluing and Edge Alignment
Leather is rarely stitched as a single layer. Most seams involve at least two bonded layers — for reinforcement, structure, or aesthetic edge folding.
How to Glue Properly:
- Use contact cement or water-based leather adhesive.
- Apply a thin, even layer to both bonding surfaces with a brush.
- Wait until tacky (1–3 minutes) before joining.
- Press surfaces firmly together with your hand roller or bone folder.
Why This Matters:
- Prevents pieces from shifting during punching.
- Keeps seam edges flush, avoiding “staggered” hole lines.
- Adds structure to soft or thin leather before piercing.
Note: Avoid excessive glue — it can seep into stitch holes, making needles sticky or blocking thread tension.
4. Creasing and Edge Bevelling
Before hole marking, refine the edge for a professional finish.
- Use an edge beveler to shave the sharp corners off your cut edge (especially on 1.5–3 mm leather).
- Follow with a creasing iron (manual or heated) to define a decorative line — this both beautifies and compresses fibers for cleaner stitching.
Why bevel? Because flat, raw edges can fray or crack. Bevelled edges fold thread more naturally, giving the seam a soft, elegant contour.
Tip: For thin chrome-tanned leather, bevel lightly or skip beveling — too much pressure can distort the material.
5. Punching the Stitch Holes
This is where precision meets patience. The goal: perfectly aligned holes that pass straight through all layers without tearing or shifting.
Two Main Tools:
- Pricking Iron: Marks diagonal entry points for awl use (preferred by European artisans).
- Stitching Chisel: Punches holes completely through the leather (common in Asia and the US).
| Hole Spacing | Recommended Use | Look |
|---|---|---|
| 3.0 mm | Small goods, wallets | Fine, delicate |
| 4.0 mm | Bags, accessories | Balanced |
| 5.0 mm | Belts, straps | Bold, rugged |
Technique:
- Start punching from a visible edge (corner or flap).
- Hold the tool perfectly vertical — any angle creates crooked threads.
- Use a nylon mallet, not metal, to protect tool teeth.
- Move one tooth into the last punched hole for perfect spacing continuity.
Tip: On long seams, recheck alignment often — even small misalignments multiply over distance.
6. Using an Awl for Traditional Saddle Stitching
If using the saddle-stitch method, holes are not punched completely — they are pierced as you sew, using an awl.
This requires more skill but provides better control:
- The diamond-shaped blade cuts a clean slit instead of removing material.
- The slit closes slightly after stitching, protecting the thread from wear.
Tip: Keep awl blades stropped and polished — a dull awl drags fibers, causing uneven holes or tearing delicate top-grain leather.
7. Edge Burnishing Before Stitching (Optional)
In luxury goods, edges are often partially finished before sewing to maintain uniform color and density. Steps:
- Sand edges lightly to remove glue residue.
- Apply gum tragacanth or Tokonole (Japanese edge compound).
- Burnish with canvas or wood slicker.
This creates a sealed surface that prevents fraying and improves thread alignment once sewing begins.
8. Marking Start and End Points
Before punching or stitching, mark the start and stop positions clearly using a scratch awl or fine silver pen.
- At corners, slightly tighten stitch spacing to reduce visual gap.
- Where seams intersect (like bag handles or belt loops), add 1–2 back stitches later for reinforcement.
This ensures symmetry — an essential detail for professional-grade products like watch straps, wallets, and structured handbags.
9. Common Mistakes in Leather Preparation
| Mistake | Result | Solution |
|---|---|---|
| Misaligned holes | Uneven stitch line | Use stitching chisel alignment marks |
| Over-gluing | Sticky thread, residue | Thin, even glue layers |
| Uneven groove depth | Thread sits unevenly | Adjust pressure, keep groover perpendicular |
| Dull blades | Ragged cuts | Sharpen knives regularly |
| No burnishing | Frayed edges | Always finish before assembly |
Which Stitch Techniques Are Most Reliable?
The most reliable hand stitch for leather is the saddle stitch, which uses two needles and a single thread for maximum strength and balance. Other techniques like running stitch, cross stitch, and box stitch are used for decoration, flexibility, or specific design structures.
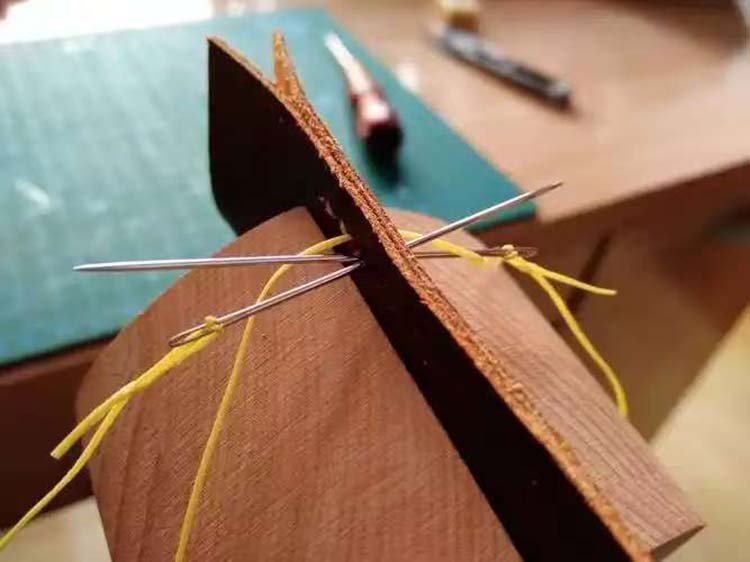
1. The Saddle Stitch — The Gold Standard of Leatherwork
If there’s one stitch every leather craftsman must master, it’s the saddle stitch. Used for centuries in saddlery, harness making, and luxury leather goods, it remains the strongest and most balanced technique known.
How It Works
The saddle stitch uses two needles and one continuous thread. Each needle passes through the same hole from opposite sides, interlocking in the middle of the leather.
- This creates a balanced lock inside the seam.
- Even if one side of the thread breaks, the seam remains intact.
Advantages
| Attribute | Saddle Stitch | Machine Lockstitch |
|---|---|---|
| Durability | Extremely high | Moderate |
| Aesthetic | Handcrafted, tactile | Mechanical, uniform |
| Flexibility | Excellent (moves with leather) | Stiff |
| Repairability | Easy | Difficult |
Application Examples
- Wallet edges and card slots (fine 3.0 mm spacing)
- Bag handles and straps (4.0–5.0 mm spacing)
- Watch straps and small accessories
Tip:
Always keep tension even on both sides. If one hand pulls tighter, the stitch will tilt — a small detail that separates a master artisan from an amateur.
2. The Running Stitch — Fast, Flexible, and Lightweight
The running stitch is the simplest of all hand stitches, often used in lighter leathers, lining attachment, or decorative seams where strength isn’t the primary goal.
How It Works
A single needle passes in and out of the leather at regular intervals, leaving evenly spaced visible dots on both sides. It’s fast but lacks the interlocking strength of saddle stitching.
Advantages
- Excellent for soft or thin leather, like lambskin or chrome-tanned hides.
- Quick and efficient — ideal for decorative top-stitching.
- Allows slight elasticity, perfect for curved or flexible seams.
Limitations
If one section of thread breaks, the entire seam can unravel easily. To compensate, artisans often backstitch 2–3 holes at both ends.
Best For
- Decorative borders
- Inner linings
- Light cosmetic bags or pouches
3. The Cross Stitch — Decorative Strength Meets Style
The cross stitch combines visual appeal with structure. It’s frequently used where aesthetics are as important as durability — think fashion belts, visible seams, or bag flaps.
How It Works
Two rows of angled stitches cross each other, forming an “X” pattern across the seam. It can be done using either:
- Two contrasting threads for visual impact, or
- A single long thread looped across diagonally.
Advantages
- Eye-catching 3D effect.
- Distributes stress evenly across edges.
- Ideal for high-visibility seams (e.g., belts, handles, wallets).
Best Practices
- Use a grooved guide to keep the Xs evenly aligned.
- Keep tension consistent; uneven pull can distort the pattern.
- For functional use, wax the thread thoroughly to add stiffness.
Applications
| Product | Purpose |
|---|---|
| Belts | Decorative reinforcement |
| Bag handles | Strength + aesthetic |
| Leather cases | Accent stitching on outer seams |
4. The Box Stitch — Structure and Endurance
The box stitch is used where seams meet at 90° angles, such as in leather boxes, structured handbags, or corners of satchels. It’s the engineer’s stitch — focused on holding shape.
How It Works
Leather edges are aligned edge-to-edge or at right angles. The stitching pattern forms a rectangular weave, securing the joint while maintaining a rigid shape.
Advantages
- Superior dimensional stability for structured designs.
- High tear resistance under load.
- Seam retains its geometry even with frequent handling.
Techniques
- Use thicker thread (0.8–1.0 mm) for visual contrast and strength.
- Grooving both edges helps the seam align neatly.
- Reinforce inner corners with double backstitching.
Common Uses
- Leather trunks and storage boxes
- Structured handbags or camera cases
- Watch display cases and gift boxes
5. The Whip Stitch — Edge Protection and Simplicity
The whip stitch wraps the thread over the edge of the leather repeatedly, creating a spiral-like pattern. It’s often seen on decorative trim seams and handmade rustic designs.
Advantages
- Simple and fast for beginners.
- Great for soft or split leather edges.
- Adds a tactile, handcrafted appeal.
Limitations
- Not as strong as saddle or box stitch.
- Over time, edges can stretch or deform if not properly glued beforehand.
Applications
- Soft leather pouches
- Rustic wallets or journals
- Small repair work
Tip:
To improve strength, pre-glue the edge and use thicker waxed thread (1.0 mm+).
Choosing the Right Stitch for Each Product Type
| Product Type | Recommended Stitch | Reason |
|---|---|---|
| Wallets | Saddle stitch | Precision and durability |
| Belts | Cross or box stitch | Strength and decorative contrast |
| Handbags | Saddle stitch + edge reinforcement | Long seam reliability |
| Watch straps | Saddle stitch | Thin layers and tight curves |
| Cases / Boxes | Box stitch | Structural integrity |
| Decorative seams | Cross or whip stitch | Aesthetic highlight |
Each product reflects a balance between strength and beauty. Functional items like belts or straps need reinforced stitches; fashion items may favor cross or whip stitches for personality and visual appeal.
Common Mistakes When Stitching Leather
Even with perfect tools, improper stitching can ruin the final look. Here are the most frequent pitfalls:
| Mistake | Consequence | Solution |
|---|---|---|
| Uneven tension | Zigzag stitch line | Keep both threads equally tight |
| Hole misalignment | Crooked seam | Use guide marks or stitching chisels |
| Frayed thread ends | Weak knots | Wax thread before stitching |
| Over-pierced holes | Loose seam | Maintain vertical tool position |
| No backstitching | Unraveling | Reinforce seam ends with 2–3 reverse stitches |
Tip: Always pull both threads simultaneously, slightly outward, rather than downward. This locks tension and prevents puckering.
Advanced Considerations: Thread Direction, Angle & Groove Depth
Professional artisans focus on micro geometry — the unseen engineering of the stitch.
- Thread angle: A consistent diagonal of 45° gives the seam a dynamic, luxurious look.
- Groove depth: Too deep weakens leather fibers; too shallow exposes thread to wear. 0.3–0.5 mm depth is ideal.
- Thread wax ratio: Over-waxed thread collects dust; under-waxed creates friction burns. Moderate coating ensures longevity.
How Do You Execute Hand Stitching Cleanly?
Maintaining uniform thread tension, stitch rhythm, and alignment is key. Avoid pulling too tightly or piercing the same hole multiple times to prevent tearing.
Threading, Tension Control, and Stitch Rhythm
Thread both needles evenly and pull each stitch until the thread lays flat — not overly tight. Keep tension consistent across the seam. A natural rhythm develops: insert left needle, then right, pull both simultaneously.
Managing Long Runs and Complex Curves
For long edges, secure the thread ends with clips to prevent tangling. On curves, punch holes closer together for smooth flow. Avoid stretching leather; guide it gently through the line.
What Are Common Mistakes When Sewing Leather?
Common mistakes include:
- Uneven hole spacing – leads to crooked seams.
- Over-tightened stitches – causes puckering.
- Using blunt or dirty tools – damages edges.
- Skipping wax – thread frays faster.
- Not finishing edges – leaves seams vulnerable to moisture.
Recognizing and correcting these early can dramatically improve craftsmanship consistency.
Preventing Uneven Stitch Lines and Thread Breakage
Always maintain a perpendicular punching angle, wax thread before use, and re-sharpen your awl regularly. Avoid sewing too close to the edge — at least 3 mm distance keeps seams strong.
Are There Finishing & Maintenance Steps After Stitching?
When the last stitch is pulled and the final knot tied, the work is far from over. True craftsmanship begins after the stitching. Finishing and maintenance transform a stitched piece of leather from “handmade” into “heirloom”—refining every edge, sealing every fiber, and ensuring decades of durability and beauty.
1. Trimming and Leveling the Edges
Once stitching is done, you’ll notice that the edges of the two leather layers may not be perfectly aligned. The first post-stitching step is to trim and level the seam.
Tools Used
- Edge skiving knife or sharp utility blade
- Sandpaper (starting from 400 grit, finishing around 1000–1200 grit)
- Edge beveler
Technique
- Gently slice along the stitched seam to remove excess or uneven layers.
- Sand the edge smooth — the goal is to make all layers appear as one solid piece.
- Use light, even strokes. Over-sanding can flatten decorative contours.
Tip:
Always sand in the direction of the seam, not across it — this prevents tearing thread ends and preserves alignment. For premium goods like wallets and belts, a perfectly smooth edge is a mark of mastery.
2. Beveling and Burnishing the Edges
Once leveled, edges are refined through beveling and burnishing, the twin secrets of a professional finish.
Edge Beveling
An edge beveler removes the sharp 90° corners, rounding the edge to prepare it for polishing.
- Use size #1 or #2 beveler for thin leather (1–1.5 mm).
- For belts and straps (2.5–3 mm), size #3 or #4 creates a soft, thick contour.
Burnishing
Burnishing is the process of compressing and polishing the leather edge until it becomes smooth and shiny. Steps:
- Apply a small amount of gum tragacanth, Tokonole, or water to the edge.
- Rub briskly with a wooden or canvas burnisher until friction heat creates a natural gloss.
- Repeat 2–3 times for a glass-like finish.
| Burnishing Compound | Result | Recommended Use |
|---|---|---|
| Water only | Matte, natural edge | Vegetable-tanned leather |
| Gum Tragacanth | Smooth, sealed edge | Wallets, belts |
| Tokonole (Japan) | High gloss, durable seal | Luxury goods |
| Wax Blend | Waterproof finish | Outdoor leather gear |
Why Burnishing Matters
It not only improves appearance but prevents moisture and dirt from penetrating the layers. On bags and belts, it’s the difference between a “handcrafted” and a “factory-made” look.
3. Sealing the Edge — Paints, Dyes, or Wax
For luxury-grade products, artisans often seal edges with edge paint or edge dye before polishing. This creates a flawless, colored edge consistent with premium designer standards (used by brands like Hermès and Louis Vuitton).
Methods
- Edge Dyeing: Apply thin coats of alcohol-based dye using a fine brush or roller. Let dry completely.
- Edge Painting: Use specialized leather edge paint (acrylic-based). Apply 2–3 thin layers, sanding between each coat.
- Wax Sealing: For rustic or natural goods, melted beeswax is rubbed onto the edge and buffed with a cloth for protection.
| Finish Type | Durability | Look | Common Use |
|---|---|---|---|
| Edge Dye | Medium | Natural tone | Belts, wallets |
| Edge Paint | High | Glossy, smooth | Fashion handbags |
| Beeswax Seal | High | Matte, organic | Outdoor or heritage goods |
Tip:
If you want to achieve a mirror edge, sand between paint layers with 1000–1500 grit paper, then polish with a soft cloth.
4. Polishing the Stitch Line
Even stitching deserves polishing. Using a bone folder or slicker, gently press and smooth the stitched area. This:
- Tightens thread into the groove.
- Flattens irregular bumps.
- Enhances shine and uniformity.
After polishing, lightly coat the entire seam with neutral wax to protect against friction and moisture.
Optional Step — Edge Creasing
An edge creaser (manual or heated) adds a subtle embossed line beside the stitch. This decorative accent compresses the edge fibers and gives a luxury-brand finish.
5. Conditioning and Oiling the Leather Surface
After all edge work, the leather itself needs nourishment. Natural hides lose oils during cutting, gluing, and handling. Conditioning restores flexibility, color depth, and scent.
Choosing the Right Conditioner
| Conditioner Type | Composition | Benefit | Notes |
|---|---|---|---|
| Neatsfoot Oil | Natural animal oil | Deep hydration | Slight darkening effect |
| Beeswax Blend | Wax + oil | Water resistance | Good for belts, bags |
| Lanolin Cream | Wool fat base | Soft feel | Ideal for luxury goods |
| Silicone Balm | Synthetic | Strong protection | Use sparingly on natural leathers |
Application
- Use a lint-free cloth to apply a thin, even layer.
- Let it sit for 20–30 minutes to absorb.
- Buff with a soft brush or cotton cloth until a gentle sheen appears.
Avoid over-conditioning — too much oil can weaken stitching or cause a sticky surface.
6. Waxing and Final Buffing
To lock in protection, apply a finishing layer of leather wax or cream. This seals pores, enhances color, and gives a tactile richness to the surface.
Procedure:
- Apply a small amount of neutral or tinted wax.
- Wait 5 minutes.
- Buff with a horsehair brush in circular motions.
Result: a subtle “satiny” sheen that feels alive under touch — not plastic-like.
7. Waterproofing (Optional for Bags & Belts)
For outdoor or travel goods, a waterproofing layer may be added.
- Use silicone-based sprays for chrome-tanned leather.
- Use wax-based waterproofers for vegetable-tanned hides. These create a breathable barrier without suffocating the leather.
Test first: Always apply on a hidden area — some waterproofers can slightly darken or alter tone.
8. Final Inspection & Quality Control
Before packaging or delivery, professional manufacturers like Szoneier Leather perform a multi-point inspection:
| Inspection Point | Check For | Tools Used |
|---|---|---|
| Seam Line | Even spacing, clean thread tension | Caliper / visual check |
| Edges | Smoothness, consistency | Finger sweep test |
| Stitch Ends | Proper backstitching, sealed knots | Loupe magnifier |
| Finish | No glue marks, color uniformity | Clean cloth / white light |
| Surface | Even oil absorption, shine | Visual + touch test |
9. Long-Term Maintenance and Care Tips
Leather is a living material — it ages, breathes, and responds to its environment. Proper maintenance keeps it looking timeless.
Storage
- Keep in a cool, dry place away from direct sunlight.
- Use fabric dust bags, not plastic (to allow airflow).
- For structured bags, insert paper stuffing to maintain shape.
Cleaning Routine
- Wipe dust with a dry microfiber cloth weekly.
- For deeper cleaning, use a mild saddle soap or leather cleaner monthly.
- Avoid alcohol-based wipes — they dry out natural oils.
Conditioning Cycle
- For everyday leather (belts, wallets): every 3–4 months.
- For exposed items (travel bags, watch straps): every 6–8 weeks.
Signs Leather Needs Conditioning
- Surface feels dry or rough.
- Visible light cracks appear.
- Leather loses its luster or darkens unevenly.
Restoration Tip
If edges start to fray or lose shine, re-burnish lightly with Tokonole or reapply wax for renewed smoothness.
Common Finishing Mistakes to Avoid
| Mistake | Result | Solution |
|---|---|---|
| Over-sanding | Uneven edge thickness | Use lighter pressure and finer grit |
| Skipping burnishing | Rough edges, moisture absorption | Always finish edges, even inner seams |
| Over-oiling | Sticky texture | Apply thin layers and wipe excess |
| Using alcohol cleaners | Dull, cracked surface | Choose pH-balanced leather cleaner |
| No conditioning | Dry, brittle leather | Regularly apply leather balm or oil |
The Art of Hand Stitching Leather
Hand stitching leather is more than a skill — it’s a dialogue between craftsman, material, and time. Every perforation, every thread pull, tells a story of patience and precision. Whether you’re crafting an heirloom wallet or a luxury travel bag, mastering this technique ensures your work stands out for generations.
At Szoneier Leather, we believe craftsmanship and technology can coexist. With over 18 years of expertise in designing, prototyping, and manufacturing leather goods, our team combines traditional sewing craftsmanship with modern R&D and strict quality control.
If you’re a designer or brand looking to create premium hand-stitched leather bags, wallets, belts, or accessories, we invite you to collaborate with us.
Contact Szoneier Leather today for custom sampling or material consultation.