 Skip to content
 How to Punch Holes in a Leather Belt: Step by Step Guide
Ever struggled with a belt that’s just a half–inch off the perfect fit? You’re not alone—ill-placed belt holes can throw off your entire look, leaving you constantly tugging or pinching your waist. But with a few simple tools and a bit of know-how, you can transform any too-big belt into a flawless fit in under ten minutes. Whether you’re a weekend DIYer or a professional craftsman, learning to punch holes precisely in leather extends your belt’s life, saves money, and sharpens your leather-working skills.
To punch holes in a leather belt, you’ll need a reliable leather hole punch (rotary or single‐punch), a cutting mat or scrap wood backing, a ruler and fine‐tip marker for precise marking, and optionally, a mallet for driving hollow punches. Measure and mark evenly spaced points, secure the belt flat, and punch straight down through the leather. Finish edges with a burnisher or edge slicker to prevent fraying.
What Tools Do You Need to Punch Holes in a Leather Belt?
You’ll need a quality leather hole punch—either a rotary punch with multiple size tips or a single hollow punch—plus a sturdy backing surface (self-healing mat or hardwood block). Accurate layout requires a steel ruler and fine-tip awl or pencil for marking. For single punches, use a rubber mallet or light hammer. Optional but recommended finishing tools include an edge beveler to round hole rims and a burnisher with beeswax or gum tragacanth to seal and polish the cuts.
1. Leather Hole Punchers
Rotary Punch (Multi‐Tip Punch):
- Design & Use: A hand‐lever tool with a revolving wheel of hollow tips (commonly 2.5 mm to 6 mm). You squeeze the handles to drive the selected tip through the leather.
- Pros: Rapid size changes without tool swaps; excellent for belts up to ~4 mm thickness; widely available and affordable ($10–$20).
- Cons: Leverage is limited—thick or heavily treated hides strain the mechanism, leading to uneven cuts or tip bending over time. Regular lubrication of the pivot joint is essential to prevent jamming.
Single Hollow Punch (Drive Punch):
- Design & Use: A cylindrical steel tube with a sharp cutting edge on one end. You position it over the mark and strike the opposite end with a mallet or under an arbor press.
- Pros: Superior for belts thicker than 4 mm and dense vegetable-tanned leathers; produces clean, burr-free holes; durable in high‐volume use.
- Cons: Requires vertical clearance and careful alignment; individual punches per diameter mean higher initial investment ($15–$50 per punch).
2. Backing Surfaces
Self-Healing Cutting Mat:
- Role: Protects workbenches and keeps punches sharp by providing a resilient surface that “heals” minor cuts.
Hardwood Block (Maple or Oak):
- Role: Offers rigid support under hollow punches, preventing damage to the punch tool itself and ensuring crisp cuts without deformation.
3. Measuring and Marking Tools
Steel Ruler or L-Square:
- Why: Leather can flex; rigid metal rulers guarantee straight, evenly spaced hole lines—critical for professional appearance and fit.
Fine-Tip Scratch Awl or Pencil:
- Why: Creates precise, visible indents. Ballpoint pens smear on leather and can bleed if the hole rim is not sealed immediately.
4. Impact Tools
Rubber Mallet:
- Use: Provides controlled force on single hollow punches without marring the leather or denting punch handles.
Lightweight Hammer:
- Use: When precision isn’t paramount, a small hammer with a soft face can substitute; caution is required to avoid excessive force.
5. Optional Finishing Tools
Edge Beveler:
- Purpose: Rounds sharp leather fibers around punched holes, reducing stress concentration that can lead to tearing.
Burnisher / Slicker:
- Purpose: Uses friction—often with a drop of gum tragacanth or beeswax—to seal and polish raw hole edges, preventing fraying and moisture ingress.
6. Tool Maintenance and Quality Considerations
Punch Sharpening:
- Hollow punches dull with use; maintain sharp rims via fine diamond or carbide files to extend tool life and ensure clean cuts.
Rotary Punch Care:
- Keep the revolving wheel’s arbor oiled (a drop of sewing machine oil) and clear of leather debris to avoid binding.
Investing in Quality:
- Entry-level rotary punches suffice for occasional DIY work, but pros benefit from higher-grade tools with hardened steel tips and ergonomic handles that resist hand fatigue.
Which Types of Hole Punchers Are Best for Leather Belts?
Rotary leather punches with hardened steel, multiple size options, and ratcheting levers excel for quick, light-duty work on belts up to 4 mm thick. For thicker or premium hides, single hollow punches (6–12 mm) driven by rubber mallet or arbor press deliver cleaner, burr-free holes. Choose based on leather thickness, hole diameter, and production volume—rotary for convenience, hollow punch for precision.
Leather belts vary in thickness and hardness, so choosing the right puncher is crucial. For most everyday belts (2–4 mm thick), a rotary leather punch is the go-to tool. It features a revolving wheel with multiple hollow tips—typically ranging from 2.5 mm to 6 mm diameters—mounted on lever handles that multiply your grip force. Rotary punches excel at quick, on-the-fly adjustments: simply align the desired tip over your mark, squeeze the handles, and twist slightly to shear cleanly through the leather. However, because their leverage is limited, they can struggle with vegetable-tanned hides over 4 mm thick and may wear down if used heavily without regular lubrication and tip sharpening.
For thicker or more rigid hides, a single hollow punch driven by a mallet or arbor press delivers superior performance. These cylindrical steel tubes have sharp cutting rims that, when placed over a mark and struck, cleanly carve out perfect circles—even in 5 mm or thicker leather. The hollow core ejects leather waste, keeping the cutting edge clear. While slower to set up and requiring a steady hand to keep the punch perfectly vertical, these tools provide burr-free holes and last for years with occasional resharpening. Pairing a series of sizes (e.g., 3 mm, 4 mm, 5 mm) lets you match hole diameter precisely to your buckle tongue.
If you’re running a small leather-goods shop or need to produce multiple belts consistently, an arbor press paired with standalone hollow punches can be a game-changer. An arbor press ensures perfectly perpendicular, repeatable force every time—eliminating the slight angle or wobble that can occur with hand-struck punches. By mounting your punches in the press’s ram and placing the belt on a hardwood stump or self-healing mat, you simply pull the press handle to drive the punch through. This setup is ideal for batch work and keeps your wrists free from the repeated stress of mallet strikes.
For hobbyists or those on a tight budget, a manual punch jig offers an affordable compromise. These desktop fixtures securely clamp the belt and guide a single hollow punch or small rotary tip through a fixed opening, ensuring perpendicular cuts without an arbor press. Combined with a quality hollow punch and rubber mallet, a punch jig yields nearly arbor-press accuracy at a fraction of the cost. Just be sure the jig is heavy and stable enough to prevent shifting under impact—otherwise you risk misaligned or jagged holes.
How Do You Measure and Mark the Perfect Hole Placement?
Accurate hole placement starts with measuring belt length from the buckle’s bar to existing holes, identifying the center point, and marking new holes evenly—typically 25 mm apart—using a steel ruler and fine awl. Ensure symmetry by transferring marks across both belt edges. A template or jig speeds up repetitive tasks. Proper marking prevents misaligned holes that can warp belt fit or damage leather.
To nail perfect hole placement every time, follow these detailed, step-by-step guidelines:
- Determine Your “Ideal Fit” Reference Point
- Wear Test: Buckle your belt in your usual waistband position. Note which hole sits most comfortably—this is your “ideal” or middle hole.
- Measure From the Buckle Bar: Lay the belt flat and measure the distance (A) from the buckle’s bar (not the buckle frame) to the center of that ideal hole. Record this as your baseline measurement.
- Confirm Consistency: Try the belt on again and verify that when the bar is at measurement A, the belt feels neither too tight nor too loose.
- Establish Uniform Hole Spacing
- Standard Interval: Industry norm is 25 mm–30 mm (1–1.2″) between hole centers. Tighter spacing (25 mm) gives finer adjustability—wider (30 mm) looks more traditional.
- Mark Edge Guides: Using a steel ruler or metal L-square, mark small dots on both the top and bottom edges of the belt at each interval from your baseline point. This edge guide prevents holes from drifting upward or downward.
- Check Parallelism: Visually connect the dots across the belt’s width to ensure your guide lines run perfectly parallel to the belt edges.
- Transfer to Center-Line Points
- Find the Center: For each pair of edge dots, draw light guide lines inward—either with a fine ruler or a straightedge—until they intersect at the belt’s midline.
- Scribe Precise Marks: Use a scratch awl or a sharp pencil to make small dimpled indentations exactly where the guide lines cross. These pinpricks serve as your punch locations without smearing or ambiguity.
- Symmetry Check: Fold the belt at its midpoint (buckle to tail) and ensure paired indentations align perfectly when the belt is folded back on itself.
- Use Jigs and Templates for Production
- Perforated Template Strip: A strip pre-drilled with holes at your chosen interval can be clamped to the belt. Simply insert an awl through each template hole to scribe marks in seconds.
- Custom Marking Jig: For shop environments, a bench-mounted jig with adjustable stops ensures repeatable baseline and interval measurements—ideal when punching dozens of belts to the same spec.
- Batch Verification: Periodically measure a sample belt after marking to confirm the jig’s calibration hasn’t drifted over time.
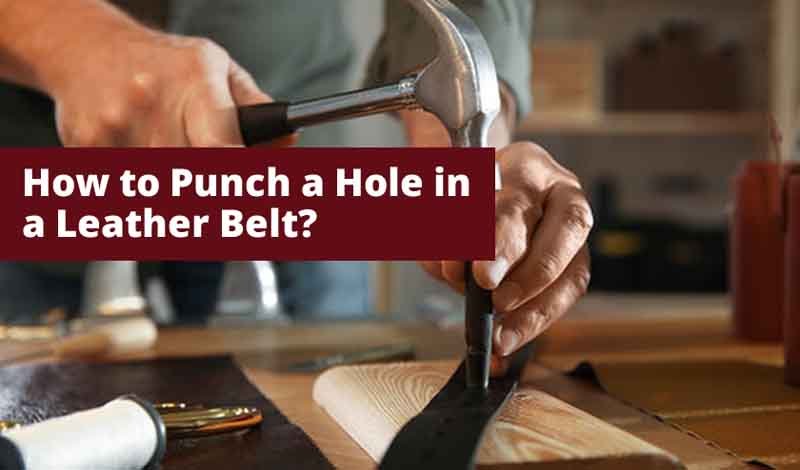
How Should You Position and Punch the Leather for Clean, Even Holes?
Place the belt flat on a solid, non-slip backing (self-healing mat or hardwood block), align your marked indentations exactly under the punch bit, and ensure the punch is perfectly perpendicular to the leather surface. Squeeze or strike with steady, even force—avoid rocking or twisting the tool. After each hole, remove any leather slug before moving to the next. Maintaining consistent setup for each punch guarantees round, burr-free holes that line up perfectly.
- Secure and Level Your Workpiece Lay the leather belt completely flat on a firm surface—ideally a self-healing cutting mat or thick hardwood block. Use small clamps or double-sided tape at the belt’s ends to prevent any shifting, but avoid over-clamping, which can distort the leather. A stable base ensures that when you apply force, the punch drives cleanly through without the belt rolling or slipping, which can produce angled, uneven holes.
- Align Punch and Mark Precisely Position the punch bit directly over the indentation you made with your awl or template. Verify visually from two angles (front and side) that the punch’s cutting edge is square to the belt’s surface—any tilt leads to oval or slanted holes. If using a rotary punch, gently rotate the wheel to confirm the chosen tip is perfectly centered. This exact alignment prevents ragged edges and maintains uniform hole shapes across the belt.
- Apply Controlled, Vertical Force For a rotary punch, squeeze the handles in a single, firm motion, then give a slight twist of the wrist to shear through the fibers completely. With a single hollow punch, strike the top of the punch with a rubber mallet or gentle hammer taps—two to three solid hits are usually sufficient. Avoid heavy, uncontrolled blows or rocking motions that can tear fibers and stretch the hole perimeter. Consistent force ensures the punch cuts through in one clean action.
- Clear and Finish Each Hole Before Proceeding After removing the punch, tip the belt to let the leather slug fall out; a clogged punch can deflect and damage subsequent cuts. Inspect each hole for any burrs or protruding fibers—gently trim or sand them if needed. Once all holes are punched, proceed with edge beveling and burnishing to seal and polish the rims. By treating each hole as its own mini-project—securing, aligning, punching, and clearing—you’ll achieve a row of identical, durable holes that elevate the quality of your leatherwork.
How Do You Finish and Protect the New Belt Holes?
After punching, bevel the hole edges lightly with an edge beveler, then burnish using a slicker and a drop of gum tragacanth or beeswax. This seals fibers, smooths roughness, and restores color. For added durability, apply a thin coat of edge paint matched to your belt. Allow to cure fully before wearing to prevent dye transfer.
Newly punched holes expose the leather’s raw interior and cut fibers, which—if left untreated—can absorb moisture, fray, and discolor. Here’s how to refine and seal them:
1. Edge Beveling
Purpose: Rounds sharp corners of the hole perimeter—prevents stress concentration and tearing.
Tool & Technique:
- Edge Beveler: Adjust blade depth (0.5–1.0 mm) and gently scrape around hole edges.
- Rotate belt slowly rather than moving tool—maintains consistent bevel.
2. Burnishing & Slicking
Materials:
- Gum Tragacanth: Natural gum that acts as a binder when rubbed, smoothing fibers.
- Beeswax or Carnauba Wax: Adds moisture barrier and sheen.
Process:
- Apply small dab of burnishing compound to hole edges.
- Use hardwood slicker or canvas burnisher—rub vigorously in circular motions until edges shine and feel smooth.
3. Edge Painting (Optional)
- When to Use: On dyed belts where hole edges reveal contrasting core color.
- Products: Acrylic edge paint matched to belt color; available in water-based or solvent-based formulas.
- Application:
- Thin, multiple coats with fine brush; allow each coat to dry (15–30 minutes).
- Lightly burnish between coats for adhesion.
- Curing: Full cure takes 24 hours—avoid bending belt during this time.
4. Conditioning & Waterproofing
- Leather Conditioner: Light coat around hole area prevents drying and cracking—avoid excess near holes to maintain crisp edges.
- Waterproof Sprays: For belts exposed to moisture, apply a thin spray of leather protector—test on inconspicuous area first.
5. Quality Check
- Visual Inspection: Ensure hole is round, free of ragged fibers, and evenly finished.
- Fit Test: Try the belt on to confirm smooth buckle tongue insertion—if too tight, lightly expand hole with tapered awl and repeat burnish.
A professionally finished hole not only looks seamless but endures countless buckle engagements without degrading—reflecting the high standards of Szoneier’s leather craftsmanship.
What Common Mistakes Should You Avoid When Punching Belt Holes?
Typical errors include misaligned marks, uneven spacing, using dull or inappropriate punches, skipping a stable backing surface, and neglecting hole edge finishing. These mistakes result in crooked, ragged holes that weaken the belt and look unprofessional. By measuring carefully, maintaining sharp tools, supporting the leather properly, and burnishing edges, you’ll avoid common pitfalls and produce clean, durable belt holes every time.
1. Misaligned or Crooked Holes Failing to keep your belt perfectly flat and your punch strictly perpendicular causes holes that tilt or wander off the centerline. This often happens when the leather shifts between punches or when you lean the punch at an angle. To prevent this, always secure the belt’s ends with light clamps or double-sided tape, verify alignment visually from both front and side, and maintain a straight, vertical punch motion.
2. Inconsistent Spacing Spacing holes too close (under 25 mm) weakens the leather bridge between them, leading to tears; spacing them too far (>30 mm) limits fine adjustment of belt fit. Relying on eye judgment rather than measured marking leads to uneven notches. Use a steel ruler or a perforated template for precise, uniform intervals—mark edge dots, transfer to the centerline, and double-check symmetry before punching.
3. Using Dull or Wrong-Sized Punches A rotary punch with worn tips crushes rather than clean-cuts fibers, resulting in jagged edges prone to fraying. Conversely, using an oversized hollow punch on thin leather can rupture the hole’s perimeter. Maintain tool sharpness by honing hollow punches with a fine file and replace rotary wheels when you see burrs. Match punch diameter to your buckle tongue and leather thickness for crisp results.
4. Skipping a Solid Backing Surface Punching directly on a table or uneven surface causes deflected cuts and damages your tools. Always work on a self-healing cutting mat or hardwood block that absorbs impact and supports clean shearing. This backing protects both the punch edge and the leather’s underside from tearing.
5. Neglecting Edge Beveling and Burnishing Raw hole edges expose cut fibers that absorb moisture, discolor, and unravel over time. Omitting beveling and burnishing steps leaves holes rough, fragile, and visually unappealing. After punching, round the hole rims with an edge beveler, then slick them with a burnisher and a dab of gum tragacanth or beeswax. This seals fibers, smooths roughness, and adds a professional sheen.
6. Rushing Through the Process Hasty work leads to mis-punches, tool slippage, and inconsistent finishes. Take a methodical, step-by-step approach: layout all marks first, then punch in sequence, clearing slugs between holes and inspecting each cut. A deliberate pace ensures accuracy, preserves tool integrity, and yields a polished end result worthy of your brand.
Conclusion
Punching holes in a leather belt is a small but impactful skill: the right tools, precise measurement, careful punching, and proper finishing turn a simple belt alteration into a polished craft. By avoiding common mistakes and following expert techniques, you’ll achieve perfectly spaced, clean, and durable holes every time.
At Szoneier Leather, we’ve honed leatherworking for over 18 years—from raw material R&D to precision manufacturing and rigorous quality control. Whether you need custom‐punched belt holes, bespoke leather belts, or private‐label leather accessories, our low-MOQ, rapid‐sampling, and end-to-end design services ensure your products exceed professional standards. Contact Szoneier today to discuss your custom leather belt and accessory needs—let our expertise be the perfect fit for your brand.
What Can I Do For You?
Here, developing your OEM/ODM private label leather goods collection is no longer a challenge,it’s an excellent opportunity to bring your creative vision to life.
Make A Sample First?
If you have your own tech packs, logo design artwork, or just an idea,please provide details about your project requirements, including preferred fabric, color, and customization options,we’re excited to assist you in bringing your leather goods designs to life through our sample production process.