How to Shorten a Leather Belt: Step by Step Guide for a Perfect Fit
Have you ever purchased a beautiful leather belt only to discover it’s too long? Or maybe you shifted in weight and realized your favorite belt no longer fits snugly. Knowing how to shorten a leather belt not only ensures a custom fit but also extends the life of a quality accessory. Whether you bought the belt online without trying it on or inherited a hand-me-down piece from someone else, adjusting its length properly can save you money and frustration.
Shortening a leather belt involves measuring your waist from the buckle end to your preferred hole, removing the buckle if possible, trimming the excess strap, punching new holes at evenly spaced intervals, and finishing the raw edge with beveling or burnishing to prevent fraying. These steps ensure a clean, professional look while maintaining the integrity of the leather.
What Tools Do You Need to Shorten a Leather Belt?
You need a ruler or measuring tape, marker or pencil, leather punch, hole punch set, rotary cutter or heavy-duty scissors, pliers (for removing buckles), and a sturdy surface to work on. Optional tools like an edge beveler and burnishing compound help achieve a finished look. Gathering quality tools ensures clean cuts and precise holes.
Below are several angles to consider when selecting tools for shortening a leather belt. A proper toolkit not only makes the job easier but also reduces the risk of mistakes.
Essential Tools Guide
- Ruler or Measuring Tape: Use a flexible measuring tape for accuracy when following your body’s curves and measuring existing belts.
- Marker or Pencil: A fine-tip, non-permanent marker ensures you can mark cutting and hole positions precisely.
- Leather Punch & Hole Punch Set: Choose a punch that matches your belt’s hole diameter; a multi-size hole punch set can be helpful for testing before committing.
- Rotary Cutter or Heavy-Duty Scissors: A rotary cutter yields cleaner edges on thick leather, while sharp, heavy-duty scissors can suffice for thinner belts (<3 mm thickness).
- Pliers or Screwdriver: To detach screw-in or snapped buckles. Some belts have small screws, so a precision screwdriver may be required.
- Sturdy Work Surface: A cutting mat or wooden board prevents damage to your table and helps stabilize the belt during cutting.
Optional Tools for Professional Results
- Edge Beveler: Rounds off sharp edges of the cut leather, giving a smooth, finished profile.
- Burnishing Compound and Cloth: Burnishing compounds (wax-based or water-based) and a hard rub cloth create a polished, sealed edge that resists moisture and wear.
- Edge Paint: A specialized paint (available in various colors) seals and protects the cut edge, especially if your belt’s interior is a contrasting color.
- Punch Guides/Templates: Some metal guides help align holes perfectly straight—particularly useful if you’re uncomfortable freehanding hole placement.
Tool Quality and Cost Considerations
- Budget vs. Professional Grade: Basic hole punch sets can start at $10–$15 online, whereas professional leather-working punches range from $30–$50 per punch. Investing in a mid-range set often pays off when you need repeated use.
- Durability and Maintenance: Look for high-carbon steel punches and self-sharpening blades in rotary cutters. Oil-resistant handles on pliers increase longevity.
- Safety Accessories: A pair of protective gloves and safety glasses is recommended, especially if using power-based leather trimmers or rotary tools.
Recommended Tools
| Tool | Purpose | Approx. Cost (USD) |
|---|---|---|
| Fabric Measuring Tape | Accurate belt and body measurement | $5 – $8 |
| Fine-Tip Non-Permanent Marker | Precise marking | $2 – $4 |
| Leather Hole Punch (4 mm) | Punching belt holes | $15 – $25 |
| Rotary Cutter | Cutting thick belts without fraying | $20 – $30 |
| Heavy-Duty Scissors | Cutting thinner belts | $10 – $15 |
| Pliers/Screwdriver Set | Removing buckles | $8 – $12 |
| Edge Beveler | Rounding cut edge for aesthetics | $12 – $20 |
| Burnishing Compound & Cloth | Sealing and polishing edge | $10 – $15 |
| Edge Paint | Sealing cut edge (multiple colors available) | $10 – $15 |
| Cutting Mat or Wooden Board | Protecting work surface; stabilizing belt | $10 – $20 |
How to Determine the Correct Belt Length?
Measure from the buckle’s point of attachment to your preferred waist position (usually the middle hole). Compare with the belt’s existing holes or measure an old belt that fits correctly. Always account for belt thickness and leather stretch. Avoid common pitfalls like measuring around your pants loops instead of your waist.
Determining belt length seems straightforward, but minor errors lead to belts that end up too tight or drooping too long. Let’s explore different measurement strategies, pitfalls to avoid, and international sizing nuances.
Measuring from Buckle End to Middle Hole
- Positioning the Belt: Lay your belt flat on a table.
- Identify the Middle Hole: Count holes and find the center one—most belts have five holes with 1 inch between each.
- Measure to the Buckle Prong Bar: Use a ruler to measure from the point where the buckle’s prong meets the belt (not the buckle’s tip) to the middle hole. This measurement is your “ideal belt size.”
- Recording Measurement: Write down the length in inches or centimeters.
Using an Existing Belt That Fits Well
- Compare to Hanging Belt: Hang a belt you already own that fits at the middle hole. Measure from buckle’s prong to that hole.
- Cross-Referencing Sizing Charts: Many belt sellers list “size 34” meaning 34 inches from prong to middle hole. Confirm with manufacturer charts, as sizing may vary by brand.
Accounting for Belt Thickness and Leather Stretch
- Leather Compression: On average, a high-quality cowhide belt may stretch 0.5 to 1 inch over several months of use. Add a small buffer (e.g., 0.25 inch) to your measurement for new, stiff belts.
- Thickness Impact: A thicker belt overlaps more in loops, potentially adding 0.25–0.5 inch to circumference. Try on similar thickness belts when possible to gauge fit.
Measurement Mistakes to Avoid
- Measuring Around Pants Loops: Belts sit over pants, not tight on your waist. Measure where the belt buckle rests—this is often 1–2 inches lower than your natural waist measurement.
- Ignoring Preferred Fit Style: Some prefer a belt that sits slightly looser at hole 2 (for “room to grow”) or tighter at hole 4 (“belt at tightest”). Know your preference and measure accordingly.
- Mixing Units: Be consistent—if the belt will be sold or modified in inches, measure in inches. Convert carefully: 1 inch = 2.54 cm.
International Sizing Variations
| Region | Belt Size Labeling | Example: “Size 90” Equivalent |
|---|---|---|
| USA | Inches from buckle to middle hole | Size 34 → 34 inches |
| Europe (EU) | Centimeters from buckle to middle hole | Size 90 → 90 cm (≈35.4 inches) |
| UK | Inches but often rounded differently | Size 36 → 36 inches |
| Asia (Japan) | Centimeters; may use waist circumference | Size 85 → fits 33–34 inch waist |
Which Parts of the Belt Should You Remove First?
Most leather belts feature a removable buckle held by screws or snaps. Identify if your belt uses a screw-in buckle or a snapped rivet. Unscrew or carefully pry open to detach the buckle. For riveted or permanently attached buckles, you’ll need to cut the leather around the edge or use pliers to remove rivets.
Removing the buckle is crucial if you want a clean cut and to avoid damaging hardware. Below are detailed considerations, techniques, and workarounds.
Identifying Screw-In Versus Riveted Buckles
- Screw-In Buckles: Look on the back—visible screws attach the buckle plate. Usually found on reversible belts.
- Riveted Buckles: Small, flush rivets hold a metal plate. Use pliers or a leather punch to push out rivet heads from behind.
- Snapped Buckles: Some casual belts use spring-loaded snaps. Press a lever or slide mechanism to release.
Removing Screw-In Buckles
- Gather Tools: Small Phillips or flathead screwdriver.
- Unscrew Carefully: Place the belt on a stable surface, hold the buckle firmly, and remove screws one by one.
- Set Hardware Aside: Retain screws and buckle plate in a small container so you don’t lose them.
- Inspect for Reversibility: Some reversible belts have a rotating catch—rotate to remove.
Extracting Riveted Buckles
- Using Pliers: Position pliers around rivet head and twist/pull to pop out.
- Punch-Out Method: Place belt on cutting mat, position a metal punch or small nail under the rivet head, and gently tap with a mallet until the rivet pushes through.
- Backing Support: Use a wooden block under the rivet to prevent crushing the leather as you punch out.
- Clean Up: Once rivet is removed, trim any excess metal prongs with wire cutters.
Dealing with Permanently Attached Buckles
- Creative Solutions: If buckle cannot be removed without damaging leather, consider shortening without removal (see “Are There Tips for Shortening a Belt Without Removing the Buckle?”).
- Cutting Around Buckle: In extreme cases, you may cut the leather just above where it meets the buckle’s bracket, leaving a short stub that’s folded or stitched for a clean look.
- Professional Help: Consult a leatherworker to replace hardware, especially on high-end belts where mistakes are costly.
Buckle Types and Removal Methods
| Buckle Type | Attachment Method | Removal Technique | Notes |
|---|---|---|---|
| Screw-In (Reversible) | Screws (Phillips) | Use small screwdriver; unscrew backup plate | Easiest to remove; hardware fully reusable |
| Snap-On (Casual) | Spring Snap | Press lever or slide catch; pull buckle | Quick removal; ensure no tension on catch to avoid breakage |
| Riveted (Permanent) | Metal Rivets | Punch out with nail/mallet or use pliers | Risk of hole enlargement; may need to re-riveting after sizing |
| Welded/Sealed | Welded Metal | Cut leather around buckle; refinish or replace hardware | Least favorable; often need professional equipment |
How to Cut and Punch New Holes in the Belt?
After removing the buckle, mark your new length using a ruler and fine-tip marker, then trim the excess leather with a rotary cutter or heavy-duty scissors. To reduce the size of a leather belt properly, use a hole punch template or measure 1 inch increments to punch new holes. Ensure holes are centered vertically and spaced evenly for a professional look.
This section explores the process of how to reduce the size of a leather belt in detail, from marking to hole punching. Let’s dig into techniques, examples, and common pitfalls.
How to Reduce the Size of a Leather Belt by Trimming Excess Length
- Measuring Twice, Cutting Once: Measure the distance from the buckle prong to the desired hole. Add a small allowance (0.1–0.2 inch) to account for edge finishing.
- Marking the Cut Line: Use a ruler to draw a straight line across the belt’s width, perpendicular to its length. A square or T-square can help ensure perfect right angles.
- Checking Leather Grain: Observe the grain direction—cut perpendicular to grain for a cleaner edge. Cutting against grain may fray fibers.
- Executing the Cut: Position the belt on a cutting mat. Using a sharp rotary cutter, glide steadily along the marked line, applying even pressure. For thinner belts, some prefer sharp, heavy-duty scissors to snip directly.
- Inspecting the Cut: After cutting, check that edges are even. If there’s minor wobble, trim carefully with a craft knife or sand lightly with fine-grit sandpaper (600–800 grit) for automotive leather.
Marking and Aligning New Holes Correctly
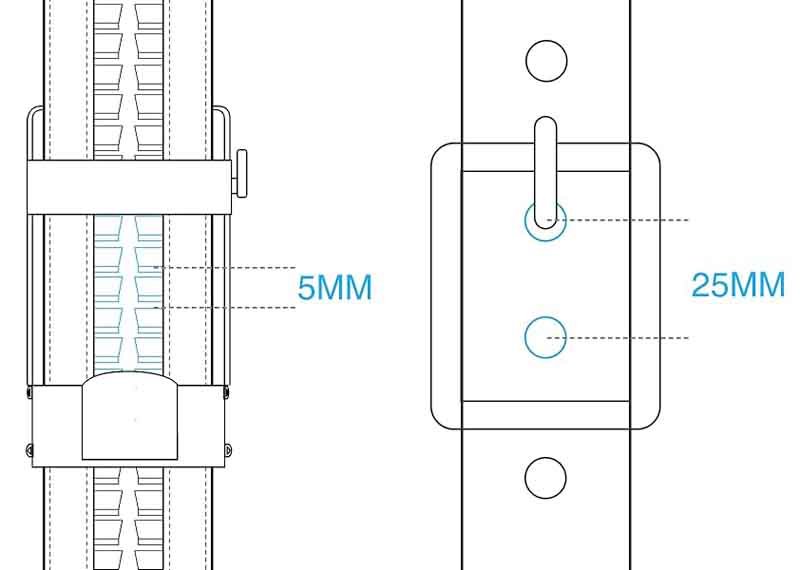
- Determining Hole Spacing: Standard belts have holes spaced 1 inch (2.54 cm) apart. Use a ruler to mark spots: measure from the new end toward where the first hole should land when worn.
- Centering Vertically: Belts often have a width between 1 and 1.5 inches; for a 1.25 inch belt, place hole centers 0.625 inch from each edge. You can create a “hole-centering jig” using cardboard cutouts.
- Use a Template or Guide: Pre-made hole templates (available online for $10–$15) help align holes quickly. Alternatively, drill two small pilot marks with an awl, then confirm symmetry before punching.
Tools and Techniques for Clean, Centered Holes
- Leather Hole Punch: Place the belt on a wooden block. Align the punch’s tip with your marked dot. Strike the top of the punch firmly with a mallet.
- Rotary Punch: If you have a rotary punch tool, select the correct diameter wheel and align with your mark. Squeeze handles evenly—test on scrap leather first to ensure proper force.
- Avoid Ragged Edges: If you notice fuzz or jagged edges around the new holes, use a small round file or fine sandpaper to smooth out any irregularities.
Hole Spacing and Diameters
| Belt Width (inches) | Standard Hole Diameter | Vertical Centering (inches from edge) | Horizontal Spacing (inches) |
|---|---|---|---|
| 1.00 | 4 mm (≈0.16 inch) | 0.50 | 1.00 |
| 1.25 | 4–5 mm (0.16–0.20 inch) | 0.625 | 1.00 |
| 1.50 | 5 mm (≈0.20 inch) | 0.75 | 1.00 |
| 1.75 | 5–6 mm (0.20–0.24 inch) | 0.875 | 1.00 |
| 2.00 | 6 mm (≈0.24 inch) | 1.00 | 1.00 |
Tip: If you’re uncertain of hole diameter, temporarily test on a piece of scrap leather of similar thickness to ensure the prong fits snugly without tearing.
Example Walkthrough—Shortening a 1.25 Inch Wide Belt
- Original Belt Length: 44 inches (buckle prong to middle hole).
- Desired Fit: 38 inches (tighter fit).
- Excess Length: 44 – 38 = 6 inches.
- Allow for Edge Finishing: Add 0.2 inch, so total cut at 6.2 inches from middle hole position.
- Mark and Cut: Use T-square to draw a straight line 6.2 inches from the hole.
- Trim: Cut along the line with a rotary cutter.
- Mark New Holes: Starting 0.5 inch from the cut edge, mark three holes at 1 inch intervals (0.5, 1.5, and 2.5 inches).
- Punch Holes: Use a 4 mm leather punch, then remove screw-in buckle and reattach.
By following these precise measurements and steps, you can reduce a belt’s size with accuracy and confidence.
Is It Necessary to Finish and Seal the Cut Edge?
Yes. Finishing and sealing the cut edge prevents moisture penetration, reduces fraying, and gives a professional look. Techniques include beveling edges, burnishing with a cloth and compound, and applying edge paint that matches your belt’s color. A properly sealed edge also resists cracking and keeps the belt durable over time.
Edge finishing is often overlooked, yet it makes all the difference in durability and aesthetics. Let’s examine why it matters, how to do it right, and pitfalls to avoid.
Why Edge Finishing Matters for Aesthetics and Durability
- Aesthetic Appeal: A raw cut edge exposes rough leather fibers that look unpolished. A crisp, sealed edge signals a professionally crafted belt.
- Moisture Resistance: Leather absorbs water; an unsealed edge can wick moisture into inner layers, leading to mold or stretching.
- Preventing Fraying: Over time, movement in belt loops causes friction. An unsealed edge may fluff or crack, compromising the belt’s integrity.
- Matching Original Design: High-end belts often have painted or polished edges. To maintain that branded look, mimic the finish exactly.
Techniques for Beveling and Burnishing Raw Edges
- Edge Beveler Usage: Run the beveler along both edges of the cut strap at a 45° angle. This removes sharp corners and rounds off edges.
- Sanding and Smoothing: If uneven, lightly sand with fine‐grit sandpaper (400–600 grit) until smooth. Wipe away dust with a dry cloth.
- Burnishing with Compound: Apply a thin layer of burnishing compound (e.g., gum tragacanth or paraffin-based wax). Using a burnishing bone or a hard cloth, rub edges vigorously until they heat up and achieve a glossy sheen.
- Multiple Passes: For thicker leather (>3 mm), do several passes, letting the friction heat help seal fibers.
Applying Edge Paint and Matching Belt Color
- Choosing Paint: Select edge paint or sealant that closely matches the belt’s color. Brands often provide color charts for common shades (black, brown, tan, etc.).
- Application Method: Use a small, angled artist’s brush. Wipe off excess, then let it dry (30–60 minutes). Sand lightly with ultra-fine sandpaper (800–1000 grit) between coats to remove brush strokes.
- Number of Coats: Two to three thin coats usually achieve optimal coverage. Allow each coat to dry completely before adding the next.
- Final Burnish: After last coat, burnish lightly with a cloth to remove any remaining roughness and enhance sheen.
Matching Finish to Original Belt Design
- Inspect Original Edges: If you have an old belt or scrap leather from the same hide, compare finishes—some belts have waxed edges, others have matte paints.
- Leather Type Considerations: Suede or nubuck belts require different treatments; avoid shiny paints that conflict with nap.
- Seamless Blend: Practice on scrap leather first to ensure your finish seamlessly blends with the factory edge.
Common Edge Finishing Mistakes to Avoid
- Over-Burnishing: Excessive friction can thin the leather edge too much or cause discoloration.
- Thick Paint Layers: Heavy layers crack over time; always apply thin coats.
- Inconsistent Beveling: Uneven bevels result in wavy edges—use a steady hand and consistent angle.
- Skipping Sanding: Not sanding between coats leaves obvious brush marks; always refine each layer for a smooth finish.
Are There Tips for Shortening a Belt Without Removing the Buckle?
If the buckle is sealed or riveted, shorten by folding and stitching the end or clipping off the excess before punching new holes. One method involves creating a loop and securing with heavy thread or rivets. While quicker, these techniques may slightly alter the belt’s appearance. For high-end leather, consider professional resizing to preserve integrity.
Some belts, especially casual or fashion styles, have buckles that cannot be removed easily. Here are workaround methods and a critique of each.
Fold-and-Stitch Method
- Determine Excess Length: Measure as usual, then fold the belt end back on itself at the desired length.
- Create a Folded Wedge: Make a small triangular wedge by folding under the leather—this prevents bulky stacking.
- Stitching: Using heavy-duty nylon or polyester thread, hand-stitch the folded leather. A saddle stitch (double-needle) is ideal for strength.
- Reinforcement: Add a small patch of leather behind the folded section to distribute tension and prevent tearing.
- Pros and Cons:
- Pros: No need to remove buckle. Quick fix for casual belts.
- Cons: Results in a thicker area where stitched; visible stitching may conflict with minimalist designs; not recommended for formal belts.
Clipping End and Re-Punching Holes
- Clipping Technique: Trim the excess leather close to the buckle end, then reposition buckle onto the newly shortened strap.
- Securing Buckle: If belt uses a metal clasp (with teeth or clamp), clamp onto the leather. If it’s a friction bar buckle, pinch leather under clamp.
- Punch New Holes: Mark new hole positions on the shortened strap, ensuring they align correctly.
- Pros and Cons:
- Pros: Doesn’t require removing rivets; straightforward for belts with clamp-style buckles.
- Cons: Most casual belts lack any hardware to re-secure buckle—belt may slip under tension. Also, the cut edge remains unfinished, requiring secondary finishing steps.
Using Belt Extenders or Shrink Tabs
- Shrink Tabs: These are small leather or metal tabs that attach between belt and buckle, effectively reducing length by up to 1.5 inches without cutting.
- Belt Extenders in Reverse: Normally used to lengthen, but some extenders allow buckles to attach lower on the strap, reducing usable length.
- Pros and Cons:
- Pros: Non-permanent, reversible, and ideal for tiny adjustments (0.5–1.5 inches).
- Cons: Usually obvious as an add-on; not elegant for formal wear; limited reduction size.
Do These Methods Compromise Belt Integrity?
- Stress Points: Folding or clipping introduces new stress areas—if not reinforced, leather may tear under tension.
- Visual Aesthetics: Visible stitches or mismatched extenders can detract from a sleek design. For luxury belts, these methods may not pass a discerning eye.
- Longevity: Temporary fixes may degrade faster than a professionally shortened belt. Leather subjected to repeated flex at a fold may crack over time.
When to Consult a Professional Leatherworker
- High-Value Belts: Fine Italian leather or handcrafted belts warrant expert resizing to preserve craftsmanship.
- Complex Hardware: If you’re unsure about dismantling unique buckles (e.g., integrated spring bars or intricate snap systems), a pro has the tools and knowledge.
- Custom Adjustments: Professionals can match edge paint exactly, re-craft holes seamlessly, and even add extra features like embossed logos or monograms post-shortening.
What Common Mistakes Should You Avoid When Shortening a Leather Belt?
Avoid cutting off too much—measure twice before trimming. Don’t misalign new holes: use templates or guides. Skipping edge finishing leads to frayed edges. Using dull tools results in ragged cuts and holes. Lastly, neglecting leather stretch causes belts to fit differently over time, so factor in minimal allowance when resizing.
Even seasoned DIYers can slip up when shortening a leather belt. Below, we examine pitfalls with real-life examples, helping you develop critical thinking around technique and choice.
Over-Cutting the Leather and Ending Up Too Short
- Case Study: Sarah bought a 40 inch belt but measured her waist incorrectly and cut 6 inches instead of 4.5 inches. The belt became unusable.
- Critical Insight: Measurement errors often happen when you forget to measure on the same plane as the belt’s final position. Always measure on a flat surface, using a consistent reference point (buckle prong) and confirm with a fitting test.
- Preventative Tip: Before cutting, fold the excess under and test the fit around your waist. Only cut once you’re confident the fold aligns with your ideal length.
Misaligned Holes Causing Improper Buckle Fit
- Example: John tried to freehand punch holes and ended up with holes slightly off-center, causing his belt prong to snag the edge.
- Multifaceted Perspective: Aesthetic symmetry is vital for a near-mirror finish. Misalignment also weakens leather around the hole—stress distributes unevenly and increases tear risk.
- Solution: Invest in a hole-centering jig or draw parallel lines outlining the hole path. For wide belts (>1.5 inches), consider marking both edges and snapping chalk lines to visualize a straight path.
Failing to Seal Raw Edges, Resulting in Fraying or Cracking
- Scenario: Emma cut her belt and skipped edge sealing. Within a month, the cut edge absorbed moisture at a wedding, warped, and showed white salt stains.
- Analysis: Leather is porous; water, sweat, or grime will penetrate unsealed edges rapidly. Proper edge finishing isn’t just cosmetic—it’s protective.
- Alternative View: Some purists argue that raw edges convey authenticity. However, for functional belts worn daily, the risks of fraying and mold far outweigh any perceived “rugged” look.
Using Dull or Improper Tools, Leading to Ragged Cuts and Holes
- Incident: Alex used household scissors to cut a 3 mm thick cowhide belt. The cut was jagged, requiring multiple passes and weakening the edge.
- Critical Thoughts: Even if you own perfectly sharpened scissors, their leverage is limited on thick leather. A rotary cutter with a fresh blade creates a single, fluid cut that preserves leather integrity.
- Tip: Test tools on scrap leather of similar thickness before committing to the actual belt. If jaggedness appears, upgrade to a dedicated leather trimming tool.
Ignoring Leather Type and Not Adjusting Method Accordingly
- Example: Mia tried to punch holes in a laminated synthetic leather belt using a standard leather punch and ended up with large, uneven holes because the layers separated.
- Deeper Insight: Different leathers (vegetable-tanned, chrome-tanned, suede, nubuck) and synthetics require distinct approaches. Vegetable-tanned leather resists tear when punched properly, while bonded or laminated materials may delaminate.
- Solution: Understand your belt’s composition. If in doubt, experiment on a hidden corner or a spare sample. Always adjust punch type (e.g., sharpness, diameter) to match material density.
FAQ: Do Leather Belts Shrink, and Can You Restore a Shortened Belt?
Leather belts can stretch with wear and humidity, but they rarely “shrink” unless exposed to extreme heat or moisture followed by rapid drying. To restore a shortened belt, add a shim between the buckle and strap, or reattach a removed segment if you kept the trimmed piece. For significant adjustments, professional re-riveting or adding an extender works best.
Leather is a natural material that reacts to its environment. Here, we explore shrinkage, restoration, and maintenance from multiple angles.
Factors That Cause Leather to Expand or Contract
- Humidity and Moisture: High humidity can cause vegetable-tanned leather to absorb moisture, making it temporarily expand by up to 2–3 %. In low humidity, it may contract slightly.
- Temperature Extremes: Exposure to heat or direct sunlight for extended periods can dry out leather, leading to minor shrinkage (1–2 %). Conversely, very cold conditions can make leather stiffer, creating an illusion of tightness.
- Leather Type Dependence: Full-grain leather resists drastic shape changes better than bonded or faux leather. Suede may compress under friction but rarely shrinks.
How Often Should You Re-Tighten or Adjust After Shortening
- Break-In Period: New belts stretch most during the first 2–3 weeks of regular wear. If you shortened your belt during this period, consider leaving an extra 0.25 inch in initial measurements to accommodate stretch.
- Seasonal Adjustments: In very humid climates (e.g., coastal regions), inspect belt fit seasonally; you might need minor adjustments every 6 months.
- Personal Factors: Weight fluctuations of ±10 pounds can prompt re-adjustments. Monitor fit if you begin or end a workout routine that significantly changes body shape around your waist.
Can You Restore a Shortened Belt?
- Reversing the Cut: If you kept the trimmed piece and it’s still in good condition, you can re-attach using rivets or stitching. However, aligning holes exactly can be challenging.
- Adding a Shim or Spacer: Place a slim leather or metal spacer between the buckle plate and strap to effectively add length (0.25–1 inch). This is a temporary fix and may feel bulky—better suited to casual wear.
- Professional Re-Riveting: A leather workshop can splice in a new leather segment, match edge finish, and punch holes precisely to replicate original dimensions—ideal for heirloom belts or high-end pieces.
Preventing Shrinkage and Maintaining Belt Fit
- Proper Storage: Store belts hanging flat or rolled loosely; avoid folded storage which can creases leather. Keep away from direct sunlight and damp areas.
- Leather Conditioning: Regularly apply a quality leather conditioner (e.g., neatsfoot oil or mink oil) every 6–12 months to maintain suppleness; dry leather shrinks more easily.
- Cleaning and Care: Wipe belts with a damp cloth to remove dirt and sweat, then let air-dry at room temperature. Never use hairdryers or heaters, as rapid drying encourages shrinkage.
Conclusion: How to Ensure Your Leather Belt Lasts Longer
Shortening a leather belt can be a rewarding DIY project—once you master precise measurements, cleaning cutting techniques, and professional-quality edge finishing. By gathering the right tools, understanding your belt’s construction, and avoiding common pitfalls like misaligned holes or unsealed edges, you end up with a custom-fit belt that looks as good as any artisan piece. Remember that leather is a living material: it stretches, reacts to humidity, and changes over time. Maintain your belts by conditioning, storing properly, and re-adjusting as needed.
If you want a truly flawless result—especially for high-end, branded leather belts—consider reaching out to Szoneier Leather. With over 18 years of experience in raw material R&D, product design, sampling, manufacturing, and quality control, Szoneier specializes in customized leather goods for brand clients and small-to-medium custom wholesale clients who seek professional craftsmanship. Whether you need a belt pre-shortened to your exact specifications or an entirely custom design, contact Szoneier Leather today to get a quote and elevate your leather accessories to the next level.
What Can I Do For You?
Here, developing your OEM/ODM private label leather goods collection is no longer a challenge,it’s an excellent opportunity to bring your creative vision to life.
Make A Sample First?
If you have your own tech packs, logo design artwork, or just an idea,please provide details about your project requirements, including preferred fabric, color, and customization options,we’re excited to assist you in bringing your leather goods designs to life through our sample production process.