 Skip to content
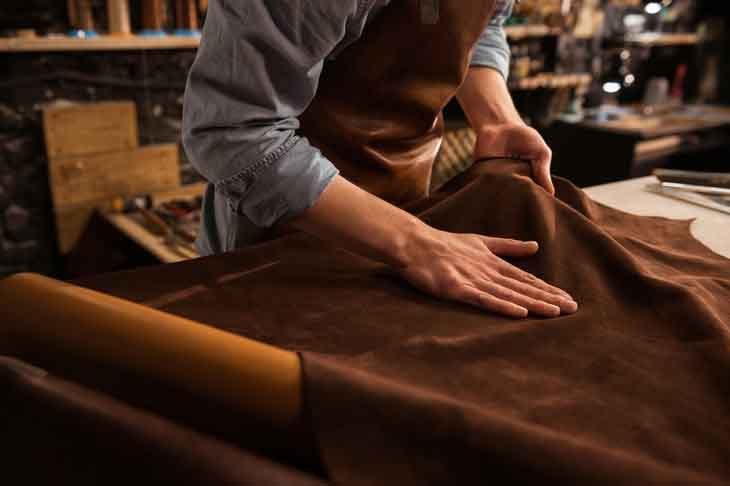
Designing your own leather bag is like writing your personal style manifesto in stitches and hides. Whether you’re a beginner or an established brand, the journey from blank page to finished bag involves inspiration gathering, material selection, technical specs, and prototyping. You’ll ask, “What kind of leather suits my vision?” “How big should pockets be?” and “Where do I find a factory that can bring this to life?”
To start designing your own leather bag, begin by researching inspiration—magazines, social media, street style—and define your user’s needs (daily carry, travel, special occasion). Select leather type (full-grain for durability or vegetable-tanned for character), sketch proportions with key dimensions, choose hardware and stitching details, then develop cardboard patterns. Finally, prototype in canvas or bonded leather before committing to premium hides with an OEM/ODM partner like Szoneier Leather.
What Leather Types and Materials Should You Choose?
Choosing the right leather starts with understanding your bag’s purpose. Full-grain leather delivers unmatched strength and patina for heirloom pieces; top-grain offers a uniform, refined surface ideal for crisp embossing; corrected-grain balances cost and consistency with embossed finishes; vegetable-tanned brings eco-credentials and rigid structure; and exotics (ostrich, crocodile, kangaroo) add unique textures for high-end runs. Pair these with technical linings (microfiber, nylon twill), supportive interfacings (EVA foam, canvas), and durable hardware to match performance and style.
When you set out to design a leather bag, your material choices define not only look and feel but longevity, function, and price point. Let’s explore each major leather category, plus complementary materials, so you can make an informed selection.
Full-Grain Leather
- The topmost layer of hide, unaltered and retaining the complete grain structure.
- Performance:
- Tensile Strength: >30 N per yarn; resists stretching and tearing.
- Abrasion Resistance: >3,000 Taber cycles—rubs and scuffs blend into a rich patina rather than cracking.
- Aesthetic & Aging: Natural scars and pores give each bag unique character over years of use.
- Best For: Daily commuters, travel duffels, and luxury heritage bags that evolve with their owner.
Top-Grain Leather
- Sanded, buffed version of full-grain that removes surface blemishes and applies a light finish.
- Performance:
- Tensile Strength: ~25–28 N; very durable with a smooth face.
- Abrasion Resistance: ~2,500 cycles—slightly less than full-grain but still robust.
- Aesthetic & Aging: Uniform surface ideal for precise embossing, laser engraving, or consistent dye coverage; develops a subtler patina.
- Best For: Corporate briefcases, printed or embossed fashion totes, and high-volume corporate gifting.
Corrected-Grain & Bonded Leathers
- Split hides embossed with grain patterns, often coated with a pigmented top layer.
- Performance:
- Tensile Strength: Varies by split thickness, typically ~20 N.
- Abrasion Resistance: 1,200–1,800 cycles depending on coating quality.
- Aesthetic & Aging: Very uniform appearance; surface coatings conceal natural variations but may crack over time.
- Best For: Entry-level lines, bulk promotional bags, and color-heavy collections where consistency and cost control are key.
Vegetable-Tanned Leather
- Tanned using natural plant tannins (bark, leaves), without chrome salts.
- Performance:
- Structure: Firmer hand, holds shape without heavy interfacing.
- Aging: Takes on a deep, chestnut patina with scratches that highlight original grain.
- Sustainability: Biodegradable, minimal chemical runoff, often sourced from artisanal tanneries.
- Best For: Structured satchels, artisan clutches, and eco-focused collections where storytelling is a selling point.
Exotic Leathers
- Options: Ostrich (quill follicles), kangaroo (high tensile per weight), crocodile, lizard.
- Performance & Texture:
- Tensile Strength: Kangaroo leads at >35 N; exotic scales repel minor scuffs.
- Visual Impact: Bold textures and rarity justify premium pricing.
- Best For: Limited-edition, high-margin luxury lines and statement pieces.
Complementary Materials
Linings & Interfacings
- Microfiber Suede: Soft, scratch-free for electronics sleeves.
- Nylon Taffeta/Twill: Durable, printable for interior branding and water resistance.
- EVA Foam / PET Felt: Adds structure to gussets, bottoms, and flaps without bulk.
Hardware & Finishes
- Metals: Solid brass or stainless steel over zinc alloy—avoids flaking and corrosion.
- Threads: Bonded nylon or polyester in 0.6–0.8 mm gauge—UV and abrasion resistant.
- Edge Treatments: Bevel, burnish, and/or paint edges to seal and refine cut surfaces.
Your leather and material choices should align with your bag’s intended function, target price, and brand story. Full-grain stands for durability and depth; top-grain for refined uniformity; vegetable-tanned for eco-luxury; exotics for exclusivity; and corrected-grain for budget-friendly consistency. Pair these with the right linings, interfacings, and hardware to ensure your custom design—whether executed via Szoneier Leather’s OEM/ODM services or your own workshop—delivers on both performance and style.
How Do You Define Style, Function, and Dimensions of Leather Bags?
Defining a leather bag’s style means choosing its silhouette—tote, satchel, backpack, messenger—based on target users’ tastes. Function dictates compartment layouts: laptop sleeves, zipper pockets, pen slots, and strap types (top handle, crossbody, backpack). Dimensions follow ergonomic and aesthetic rules: length ≈1.5× height or golden ratio (1.618×), gusset depth for volume, and strap drop (200–250 mm) for comfort. Balancing these ensures a bag that looks great, carries well, and fits real-world needs.
Designing a leather bag begins with a clear vision of style, progresses through defining function, and is finalized by setting precise dimensions. Each step interlocks: style guides aesthetics and initial form; function shapes organization and usability; dimensions calibrate balance, ergonomics, and manufacturing feasibility.
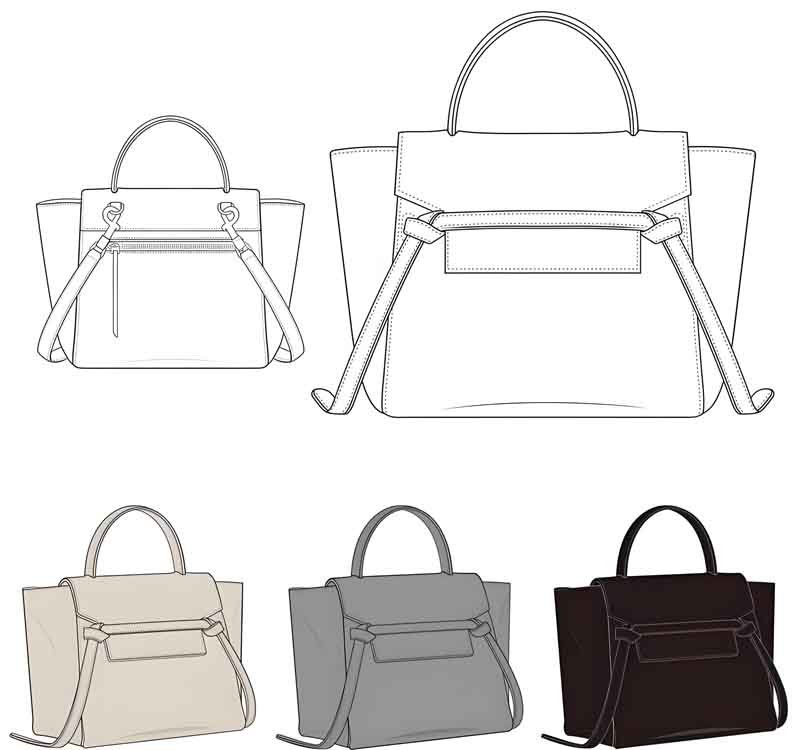
Establishing Style: The Silhouette & Brand DNA
Silhouette Selection: Common leather bag shapes include
- Tote: Clean, open-top, versatile for daily carry.
- Satchel: Structured, often with flap closures—ideal for professional audiences.
- Backpack: Dual straps for hands-free comfort, popular with commuters and students.
- Messenger: Crossbody convenience with quick-release buckles—favored by cyclists and urban professionals.
Brand Signature: Style cues—contrast stitching, edge paint colors, signature hardware shapes—reinforce brand identity.
Fashion vs. Utility: A minimalist tote might eschew exterior pockets for a sleek look, while a travel backpack embraces multiple zip closures and D-rings.
Defining Function: User Needs & Compartmentalization
User Profiling:
- Corporate Commuters: Need laptop/tablet sleeves (up to 15″), document pockets, pen loops.
- Frequent Travelers: Require RFID-blocking pockets, zip-out toiletry pouches, and luggage-pass thru.
- Urban Explorers: Value quick-access exterior pockets for smartphones and transit cards.
Internal Organization:
- Padded Sleeves: Protect electronics—specify foam density (5–10 mm).
- Accessory Pockets: Zippered valuables compartment vs. slip phone pockets.
- Key Leash & Pen Slots: Prevent losing small essentials.
Closure & Security:
- Magnetic Snaps: Offer low-profile convenience.
- Zippers: Full-closure for weather resistance.
- Flap & Buckle Systems: Provide a classic look and theft deterrence.
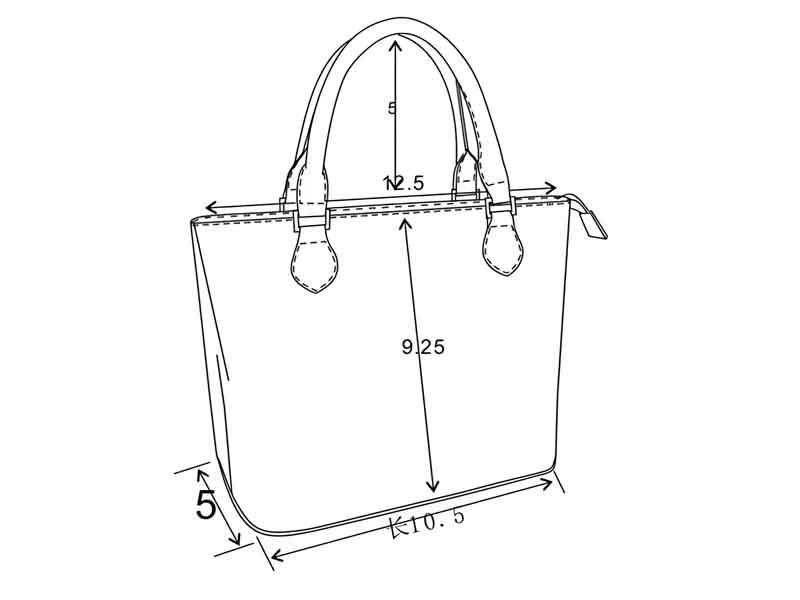
Calculating Dimensions: Proportion, Volume, & Ergonomics
Aesthetic Ratios:
- Rule of 1.5: Bag length ≈1.5× height—yields balanced proportions for satchels and totes.
- Golden Ratio (1.618): Luxury designs adopt length = 1.618× height (e.g., 250 mm height × 404 mm length) for visually harmonious shapes.
Volume & Gusset Depth:
- Gusset Width: Typically 20–30% of bag length for moderate capacity; up to 40% for duffels.
- Structured vs. Slouchy: Rigid interfacings (EVA or PET) maintain silhouette; softer bags use unlined or minimally lined gussets.
Strap & Handle Ergonomics:
- Top Handle Drop: 50–80 mm for handheld carry.
- Shoulder Strap Drop: 200–250 mm accommodates average torso lengths; adjustable sliders extend 50–100 mm.
- Crossbody Length: 1200–1400 mm total strap length for comfort across the body.
Human Factors Testing:
- Mock-up Trials: Prototype patterns on mannequins or human models to ensure proportions suit 85th-percentile user heights.
- Wear Testing: Fill with intended load (laptop, books, water bottle) and evaluate weight distribution and strap comfort over 30-minute walks.
Synthesis: Balancing Trade-Offs
No design is perfect if it tries to be everything. A slim messenger bag that looks sleek may sacrifice pocket capacity; a voluminous tote might overwhelm petite users. Through iterative sketches, digital flats, and cardboard mock-ups, refine the intersection of style, function, and dimensions.
- Example Hybrid: A structured tote (style) for urban professionals, featuring a padded 15″ laptop compartment (function), with dimensions 350 mm × 230 mm × 100 mm (volume ~8 L) and adjustable shoulder straps (ergonomics).
Which Sketching and CAD Tools Help You Visualize Your Design?
Effective bag design starts with clear visualization. Hand sketching in sketchbooks lets you rapidly explore silhouettes and proportions. Adobe Illustrator or CorelDRAW enable precision technical flats with accurate seam, stitch, and hardware call-outs. Pattern-making CAD tools like Optitex, Gerber AccuMark, and Lectra streamline digital pattern grading and nesting for material yield. 3D draping/modeling in Clo3D or Browzwear simulates leather behavior, volume, and hardware placement before a single cut is made.
Bringing a leather bag from concept to reality requires a toolkit that bridges artistry and technical precision. Below is a deeper look at both analog and digital methods that designers use to visualize and refine their bag creations.
1. Hand Sketching: The Creative Launchpad
Tools & Materials:
- Sketchbook & Pencils: A5–A3 pads with medium graphite (HB–2B) let you freehand multiple views—front, side, and isometric.
- Markers & Colored Pencils: Copic markers or Prismacolor pencils add quick color studies for leather tones and hardware contrasts.
- Templates & Stencils: Pre-cut shape templates speed up consistent silhouettes and gusset outlines.
Techniques:
- Thumbnail Sketches: 1–2 minute small-scale ideas to iterate shapes and feature placements.
- Exploded Views: Draw panels, gussets, straps, and hardware separately to understand assembly.
- Proportion Studies: Use the “rule of thirds” or simple grid overlays to ensure balanced length-to-width ratios.
2. Vector Technical Flats: Precision in 2D
Adobe Illustrator / CorelDRAW:
- Flat Drawings: Create vector lines for each panel, stitch line, fold, and seam allowance.
- Layered Files: Separate layers for leather panels, lining, interfacings, and hardware—makes revisions painless.
- Dimensioning Tools: Accurate measurement callouts (mm or inches) tied to artboard scales ensure factory-ready specs.
- Symbols & Libraries: Save custom symbols for buckles, rivets, and zipper pulls to maintain consistency across styles.
3. Pattern-Making CAD: Digital Pattern Engineering
Optitex / Gerber AccuMark / Lectra:
- Dart and Curved Seam Handling: Digitally refine complex curves for gussets, flaps, and ergonomic straps.
- Grading: Auto-grade patterns across multiple bag sizes (e.g., small, medium, large) with consistent proportions.
- Marker Nesting: Optimize leather hide usage by nesting panels to minimize waste—critical for expensive full-grain hides.
- Plotter Integration: Export to plotters for accurate paper pattern production, avoiding manual drafting errors.
4. 3D Draping & Visualization Tools
Clo3D / Browzwear / Lectra 3D Modeling:
- Virtual Draping: Simulate how leather panels fold, crease, and drape under gravity—adjust panel angles and interfacing stiffness before prototyping.
- Hardware Placement: Position buckles, zippers, and rivets and see real-time shadow, reflection, and interaction with leather surface.
- Volume & Fit Checks: Inspect interior cavity for item fit—test-fitting a 15″ laptop or water bottle in the digital prototype.
- Realistic Textures: Apply leather grain maps and finishes to preview final aesthetics under virtual lighting.
5. Collaborative Platforms & Presentation
Milanote / Pinterest / Trello:
- Mood Boards: Collect inspiration photos, color swatches, and material samples in one shareable space.
- Feedback Loops: Invite team or client comments directly on digital flats or 3D snapshots.
- Version Control: Track revisions and maintain a clear record of design evolution.
What Hardware, Stitching, and Finishing Options Enhance Durability and Aesthetics?
Premium hardware—solid brass buckles, YKK zippers, stainless-steel rivets—paired with heavy-duty bonded polyester thread (0.6–0.8 mm) and saddle or lock stitching delivers lasting strength. Edge treatments like beveling, burnishing, and acrylic edge paint seal cut surfaces, while topcoats (aniline, semi-aniline, pigmented) control color depth and water resistance. Thoughtful finishing elevates both function and style, ensuring your leather bag weathers daily use without sacrificing its visual appeal.
Achieving a leather bag that looks exquisite and stands the test of time hinges on three pillars: hardware quality, stitching technique, and edge & surface finishing. Here’s how to optimize each.
1. Hardware Selection
Material Choices:
- Solid Brass or Bronze: Naturally antibacterial and corrosion-resistant, these develop a warm patina that complements natural and vegetable-tanned leathers.
- Stainless Steel: Bright finish, ideal for modern or marine-inspired designs, resisting rust even in humid climates.
- Avoid Zinc Alloys: While cheaper, zinc-based “Zamak” hardware often flakes and discolors over time.
Key Components:
- Zippers:
- YKK Vislon™ (coiled nylon): Lightweight, smooth operation for jackets and pouches.
- YKK Aquaguard™: Water-resistant tape for rain-ready bags.
- Metal Excella™: Premium polished teeth for luxury lines.
- Buckles & Adjusters:
- Roller Buckles: Reduce strap abrasion, ideal for adjustable closures.
- Triglide Sliders: Keep strap ends neat and prevent slippage.
- Rivets & Chicago Screws:
- Reinforce high-stress points (strap bases, gusset joins). Choose mushroom-head rivets that won’t snag linings.
2. Stitching Techniques
Thread Specification:
- Bonded Polyester/Nylon (0.6–0.8 mm): High-tenacity, UV-resistant, colors available to match or contrast.
- Waxed Polyester: Slight sheen, added water repellency—preferred for saddle stitching.
Stitch Styles:
- Lock Stitch (Machine): Fast, uniform; ideal for long straight seams. Ensure correct tension to avoid perforating or puckering leather.
- Saddle Stitch (Hand): Two-needle method where each stitch crosses itself—if one side breaks, the other holds. Use on strap edges and structural seams.
Stitch Density:
- Structural Seams: 4–5 stitches per 10 mm to balance strength and leather integrity.
- Decorative Topstitching: 6–7 stitches per 10 mm around flaps or piping for refined aesthetics.
3. Edge Treatments
| Treatment | Method & Materials | Benefit |
|---|---|---|
| Beveling | Rotary or manual beveler removes sharp corners | Smooth, safe edges |
| Burnishing | Rub edges with wooden/bone slicker, water or beeswax | Seals fibers, gives glossy finish |
| Edge Paint | Multiple coats of acrylic edge paint (Edge Kote) | Uniform color, moisture barrier |
| Folded Binding | Wrap thin leather strip around raw edge, stitch in place | Hides raw edge, adds decorative trim |
4. Surface & Protective Finishes
Leather Topcoats:
- Aniline Dye: Maintains grain visibility, natural look but minimal surface protection.
- Semi-Aniline: Light pigment+aniline blend for subtle uniformity and moderate protection.
- Pigmented Topcoat: Heavy pigment layer for consistent color, strong UV and abrasion resistance.
Water & Stain Repellents:
- Wax & Oil: Traditional wax or neatsfoot oil treatments add water beading; re-apply annually.
- Nano-Coatings: Invisible polymer layers repel liquid and dirt without altering hand feel.
Conditioning:
- Recommend a light application of neutral or tinted conditioner every 6–12 months to nourish fibers and maintain suppleness.
How Do You Prototype, Sample, and Test Your Leather Bag?
Prototyping starts with converting your technical flats into sturdy cardboard patterns, then producing mock-ups in inexpensive materials—canvas, bonded leather, or craft foam—to validate shape, fit, and function. Sample in actual leather only after pattern tweaks. Conduct rigorous tests: load cycles (weight drop tests), zipper endurance (500+ open/close cycles), seam tension, and water spray. Iterate 2–3 rounds, each costing $100–$200, before moving to full production to ensure your bag meets both design intent and real-world durability.
Prototyping and sampling are critical phases that transform your 2D designs into fully functional, real-world products. Here’s a step-by-step guide to ensure your leather bag performs beautifully and lasts:
1. Create Cardboard Patterns
- Transfer Technical Flats: Print or plot your Illustrator/CAD panels at 1:1 scale.
- Cut and Label: Use 2–3 mm chipboard or poster board. Mark grain direction, stitch lines, seam allowances (typically 3–5 mm), and notches for alignment.
- Test-Fit: Tape panels together to check overall proportions and gusset alignment. Adjust only one variable—either gusset width or body dimension—to isolate fit issues.
2. Build Low-Cost Mock-Ups
- Materials:
- 12 oz Canvas: Mimics leather thickness; stiffen with 50/50 PVA water solution for structure.
- Bonded Leather or Felt: Simulates hide hand and edge behavior.
- EVA Foam / PET Felt: Fills gussets and pockets to approximate interior volume.
- Assembly:
- Temporary Adhesive: Use contact cement to hold panels.
- Machine Stitching: Quick seams for fit evaluation; hand-stitch only high-stress areas.
- Functional Checks:
- Closure Fit: Test zipper alignment, snap closures, and magnetic snaps.
- Hardware Placement: Attach prototype buckles, D-rings, and see how straps hang.
3. Leather Sample Construction
- Select Final Leather: Use the chosen hide—full-grain, top-grain, or vegetable-tanned—for the first leather prototype.
- Cutting: Use your refined patterns to bevel-cut actual leather panels.
- Stitching & Assembly: Employ final threads (0.6–0.8 mm bonded nylon) and techniques (saddle or lock stitch). Apply edge finish and hardware as specified.
- Cost:
- Materials: $30–$60 (leather) + $10–$20 (hardware) + $5–$15 (lining/interfacing) = ~$45–$95
- Labor: $50–$100 for hand stitching, burnishing, and finishing
- Total: ~$100–$200 per full leather prototype
4. Durability & Function Testing
- Load Cycling: Fill bag to maximum rated weight, hang from straps, then repeatedly lift/drop to simulate wear—aim for 100–200 cycles before assessing elongation or deformation.
- Zipper Endurance: Manually or machine-cycle the zipper 500+ times to verify smooth operation and retention.
- Seam Tension Test: Apply torque to high-stress seams (corners, strap anchors) and inspect for stitch breaking or leather tearing.
- Weather Resistance: Spray with 200 ml/min water or submerge flap-closed bag for 1 minute—check for leaks in seams and closures.
- Wear Simulation: Rub base and corners against coarse surfaces (concrete block or Taber abrasion tester) to gauge abrasion life.
5. Feedback & Iteration
- User Trials: Provide prototypes to real users—collect feedback on comfort, ease of access, and aesthetics.
- Document Issues: Log any hardware failures, stitch loosening, or material fatigue.
- Pattern Revision: Update patterns and repeat prototyping rounds until all performance criteria are met.
6. Final Pre-Production Review
- Cost Analysis: Compare prototype costs to projected production costs and retail pricing.
- Quality Sign-Off: Conduct a pre-production sample review—ensure all specs (stitch density, hardware placement, edge finish) match master sample.
- Move to Production: With patterns locked and performance validated, release to factory for low-MOQ production runs with confidence.
How Do You Partner with an OEM/ODM Factory Like Szoneier Leather?
To partner effectively with an OEM/ODM factory like Szoneier Leather, start by outlining your product requirements—leather grade, hardware specs, volume, timelines—and request capability presentations and certifications (ISO, SGS). Evaluate sample lead times, MOQ, pricing, and quality-control processes. Establish clear communication channels with a dedicated account manager, use digital project boards for real-time updates, and agree on prototyping iterations. A strong partnership blends transparent expectations, mutual trust, and ongoing collaboration from R&D through final shipment.
Define Your Project Scope and Requirements
Before you even approach a factory, crystallize your concept:
- Product Specification Sheet: Detail leather type (full-grain, top-grain), lining materials, thread weight, hardware finishes, stitch density, bag dimensions, and functional features (pockets, zippers, straps).
- Order Volume & Timeline: Forecast initial run (e.g., 200–500 units) and long-term potential, plus launch deadlines—this helps the factory plan capacity and allocate resources.
Having precise documentation ensures the factory understands your vision and can provide an accurate quotation.
Vet Capabilities & Certifications
Not all factories are created equal:
- Quality Certifications: Look for ISO 9001 (quality management), ISO 14001 (environmental), and SGS or Intertek audit reports to verify compliance with chemical, labor, and environmental standards.
- Technical Expertise: Ask for their material R&D capabilities—can they develop custom leather treatments or new finishes? Do they have in-house prototyping labs, digital CAD pattern-making, and 3D draping tools?
- Sample Portfolios: Review previous OEM/ODM work. High-resolution photos or physical samples demonstrate finish quality, edge treatment consistency, and hardware alignment.
A factory with end-to-end capabilities—from material sourcing through packaging design—minimizes the risk of miscommunication and delays.
Negotiate Minimum Order Quantities (MOQs) and Pricing
Factories often set MOQs to optimize production runs:
- Small-Batch Runs: Szoneier Leather offers flexible MOQs starting around 100–200 units, ideal for market testing.
- Volume Discounts: Larger orders (1,000+ units) unlock tiered pricing—factor in long-term growth plans.
- Cost Structure Transparency: Request a detailed cost breakdown—leather per square foot, hardware per piece, labor per bag, and packaging—so you can identify cost-saving opportunities without sacrificing quality.
Being clear about budget constraints and projected sales velocity helps the factory propose the most efficient production plan.
Establish Communication & Project Management Tools
Smooth collaboration depends on real-time visibility:
- Dedicated Account Manager: A single point of contact who knows your product inside and out accelerates decision-making.
- Digital Collaboration Platforms: Use Trello, Airtable, or a factory-proprietary portal to track sample status, share CAD files, approve artworks, and log quality-control checklists.
- Regular Check-Ins: Schedule weekly or bi-weekly video calls to review prototypes, address questions, and adjust timelines.
Transparent, frequent communication prevents misunderstandings and keeps the project on schedule.
Prototype Approval & Pre-Production
Once specifications are agreed upon:
- First Samples: Expect a 7–10 day turnaround for canvas or bonded leather mocks, then 10–14 days for full-leather prototypes.
- Testing & Feedback: Conduct your own QC tests—load cycles, zipper endurance, seam stress—and consolidate feedback into a revision list.
- Sign-Off Protocol: A formal approval document (sample sign-off sheet) ensures both parties agree on final specs before mass production.
This gate-approval approach safeguards you against costly mid-run design changes.
Quality Control & Ongoing Support
During production:
- In-Line Inspections: Floor inspectors check hides, stitching, hardware fit, and edge finishes at each assembly stage.
- Final Random Inspections: Pull 5–10% of finished bags for a detailed review—function tests, finish consistency, and packaging verification.
- After-Sales & Reorders: Establish a warranty and re-order process—Szoneier’s ERP system can alert you when stock levels dip or material suppliers change.
A strong OEM/ODM partnership is a living process, evolving from your first sample to your tenth collection, always rooted in mutual trust and transparent metrics.
Conclusion
Designing and crafting your own leather bag is a journey that spans creative inspiration, meticulous material selection, detailed technical planning, iterative prototyping, and strategic manufacturing partnerships. From picking the perfect full-grain hide to specifying 75D thread counts and rivet placements, each decision shapes the final product’s performance and desirability.
Ready to bring your leather bag vision to market? Szoneier Leather offers 18+ years of expertise in R&D, rapid sampling, low MOQs, and turnkey OEM/ODM services—including material innovation, prototyping labs, quality-inspected manufacturing, and branded packaging solutions. Let’s collaborate to craft a bag that tells your brand story, delights customers, and stands the test of time.


